Glue the lower vertical fuselage pieces to the
horizontal assembly making sure it is square.
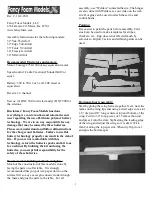
Now is the time to add carbon bracing to the tail. Cut
the 1mm carbon rod into 2 – 3.5” pieces and 6 – 5.25”
pieces. Glue them per the picture with hotglue.
(note: this step is not required on the hybrid planes
(depron/EPP))
Landing Gear Preparation and Attachment:
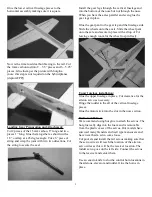
Cut 2 pieces of the 1.5mm carbon, 8” long and two
pieces 1” long. Glue them together as shown with a
1/8” overlap at a 45 degree angle. Cut a 6” piece of
string and wrap the joint with it in two directions. CA
the string to secure the axel.
Install the gear legs through the vertical fuselage and
into the bottom of the nose but not through the nose.
When you have the axles parallel and even glue the
gear legs in place.
Glue the gear pant to the gear leg and the fuselage side.
Slide the wheels onto the axels. Slide the wheel pant
onto the axle and secure in place with a drop of CA
leaving enough room for the wheel to spin freely.
Upper fuselage installation:
Glue the upper fuselage in place. Cut clearance for the
aileron servo as necessary.
Hinge the rudder to the aft of the vertical fuselage
pieces.
Glue the motor stick into the slot in the nose section.
Radio installation:
We recommend using hot glue to attach the servos. The
hot glue really digs into the foam and is removable
from the plastic cases of the servos. Our models have
survived many blenders and wall type maneuvers and
have never had a servo come loose.
Cut pockets and install the tail servos making sure that
the servo wires will reach the location of the aileron
servo wires as this will be the receiver location. The
rudder servo goes on the left side. Connect the servos
to the receiver and center them.
Use an exacto knife to slot the control horn locations in
the ailerons, elevator and rudder. Glue the horns in
place.
3


