


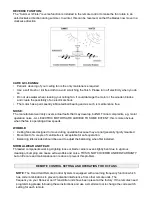


Pairing the remote
1. Connect power to the fan; the receiver will beep after 2 - 20 seconds.
2. Press and keep pressed the on/off button (on remote) for 5 - 30 seconds until it beeps again.
3. The second beep indicates the remote is now talking to the fan.
4. Now test the remote is controlling the fan by pressing on the speeds and on/off keys.
5. It can take up to 10 seconds for the fan to start moving, after pressing a speed button. The fan
will move a few times slightly backwards and forwards and then will start rotating slowly whilst
building up to the correct speed. This is normal behaviour for DC fans.
Considerations:
1. If the receiver is not receiving a signal from the remote control:
a. Please check the battery to ensure it has sufficient power and has been inserted correctly and
aligns with the positive and negative terminals; or
b. Please check if there are any other similarly remote controlled objects that work nearby, as
remote controlled items operating on the same frequency may disturb each other.
2. If the battery is low it will effect the sensitivity of the remote control and the signal reception and
must be replaced (the LED indicator light will flash a warning when the battery runs low).
3. Please remove the battery if the remote control is not being used for a long time.
4. The maximum supported wattage for the light is 200W. Ensure that the earth wire is properly
connected to prevent the light from flashing or proper operation.
Considerations when installing multiple ceiling fans:
Sometimes you may encounter a remote control issue when installing multiple fans. For the
purposes of this troubleshooting guide:
Fan A uses Remote control A and Receiver A while Fan B uses Remote control B and Receiver B
1. Isolate power to one fan only when pairing the remotes
When installing two or more fans, you should manually isolate power to Fan B while completing
the pairing process on Fan A. If power is not isolated to one of the fans when the power is
restored at the fuse box, then both receivers will be put into “learning mode” such that when you
try to pair Remote control A to Receiver A, Receiver B will also be in learning mode and might
pair to Remote control A as well.
To troubleshoot:
1. Switch off power at the fuse box
2. Manually remove the active wire from the top of one fan (Fan B)
3. Switch power back on at the fuse box and complete the pairing process for Fan A
4. Switch power back off at the fuse box
5. Reconnect the active wire back to Fan B
6. Restore power at the fuse box
2. Erase the transmitter codes stored in the remote control memory
The ceiling fan receiver may be holding multiple remote control/transmitter codes in its memory.
Assuming the steps outlined above in (1) have been tried and correctly followed, there could still
be a situation where Remote control B is controlling both Fan A and Fan B, while Remote control
A only controls Fan A.
This might be because Receiver A (installed in Fan A) still “remembers” Remote control B,
despite the re pairing process having been completed with Remote control A.