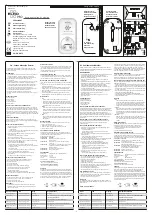
HOW TO INSTALL THIS SMOKE ALARM
THE PARTS OF THIS SMOKE ALARM
FOLLOW THESE SIMPLE STEPS!
1. “OPEN HERE” tab
2. Cover hinge
3. Test button
4. Power/alarm indicator
Tools you will need:
• Pencil
• Drill with 3/16” (5 mm) drill bit
• Hammer
• Standard flathead screwdriver
1. Hold base firmly and pull up on cover tab marked “OPEN HERE.”
This will open the hinged cover. The cover may unsnap from the base
if it's opened too far. This will not damage the unit—the cover hinge
snaps back into place easily.
2. Hold the Smoke Alarm base against the ceiling (or wall) and make a
mark at the center of each of the mounting slots with a pencil.
3. Put the unit where it won’t get covered with dust when you drill the
mounting holes.
4. Using a 3/16” (5 mm) drill bit, drill a hole through each pencil mark.
5. Insert the plastic screw anchors (in the plastic bag with screws) into
the holes. Tap the screw anchors gently with a hammer, if necessary,
until they are flush with the ceiling or wall.
6. Tighten the screws (provided) into the screw anchors, then loosen
them two turns.
7. Fit the Smoke Alarm over the screw heads as shown. Close cover.
8. If the Smoke Alarm cover does not line up the way you want it, rotate
the base and re-tighten the screws.
9. Activate the battery. With the cover open, remove and reinstall the
battery so the terminals on the battery match the terminals on the
Smoke Alarm. Match “+” to “+” and “-” to “-.” Push the battery in
until it snaps in securely and cannot be shaken loose.
If the battery is not snapped in completely, the unit cannot receive
battery power. The Smoke Alarm may beep briefly when you install
the battery—this is normal.
Once the battery is installed, the red power indicator light (behind the
test button) will flash once a minute to show you the Smoke Alarm is
working.
10. Close the cover all the way.
11. Test the Smoke Alarm. See “Weekly Testing.”
To lock/unlock the cover to the base:
1. Using needle-nose pliers or a utility knife, detach locking
pin from back of alarm base.
2. Insert locking pin into the slot located on the front of the
alarm as shown in the diagram.
3. Remove pin to unlock and replace battery.
Cover Open
1. “Open Here”
2. Test button or Test/Silence
button (FG250 only)
3. Smoke alarm base
4. “No Battery” tab
5. Mounting slots
6. Install 9V battery here
7. Locking pin slot
Locking Pin
Insert Locking Pin
LOCKING FEATURE
This unit is designed to be
mounted on the ceiling, or
on the wall if necessary.
2
BEFORE YOU INSTALL THIS SMOKE ALARM
IMPORTANT! Read “Recommended Locations for Smoke Alarms”
and “Locations to Avoid for Smoke Alarms” before beginning. This unit
monitors the air, and when smoke reaches its sensing chamber, it alarms.
It can give you more time to escape before fire spreads. This unit can
ONLY give an early warning of developing fires if it is installed, maintained
and located where smoke can reach it, and where all residents can hear
it, as described in this manual. This unit will not sense gas, heat, or
flame. It cannot prevent or extinguish fires.
Understand The Different Type of Smoke Alarms
Battery powered or electrical? Different Smoke Alarms provide
different types of protection. See “About Smoke Alarms” for details.
Know Where To Install Your Smoke Alarms
Fire Safety Professionals recommend at least one Smoke Alarm on every
level of your home, in every bedroom, and in every bedroom hallway or
separate sleeping area. See “Recommended Locations For Smoke
Alarms” and “Locations To Avoid For Smoke Alarms” for details.
Know What Smoke Alarms Can and Can’t Do
A Smoke Alarm can help alert you to fire, giving you precious time to
escape. It can only sound an alarm once smoke reaches the sensor.
See “Limitations of Smoke Alarms” for details.
Check Your Local Building Codes
This Smoke Alarm is designed to be used in a typical single-family
home. It alone will not meet requirements for boarding houses,
apartment buildings, hotels or motels. See “Special Compliance
Considerations” for details.
•
This unit will not alert hearing impaired residents. It is recom-
mended that you install special units which use devices like
flashing strobe lights to alert hearing impaired residents.
•
Do not connect this unit to any other alarm or auxiliary device.
It is a single-station unit that cannot be linked to other devices.
Connecting anything else to this unit may prevent it from working
properly.
•
Unit will not operate without battery power. The Smoke Alarm
cannot work until you install the battery in the correct position
(Match “+” to “+” and “-” to “-”).
•
This Smoke Alarm has a battery guard which prevents it from
closing unless a battery is installed. This warns you the unit will
not operate without a battery.
•
Do not install this unit over an electrical junction box. Air currents
around junction boxes can prevent smoke from reaching the
sensing chambers and prevent the unit from alarming. Only AC
powered units are intended for installation over junction boxes.
•
Do not stand too close to the unit when the alarm is sounding.
It is loud to wake you in an emergency. Exposure to the horn at
close range may harm your hearing.
•
Do not paint over the unit. Paint may clog the openings to the
sensing chambers and prevent the unit from operating properly.


