background image

17

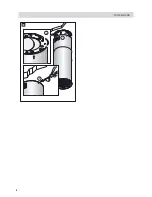
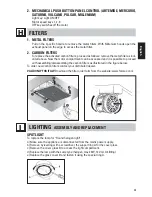
d)   Sostituire la lampada con una analoga (alogena max 20 W, 12 Volt attacco G4). 
e)  Rimontare il vetro di protezione B fissandolo con l’apposito anello A.

MANUTENZIONE E PULIZIA

L


Una costante manutenzione garantisce un buon funzionamento ed un buon rendimento nel 
tempo. Particolari attenzioni vanno rivolte ai filtri metallici antigrasso ed ai filtri al carbone 
attivo, infatti la pulizia frequente dei filtri e dei loro supporti garantisce che sulla cappa non si 
accumulino grassi che sono pericolosi per la facilità di incendio.

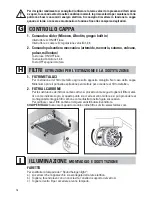
1.  FILTRI ANTIGRASSO METALLICI


Hanno la funzione di trattenere le particelle grasse in sospensione, pertanto si consiglia di 
lavarli ogni mese in acqua calda e detersivo evitando di piegarli. Attendere che siano ben 
asciutti prima di rimontarli.


Per lo smontaggio e montaggio vedi istruzioni al punto H1. Si raccomanda costante fre-
quenza nell’operazione.

2.  FILTRI AL CARBONE ATTIVO


Hanno la funzione di trattenere gli odori presenti nel flusso d’aria che li attraversa. L’aria 
depurata per successivi passaggi attraverso i filtri viene rimessa nell’ambiente cucina. l 
filtri al carbone attivo non possono essere lavati e vanno sostituiti mediamente ogni 3-4 
mesi (dipende poi dall’uso). Per la sostituzione dei filtri al carbone attivo seguire le istru-
zioni come al punto H2.

3.   PULIZIA ESTERNA


Si raccomanda di pulire le superfici esterne delle cappe almeno ogni 15 giorni per evitare 
che le sostanze oleose o grasse possano intaccare le superfici in acciaio. 


La pulizia della cappa va eseguita usando un panno umido con detersivo liquido neutro o 
con alcool denaturato. 


Nel caso di materiale con trattamento antimpronta (Fasteel) eseguire la pulizia solo con 
acqua e sapone neutro utilizzando un panno morbido avendo cura di risciacquare e 
asciugare accuratamente. Non si devono utilizzare prodotti contenenti sostanza abrasive, 
panni con superfici ruvide o panni comunemente in commercio per la pulizia dell’acciaio. 
L’utilizzo di sostanze abrasive e panni ruvidi danneggerà irreparabilmente il trattamento 
superficiale dell’acciaio. Conseguenza diretta del non rispetto di tali avvertenze sarà il 
deterioramento irreversibile della superficie dell’acciaio. 


Tali avvertenze dovranno essere conservate insieme al libretto istruzioni della cappa. Il 
produttore declina ogni responsabilità qualora non vengano rispettate tali istruzioni. 

4.  PULIZIA INTERNA


É vietata la pulizia di parti elettriche o parti relative al moto re all’interno della cappa, con 
liquidi o solventi.

 Non usare prodotti contenenti abrasivi. Effettuare tutte queste operazioni scollegando 

preven tivamente l’apparecchio dalla rete elettrica.

Italiano

Содержание VULCANO

Страница 1: ...BEDIENUNGSSANLEITUNG LIVRET D INSTRUCTIONS MANUAL DE INSTRUCCIONES MANUAL DE INSTRU ES INSTRUKCJE OBS UGI Ed 2014 LIBRETTO ISTRUZIONI Cod 110030287 CAPPE AIRMEC Italiano English Deutsch Fran ais Espa...

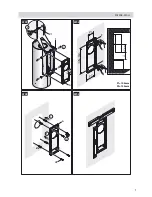
Страница 2: ...1 X Y 320 mm A B C SUCTION MODE Fig 1 Fig 2 RECIRCULATION MODE MERCURIO ARTEMIDE VULCANO...

Страница 3: ...2 Fig 3 Fig 4 L M G V1 M H MERCURIO ARTEMIDE VULCANO...

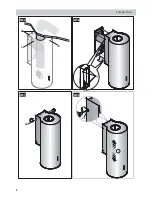
Страница 4: ...3 05 06 MINERVA AFRODITE X 65cm L M M 8mm G 1 2...

Страница 5: ...4 07 08 MINERVA AFRODITE G H H 2 1 3 4 5 L M M 4mm x2...

Страница 6: ...5 3 09 10 1 2 8 V1 C 11 C B G 12 x cm D V3 PULSAR ISLAND...

Страница 7: ...6 13 2 1 3 PULSAR ISLAND...

Страница 8: ...7 W01 W02 W03 W04 1 1 2 3 3 T V1 A A 8 V2 P1 105 mm P2 154 mm P1 P2 446 mm F F 2 PULSAR WALL H1 327mm...

Страница 9: ...8 W05 W06 W07 W08 B V3 V3 G V2 1 V2 PULSAR WALL...

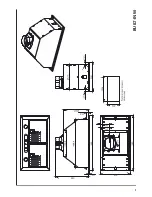
Страница 10: ...9 BUILT IN 50...

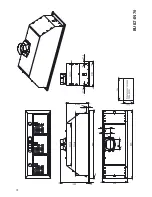
Страница 11: ...10 BUILT IN 70...

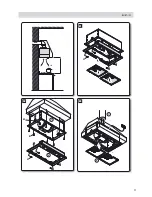
Страница 12: ...11 BUILT IN X B1 B2 B3 A B A 1 2 1 2 M...

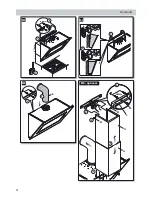
Страница 13: ...12 M3 M4 optional E 1 2 M2 1 E D L M 4mm G M H 2 3 4 5 V3 M1 X 415 mm A 8mm 1 2 3 1 B D 2 MILLENIUM...

Страница 14: ...to In caso di riparazioni o mal funzionamento dell apparecchio non tentare di risolvere da soli il problema Le riparazioni effettuate da persone non competenti possono provocare danni Per eventuali in...

Страница 15: ...HE TECNICHE B I dati tecnici dell elettrodomestico sono riportati su delle targhette posizionate all interno della cappa INSTALLAZIONE C parte riservata solo a persone qualificate per il montaggio del...

Страница 16: ...ica controllare che la tensione d alimentazione corrisponda a quella indicata dalla targhetta caratteristiche tecniche la presa di terra sia corretta e funzionale l impianto di alimentazione sia munit...

Страница 17: ...E H 1 FILTRI METALLICI Per l estrazione del filtro metallico agire sulla apposita maniglia Nel caso della cappa Millenium aprire il pannello aspirazione perimetrale per accedere al filtro metallico 2...

Страница 18: ...a sostituzione dei filtri al carbone attivo seguire le istru zioni come al punto H2 3 PULIZIA ESTERNA Si raccomanda di pulire le superfici esterne delle cappe almeno ogni 15 giorni per evitare che le...

Страница 19: ...te superiore B regola la distanza dalla parete quella inferiore C lo scorrimento verticale Fase 3 fig 3 Per evitare lo sganciamento della cappa dovuto ad una pressione sottostante fissarla alla parete...

Страница 20: ...tto utilizzando 6 fischer da 8 e relative viti V1 in dotazione Individuare l altezza desiderata tra cappa e piano cottura a norma 65 cm Fase 2 fig 11 12 Fissare l assieme cono prolunga A B al tralicci...

Страница 21: ...asso nel mobile e fissarlo tramite 8 viti autofilettanti da legno B in dotazione nei fori gi esistenti Rimontare l assieme fondo avvitando le 4 viti autofilettanti A Le molle M permettono l aggancio p...

Страница 22: ...ta Trovata la posizione ottimale appoggiare alla parete la staffa L controllare con una bolla di livello l allineamento orizzontale e segnare alle estremit n 2 punti di foratura Forare inserire n 2 ta...

Страница 23: ...quired to the appliance do not attempt to solve the problems directly Repairs performed by unqualified persons may cause damage For all repair and other work on the appliance contact an authorised ser...

Страница 24: ...CAL SPECIFICATIONS B The technical data pertaining to the electric appliance The technical specifications of the ap pliance are shown on the rating plates located inside the range hood INSTALLATION C...

Страница 25: ...NAL EXHAUST In this version the kitchen fumes and vapours are conveyed outside through an exhaust pipe The exhaust conveyor that extends from the upper part of the hood must be connected with the pipe...

Страница 26: ...d it is possible to proceed with assembling disassembling the carbon filters as illustrated in the figure below To order new carbon lters contact your distributor dealer VALID ONLY FOR ITALY Download...

Страница 27: ...using a damp cloth and neutral liquid detergent or denatured alcohol In case of fingerprint less finish fasteel clean only with water and neutral soap using clean with a soft cloth rinse and wipe dry...

Страница 28: ...e best position place the bracket on the wall L using a spirit level check the horizontal alignment and mark two drilling points at the ends of the bar Drill the holes insert n 2 expansion bolts of 4m...

Страница 29: ...flange fig 13 then fasten permanently with the supplied M3 metric screw V3 Power the hood in accordance with regulations in force see sec D of the booklet WALL MOUNTED HOOD Phase 1 fig W01 W02 W03 W0...

Страница 30: ...on bolts and fasten the bar with the relative screws Phase 2 Take the exhaust panel off of the outer edge and the metal filters Hook the hood onto the support bar fig M2 Adjust the alignment of the ho...

Страница 31: ...lich von kompetenten Personen vorgenommen werden Es ist gef hrlich die Eigenschaften dieser Anlage abzu ndern bzw versuchen abzu ndern Bei Reparaturen bzw Betriebsst rungen des Ger tes nicht versuche...

Страница 32: ...indem man den Stecker zieht bzw den Hauptschalter bet tigt Der Hersteller lehnt jede Haftung f r eventuelle direkte oder indirekte Sch den an Personen Gegenst nden und Haustieren ab die auf die Nichte...

Страница 33: ...ausgestattet sein in diesem Fall ist ein genormter Stecker zu verwenden wobei folgendes zu beachten ist Der gelb gr ne Draht ist f r die Erdung zu benutzen der blaue Draht ist f r den Nullleiter der...

Страница 34: ...T Schalter A ON OFF Licht Schieberegler B Einstellung der Drehzahlstufen 1 2 und 3 2 BEDIENUNG MIT MECHANISCHEN BEDIENFELD ARTEMIDE MERCU RIO SATURNO VULCANO PULSAR MILLENIUM Taste Licht ON OFF Licht...

Страница 35: ...au wird auf die Anleitungen unter Punkt H1 verwiesen Die Reinigung muss unbedingt regelm ig durchgef hrt werden 2 AKTIVKOHLEFILTER Diese Filter haben die Aufgabe die in der Luft die sie durchstr mt en...

Страница 36: ...Schrauben oder die Befestigungsvorrichtung nicht gem diesen An weisungen angebracht werden kann dies zu elektrischen Gefahren f hren N1 MONTAGEANLEITUNG DER ABZUGSHAUBEN VULCANO ARTEMIDE MERCURIO SATU...

Страница 37: ...ernen und die Abzugshaube an den Haken G ein haken Um zu vermeiden dass sich die Haube durch einen von unten ausge bten Druck aushaken kann befestigen Sie sie mit einem Spreizd bel und entsprechender...

Страница 38: ...it einer Wasserwaage die horizontale und vertikale Ausrichtung der R ckwand berpr fen Phase 2 Abb W05 W06 W07 W08 Bei der Abluftversion entscheiden ob Austritt hinten oder oben die optimale L nge des...

Страница 39: ...er Abstand von der Wand eingestellt mit der unteren Schraube C die H he Phase 3 Zur Vermeidung dass sich die Haube durch einen von unten ausge bten Druck aushaken kann befestigen Sie sie mit einem Spr...

Страница 40: ...tte installation En cas de panne ou de mauvais fonctionnement de l appareil ne pas essayer de r soudre le probl me mais s adresser au Service apr s vente agr Les r parations faites par des personnes n...

Страница 41: ...n de la chemin e est de 10 mm fournies par le fa bricant AVERTISSEMENT L installation des vis ou du dispositif de fixation de fa on non conforme aux pr sentes instructions peut provoquer des dangers l...

Страница 42: ...doivent indiquer que ces dispositifs de coupure doivent tre pr vus dans le r seau d alimentation conform ment aux r gles d installation Le c ble de terre jaune vert ne doit pas tre interrompu par l i...

Страница 43: ...ur A ON OFF clairage Interrupteur curseur B r glage vitesse 1 2 3 2 COMMANDE TABLEAU M CANIQUE ARTEMIDE MERCURIO SATURNO VULCANO PULSAR MILLENIUM Touche clairage ON OFF clairage Touches vitesse moteur...

Страница 44: ...au charbon actif suivre les instructions du point H2 3 NETTOYAGE EXT RIEUR DE LA HOTTE Nous recommandons de nettoyer les surfaces externes des hottes chaque 15 jours au moins afin d viter que les subs...

Страница 45: ...ignement de la hotte l aide des vis des cintres La vis sup rieure B r gle la distance de la paroi l inf rieure C le glissement vertical Phase 3 fig 3 Pour viter le d crochage de la hotte d une pressio...

Страница 46: ...sous tension en respectant les normes en vigueur voir section D N3 INSTRUCTIONS DE MONTAGE HOTTE PULSAR HOTTE ILOT Phase 1 fig 09 10 1 Enlever les vis de fixation entre la rallonge et le treillis uniq...

Страница 47: ...errer d finitivement les vis de fixage V1 inf rieu res et sup rieures 5 Mettre sous alimentation lectrique la hotte en respectant les normes en vigueur voir section D du livret N4 INSTRUCTIONS DE MONT...

Страница 48: ...ation lectri que de la hotte Phase 4 en option fig M4 Introduire la rallonge H dans la chemin e G puis fixer l ensemble au corps de la hotte au moyen des 8 vis V2 Faire glisser la rallonge H jusqu att...

Страница 49: ...diritto di ottenere a l aggiornamento la rettificazione ovvero quando vi ha interesse l integrazione dei dati b la cancellazione la trasformazione in forma anonima o il blocco dei dati trattati in vio...

Страница 50: ...a per la fornitura ed installazione dell apparecchio avvenuta nel solo territorio italiano Informativa ai sensi dell art 13 dei D Lgs n 196 2003 La scrivente Societ informa che per l instaurazione e l...

Страница 51: ...ghetta del motore Questo apparecchio viene garantito per 2 anni dalla data di acquisto contro difetti di materiale e o di fabbricazione Questo certi cato valido e operante solo se conservato assieme a...

Отзывы: