background image


18


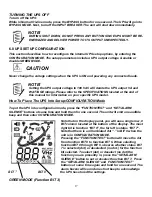
Green Mode is a power saving feature that should only be used in non-critical applications. 
When the Green Mode is enabled and the connected load decreases to less than 3% of the full 
rated UPS output capacity, the UPS will automatically change from ON-LINE MODE to BYPASS 
MODE, 30 seconds after the drop in load has been detected. After the UPS has switched to 
BYPASS MODE, the “GREEN MODE BULB” on the display panel will flash to indicate the UPS 
is in the energy saving Green Mode. When the load increases to greater than 3% of the UPS’s 
full output rating, the UPS will automatically return to NORMAL On-line MODE operation.  
 
CAUTION- When green mode is enabled, and the UPS has switched to BYPASS MODE due to 
a reduction in load, THE UPS WILL NOT GO TO BATTERY MODE IN THE EVENT OF A UTILITY 
FAILURE.  THE CONNECTED LOAD WILL BE DROPPED. 

 
How to Enable or Disable Green Mode 

 
To Enable: 
 

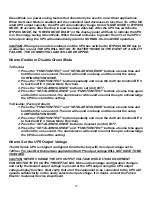
1. Press the “FUNCTION/TEST” and “SET/ALARM SILENCE” buttons at same time and 


    hold them for one


second. The unit will sound one beep and then enter the setup  


    CONFIGURATION MODE.   


2. Press the “FUNCTION/TEST” button repeatedly and move the dot from function BIT 0  


    to function BIT 3 (Green Mode Function). 


3. Press the “SET/ALARM SLIENCE” button to set (dot) BIT 7.   


4. Press the “SET/ALARM SLIENCE” and “FUNCTION/TEST” buttons at same time again  


    and hold for one second. The alarm buzzer will sound one short beep to acknowledge  


    the UPS has stored the setting.      


To Disable: (Factory Default) 
 

1. Press the “FUNCTION/TEST” and “SET/ALARM SILENCE” buttons at same time and  


    hold them for one


second. The unit will sound one beep and then enter the setup  

               CONFIGURATION MODE.   
 

2. Press the “FUNCTION/TEST” button repeatedly and move the dot from function BIT 0    


    to function BIT 3 (Green Mode Function). 


3. Press the “SET/ALARM SLIENCE” button to deselect (no dot) BIT 7.   


4. Press the “SET/ALARM SLIENCE” and “FUNCTION/TEST” buttons at same time again  


    and hold for one second. The alarm buzzer will sound one short beep to acknowledge  


    the UPS has stored the setting.      


How to Set the UPS Output Voltage


The XG Series UPS is shipped configured from the factory with its output voltage set to 
120Vac. For most North American application the UPS output voltage WILL NOT HAVE TO BE 
CHANGED.


CAUTION: NEVER CHANGE THE UPS OUTPUT VOLTAGE WHILE IT HAS EQUIPMENT 
CONNECTED TO ITS OUTPUT RECEPTACLES. Make output voltage configuration changes 
and verify the desired output voltage is present at the UPS output using the UPS output 
voltage display function. Next verify that all of the equipment to be connected to the UPS will 
operate satisfactorily on the newly selected output voltage. If in doubt, contact the Falcon 
Electric Customer Service Department


Содержание XG1.5K-1T

Страница 1: ...All rights reserved All other brand names and trademarks are the property of their respective owners The information stated in this document is subject to change without notice 2005 10 14 Falcon Falco...

Страница 2: ...LAY AND CONTROLS 12 Indicators and LCD Display Controls 5 0 OPERATION 15 Operating Modes Turning UPS On Turning UPS Off 6 0 CONFIGURATION 17 Green Mode Setting Voltage Setting 7 0 COMMUNICATION 19 RS...

Страница 3: ...be retained in the event the UPS needs to be returned for service INSTALLATION Install this UPS in a clean environment free from moisture flammable gases or fumes and corrective substances Operate th...

Страница 4: ...res of XG series UPS as well as detailing operation configuration and troubleshooting The specifications section states all of the detailed parameters of operation for the Series and provides general...

Страница 5: ...ad while operation from a utility source with abnormally low input voltage DC DC CONVERTER The DC DC converter utilizes energy from battery and boosts up the DC bus voltage to a level required by the...

Страница 6: ...over temperature over input current over crest factor load designed for 3 1 nonlinear load or a UPS failure condition Should any of these events occur the UPS will automatically transfer to bypass mod...

Страница 7: ...ge claim within 15 days to Falcon Electric Inc CAUTION The UPS and Battery Module are heavy Take proper precautions when lifting or moving them Install the UPS indoors in a controlled environment plac...

Страница 8: ...and secure with the supplied screws 3 If installing the Battery Module repeat above STEPS 4 For slide rail installations fasten the inner parts of the slide rails to the UPS on both sides with the scr...

Страница 9: ...load may be connected Ensure the load equipment is turned off plug all loads into the output receptacles on the rear of the UPS Plug the UPS into a dedicated wall receptacle properly protected by a ci...

Страница 10: ...g To orient the LCD display for vertical Mini Tower viewing remove the front plastic bezel by unscrewing the screws The unit has two front panel covers Remove the left cover first Next pull the right...

Страница 11: ...e battery modules have been designed to be placed on one side of the UPS or stacked beneath the UPS 1 Visually inspect the battery module for any freight damage Report damage to the carrier and Falcon...

Страница 12: ...f the extended battery module 6 If an extended battery module has been connected refer to the Battery Run Time charts in this manual for the approximate runtime available 4 0 DISPLAY CONTROLS The diag...

Страница 13: ...he more bars that will be illuminated Each bar represents 25 of the UPS output rating Inverter When Inverter is functioning this symbol will be illuminated PFC When PFC is functioning this symbol will...

Страница 14: ...e to operate from the utility voltage without going to battery mode During the battery test the output of the UPS will not be affected SET ALARM SILENCE BUTTON This button has three functions Disable...

Страница 15: ...nverter BATTERY MODE Battery mode is displayed during high input voltage conditions or a utility power failure When in battery mode the UPS battery supplies energy through the DC to DC converter to th...

Страница 16: ...urned on the XG unit is automatically switched to GREEN MODE once the connected load drops to less than 3 of the UPS rated output The load will operate directly from utility power similar to BYPASS MO...

Страница 17: ...up CONFIGURATION Mode To put the UPS into configuration mode press the FUNTION TEST and SET ALARM SILENCE buttons at same time and hold them for one second The unit will emit one audible beep and then...

Страница 18: ...ss the SET ALARM SLIENCE and FUNCTION TEST buttons at same time again and hold for one second The alarm buzzer will sound one short beep to acknowledge the UPS has stored the setting To Disable Factor...

Страница 19: ...nd move the dot to function BIT 1 5 Press the SET ALARM SLIENCE button once or twice to Enable dot Status BIT 7 6 Press the SET ALARM SLIENCE and FUNCTION TEST buttons at same time again and hold for...

Страница 20: ...ected and the supplied UPSILON Computer Shutdown and Management software has been properly installed on the connected computer a high level of protection against lost or corrupted files is in effect P...

Страница 21: ...UPS is on battery will turn the UPS off 8 Alarm Upon a UPS fault or failure the contact activates J3 1 2 short N O J3 2 3 short N C 9 JP3 shorted Alarm common all other shorted JP commons JP3 open Ala...

Страница 22: ...t is recommended to plug the UPS in for at least 24 hours every four to six months to ensure full recharge of the batteries WHEN TO REPLACE BATTERIES We suggest that you replace the battery pack every...

Страница 23: ...k 5 Unpack the new battery pack Take care not to destroy the packing Compare new and old battery pack to make sure they are the same If so proceed with next the STEP otherwise STOP and contact Falcon...

Страница 24: ...eplacement battery packs with right polarity by verifying against the marked battery pack 8 Reinstall the battery stoppers with the screws 9 Reinstall panels to the unit with the screws 10 Connect the...

Страница 25: ...or metal parts on top of batteries Do not attempt to alter any battery wiring or connectors Attempting to alter wiring can cause injury Do not dispose of batteries in a fire The batteries may explode...

Страница 26: ...tion in action Verify the input AC voltage is not too low remove some load from UPS output Seven short beeps followed by three long beeps every five seconds Battery low after utility loss Save the dat...

Страница 27: ...run an UPS UPS drops the load and is in bypass mode with alarm Check the load status the UPS may be overloaded UPS battery time is not long enough or the unit does not run on battery at all Test the...

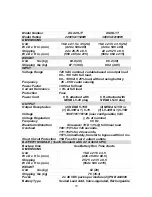
Страница 28: ...oad Protection Fuse Power Cord 6 ft attached with NEMA 5 15 plug OUTPUT Output Receptacles 4 NEMA 5 15R Voltage 100 110 115 120 user selectable VAC Voltage Regulation 2 of nominal Frequency 60 Hz Wave...

Страница 29: ...L5 20 plug 6 ft attached with NEMA L5 30 plug OUTPUT Output Receptacles 4 NEMA 5 15R 1 L5 30R 1 5 15 4 NEMA 5 15R or 1 L5 30R 1 5 15R Voltage 100 110 115 120 user configurable VAC Voltage Regulation 2...

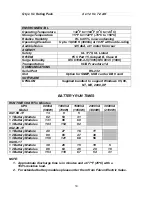
Страница 30: ...Option for SNMP USB card or DB 9 card SOFTWARE UPSILON Supplied bundled to support Windows 95 98 NT ME 2000 XP BATTERY RUN TIMES RUN TIME CHART in Minutes UPS Model 800VA 560W 1000VA 700W 1500VA 1050W...

Страница 31: ...and Falcon Electric Inc will not knowingly sell this product for use with life support and other designated critical devices ANY SUCH USE BY A USER AUTOMATICALLY VOIDS AND DISCLAIMS ANY AND ALL WARRA...

Страница 32: ...r agrees to pay for all shipping costs associated with transportation of the loaner unit both from and return to the Falcon Electric U S Service Center c All shipping costs for product submitted beyon...

Отзывы: