background image

63

DS

<8

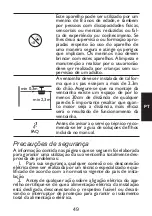
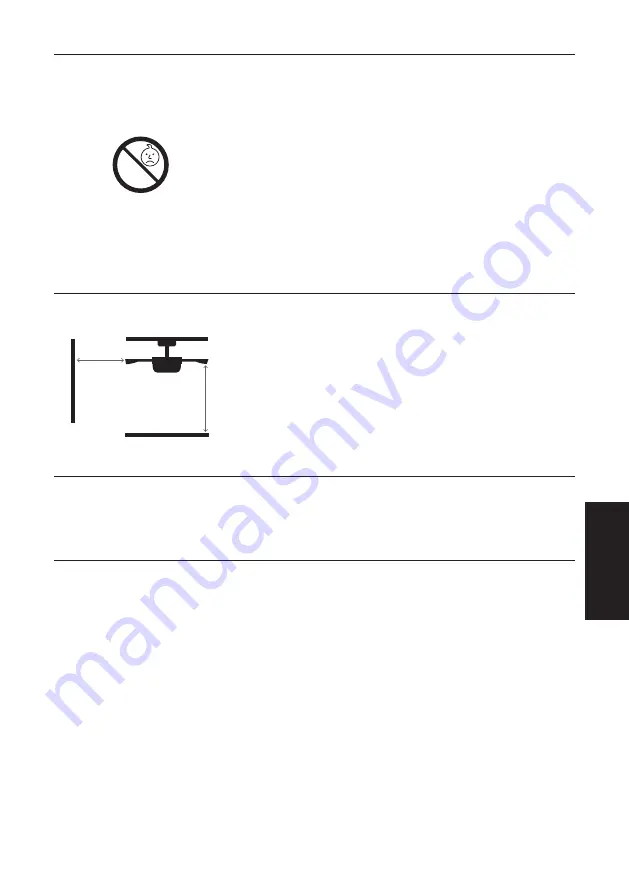
min 2,3m

min 0,3m

FAQ

¿?

Dieses Gerät kann von Kindern ab dem 

Alter von 8 Jahren, von Personen mit 

eingeschränkten  körperlichen, Wahrneh-

mungs – oder geistigen Fähigkeiten oder 

von Personen mit fehlender Erfahrung 

verwendet werden, aber immer dann, 

wenn sie beaufsichtigt werden oder ihnen 

eine ausreichende Ausbildung bezüglich 

der Risiken und der sicheren Verwen-

dung des Geräts gegeben wurde. Kinder 

dürfen nicht mit dem Gerät spielen. Die 

Säuberung und Instandhaltung durch den 

Benutzer, soll nicht von Kindern ohne 

Beaufsichtigung ausgeführt werden.
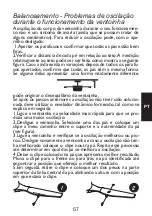
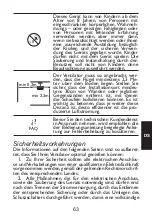
Der Ventilator muss so angebracht wer-

den, dass die Flügel mindestens 2,3 Me-

ter über dem Boden liegen. Stellen Sie 

sicher, dass der Installationsort mindes-

tens 30cm von Wänden oder jeglichen 

Gegenständen entfernt ist, mit denen 

die Schaufeln kollidieren könnten. Es ist 

wichtig zu betonen, dass je weiter diese 

Distanz ist, desto effizienter ist die pro-

duzierte Luftströmung.
Bevor Sie den technischen Kundendienst 

in Anspruch nehmen, wird empfohlen die 

der Bedienungsanleitung beigelegte Anlei-

tung zur Fehlerbehebung zu kosultieren.

Sicherheitsvorkehrungen

Die Informationen auf den folgenden Seiten sind so aufberei-

tet, dass Sie Ihren Ventilator optimal genießen können:

  1.  Zu Ihrer Sicherheit sollten alle elektrischen Anschlüs-

se und Verkabelungen von einer qualifizierten Elektrofachkraft 

vorgenommen werden, gemäß der geltenden Rechtsvorschrif-

ten des entsprechenden Landes. 

  2.  Alle Maßnahmen, die für den elektrischen Anschluss, 

sowie die Säuberung des Geräts notwendig sind, dürfen erst 

nach dem Trennen der Stromversorgung, durch das Entfernen 

der entsprechenden Sicherung oder durch das Umlegen des 

Schutzschalters durchgeführt werden, damit eine vollständige 

Содержание REF 072228

Страница 1: ...nica sat sulion es y a través de nuestra web www sulion es donde encontrarás un acceso a vídeos instrucciones y una guía de preguntas frecuentes In the event of any questions incidents or missing parts before consulting with your retailer call our customer service department at 916 774 540 from 9 a m 7 p m from Monday Thursday or 9 a m 3 p m on Fridays You can also contact us via email at info sul...

Страница 2: ...2 ES ...

Страница 3: ...nçais 31 44 Portugues 45 58 Deutsch 59 72 Italiano 73 86 Instalación del ventilador Installing the fan Installation du ventilateur Instalando o ventilador Installieren Sie den Lüfter Installazione della ventola 87 91 Índice Indice Index1 ...

Страница 4: ...4 ES ...

Страница 5: ...namiento Funcionamiento con bajo calentamiento Este motor de DC es alimentado de forma eficiente reduciendo su tempera tura de funcionamiento por debajo de los 50º C resultando en una mejor refrigeración que uno standard de corriente alterna AC y aumentando así su durabilidad Confort Este ventilador con motor DC incorpora un control remoto de 6 velocidades que supera el número tradicional de veloc...

Страница 6: ...s Es importante resaltar que cuanto mayor sea dicha distancia más eficaz será el flujo de aire producido Antes de avisar al servicio técnico se re comienda leer la guía de solución de fallos incluida en este manual Precauciones de seguridad Lainformacióncontenidaenlassiguientespáginashasidopreparada para asegurarle disfrutar de su ventilador de forma totalmente exenta de problemas 1 La instalación...

Страница 7: ...n de categoría III Use sólo el controlador del ventilador para ponerlo en marcha o detenerlo 6 Se recomienda no usar en la misma sala este tipo de ven tiladores junto a instalaciones de gas de forma simultánea 7 El ventilador debe ser detenido y haber parado de girar de forma completa antes de invertir su sentido de giro Esto evitará daños en su motor y en la unidad de control en su caso 8 No inse...

Страница 8: ...el que se puede instalar 23º Ángulo luminaria 180º Ra luminaria 80 Velocidad 1 2 3 4 5 6 Potencia ventilador W 3 6 9 13 19 33 RPM ventilador 50 75 100 125 150 175 Flujo de aire ventilador m3 min 50 99 122 147 174 201 Nivel sonoro dB 36 37 38 41 43 45 este manual no garantizan cubrir todas las posibles condiciones y situaciones que pueden ocurrir Debe ser entendido que el sentido común la precaució...

Страница 9: ...a cualificado Desembalar el ventilador de forma cuidadosa evitando el uso de cutters o navajas que podrían rayar cualquier parte del mismo Extraer todos los componentes Situar el motor sobre un trapo o supercie blanda para evitar dañar su acabado supercial Manipular cui dadosamente el conjunto para evitar que su carcasa se doble o arañe El ventilador debe de montarse en el suelo o en una mesa lo s...

Страница 10: ...de seguridad Taladro eléctrico ATENCIÓN VER PASOS DE INSTALACIÓN AL FINAL DE ESTE MANUAL Control remoto Instalación del ventilador III IV V VI I II Encender Apagar ventilador Cambiar sentido de rotación I Velocidad 1 II Velocidad 2 III Velocidad 3 IV Velocidad 4 V Velocidad 5 VI Velocidad 6 Encender Apagar luz ...

Страница 11: ...smo control remoto Sincronización 1 Conectar la corriente interruptor de la pared del ven tilador o ventiladores y justo a continuación dentro de los siguientes 60 segundos puntar la tecla del control durante 6 segundos continuados 2 La luz del ventilador parpadeará y el ventilador comen zará a girar durante 90 segundos en un sentidor Parará y au tomáticamente girará 90 segundos en sentido contrar...

Страница 12: ...e 90 segundos en un sentido Parará y automáticamente girará 90 segundos en sentido contrario No pulse ninguna tecla hasta complementar el porceso 3 Ahora transmisor y receptor del ventilador es habrán quedado sincronizados Quite la corriente del ventilador me diante el iterruptor o el automático y acto seguido vuelva a encenderlo este paso es el que cierra el proceso de sincroni zación 4 Para la s...

Страница 13: ...tar la calefacción a un nivel más bajo Nota Apague el ventilador y espere a que se detenga com pletamente antes de cambiar la dirección de giro de las aspas III IV V VI I II Protección frente a las sobrecargas Si el receptor del ventilador percibe que el motor funciona a más de 80W esto es una condición de sobrecarga se cortará automáticamente la corriente al motor lo que parará el ven tilador inm...

Страница 14: ...ilibrio al girar el ventilador Si tras los pasos anteriores el balanceo no ha sido resuelto es necesario aplicar el equilibrado dinámico con el kit sumi nistrado tal y como se explica a continuación 1 Encienda el ventilador en la velocidad más alta para que se produzca mayor balanceo 2 Apague el ventilador Seleccione un aspa y coloque el clip ver figura en ella a medio camino entre el soporte y el...

Страница 15: ...illos de fijación de las aspas están flojos Seguir las instrucciones indicadas en la sección de Equilibrado de este manual C Aspas deformadas Seguir las instrucciones indicadas en la sección de Equilibrado de este manual 3 Ruido excesivo del ventilador al girar A El florón está tocando el techo Bajar el florón asegurando una separación res pecto del techo no inferior a 3 mm B Tornillos de fijación...

Страница 16: ... motor o la madera o causar descarga eléctrica 3 Use sólo un cepillo blando o un trapo sin pelusa para no rayar el acabado El enchapado está sellado con una capa de laca para minimizar la decoloración o pérdida del brillo 4 No hay necesidad de aceitar el ventilador El motor tie ne cojinetes de lubricación permanente Nota El hecho de no respetar estas instrucciones provoca la pérdida de la garantía...

Страница 17: ...mente aceptable y no sugiere ningún malfuncionamiento ni originar su caída si se montó siguiendo este manual de forma adecuada al techo Este ventilador de techo dispone de un sistema de montaje totalmente seguro por medio de sopor tes de acero y esferas de unión para permitir su giro y evitar transmitir vibraciones a la estructura del techo Note por favor que aun siendo del mismo modelo dos ventil...

Страница 18: ...orrecto funcionamiento del equipo y posibles reparaciones o suministro de recambios del mode lo debidos a defectos de fabricación durante 2 años desde la fecha de entrega 10 años exclusivamente en el caso del motor del ventilador pero no puede responsabilizarse de daños y o perjuicios causados por un mal empleo del mismo Para cual quier reclamación se deberá adjuntar a esta garantía el ticket de c...

Страница 19: ...incorporates a six speed remote control that exceeds the traditional number of speeds in AC motors allowing for a greater variety of comfort levels Precaución Follow these instructions carefully to enjoy maximum safety in the installation and operation of this equipment The minimum distance between the lamp and any illuminated objects must be greater than 1m The electrical installation of the ceil...

Страница 20: ...outafterensuring that the general power supply is disconnected by removing the corresponding fuse or disarming the protective switch in order to ensure total isolation of the power supply 3 The fan must be installed at a location on the ceiling sch that the blades are at least 2 3 m above the floor and 300 mm from any object or wall The mounting bracket must be attached to a ceiling structure that...

Страница 21: ...control unit when applicable 8 Do not insert anything that could hit the fan s blades into its pathway while it is moving as this could cause damage to people can damage the blades and can offset the balance of the unit causing vibrations and wobbling 9 After installing the fan ensure that all fastenings are se cure and tightened in order to avoid any noise caused by loose elements 10 Due to the f...

Страница 22: ...0000 Nº of hours of light lifespan 25000h Protection category Class I Protection index IP20 Word temperature 20 50ºC Dimmable Not dimmable No dimmable Maximun ceiling slope on which it can be installed 23º Light angle 180º Light Ra 80 Speed 1 2 3 4 5 6 Fan power W 3 6 9 13 19 33 Fan RPM 50 75 100 125 150 175 Fan airflow m3 min 50 99 122 147 174 201 Noise level dB 36 37 38 41 43 45 ...

Страница 23: ...pieces Place the motor on top of a rag or soft sur face to avoid damaging its finish Handle it carefully to prevent its casing from becoming bent or scratched III IV V VI I II Description Quan tity Photo Description Quan tity Photo Ceiling bracket 1 Body motor 1 Receiver 1 Blades 1 Top canopy 1 Blade balan cing kit 1 Bottom ca nopy 1 Light set 1 Shaft 1 Diffuser 1 Extension cable 1 Installation ki...

Страница 24: ...hillips head screwdriver and flat head screwdriver for flat head screws Safety ladder Electric drill WARNING SEE INSTALLATION STEPS ATTHE END OF THIS MANUAL Remote control Installing the fan III IV V VI I II III IV V VI I II ...

Страница 25: ...tch of the fan or fans and just then within the next 60 seconds press the key on the remote control for 6 continuous seconds 2 The fan light will flash and the fan will start rotating for 90 seconds in one direction It will stop and automatically turn 90 seconds in the opposite direction Do not press any key until the process is complete 3 Now the transmitter and receiver of the fan s will have be...

Страница 26: ...d is pressed the fan starts turning 90 seconds at the maximum speed to perform a start up After that 90 seconds the fan rotates at the selected speed If the fan is switched off from the remote control you do not need to start up for 90 seconds Remote control safety functions Blocking protection The remote receiver includes a function that automatically blocks motor operation cutting current to the...

Страница 27: ...he model The fan runs clockwise An ascending air current pushes hot air away from the fan area near the ceiling as indicated in dia gram B This allows you to use less central heating Note Turn off the fan lower the differential and wait for it to come to a complete stop before changing the blade rotation direc tion with the sliding switch III IV V VI I II Note If the receiver goes into protection ...

Страница 28: ... and the wobbling has not resolved you should apply dynamic balancing with the kit provided as explained below 1 Turn the fan on to the highest speed so that the greatest amount of wobbling is produced 2 Turn off the fan Select a blade and place a clip on it see diagram halfway between the fastening and the far edge of the blade 3 Turn on the fan and check whether the wobbling has im proved or got...

Страница 29: ...crews are loose Follow the instructions indicated in the Balan cing section of this manual C Deformed blades Follow the instructions indicated in the Balan cing section of this manual 3 Excessive noise when the fan moves A Upper canopy is touching the ceiling Lower the upper canopy ensuring a separation from the ceiling of no less than 3 mm B Blade fastening screws are loose Tighten all fastening ...

Страница 30: ...nly a soft brush or microfiber cloth as to not scratch the finish The veneer is sealed with a layer of lacquer to mi nimize discoloration or loss of shine 4 It is not necessary to oil the fan The motor contains bea rings with permanent lubrication Note Failure to comply with these instructions results in the loss of the equipment warranty Warranty service The manufacturer s warranty covers real fa...

Страница 31: ...ions in this manual This ceiling fan has a completely secure moun ting system that uses steel brackets and connecting spheres to allow it to rotate and to prevent the transmission of vibrations to the ceiling structure Please note that even fans of the same model can have different wobbles which is totally acceptable and does not imply any malfunction or manufacturing defect Increased perception o...

Страница 32: ...bility will not be accepted however for damages or injury caused through misuse For any claims the sale ticket must be presented The company agrees to repair any defect or malfunction found in the item and any damages said defect or malfunction might directly provoke If the reparation should fail to satisfy the customer and or the object fail to present the optimum con dition for the use to which ...

Страница 33: ...e efficacement le bruit de son fonctionnement Fonctionnement à basse température Ce moteur DC est alimenté de manière efficace ce qui réduit sa température de fonctionnement au dessous des 50 C et nous offre une meilleure réfrigération par rapport à un ventilateur standard en courant alternatif AC ainsi qu une plus grande durabilité Confort Ce ventilateur à moteur DC intègre une télécom mande doté...

Страница 34: ...le que vos pales pourraient heurter Il est important de noter que plus la distance est grande plus le débit d air produit sera efficace Avant de contacter le service technique il est recommandé de lire le guide de dépannage inclus dans ce manuel Précautions de sécurité L information contenue dans ces pages a été prévue pour vous assurer un bon usage de votre ventilateur sans aucun problème 1 L ins...

Страница 35: ...r et ou des dommages au niveau du moteur Il doit être directement connecté à un circuit de l installa tion dûment protégé interrupteur magnéto thermique et différentiel aux dimensions adaptées au fonctionnement et aux spécificités techniques du ventilateur N utilisez que la télécommande du ventilateur pour le mettre en marche ou l arrêter 6 Il est recommandé de ne pas utiliser ce type de ventilate...

Страница 36: ...rdon d alimentation est endommagé il doit être rem placé par le fabricant par son service après vente ou par un personnel qualifié similaire afin d éviter tout danger 12 La source lumineuse de ce luminaire ne doit être remplacée que par le fabricant son service technique ou une personne qualifiée Remarque Les mises en garde et les instructions importantes indiquées dans ce manuel ne garantissent p...

Страница 37: ...37 FR Vistesse 1 2 3 4 5 6 Puissance du ventilateur W 3 6 9 13 19 33 RPM du ventilateur 50 75 100 125 150 175 Flux d air du ventilateur m3 min 50 99 122 147 174 201 Niveau sonore dB 36 37 38 41 43 45 ...

Страница 38: ... la structure ne se plie ou ne se raye Le ventilateur doit être monté sur le sol ou sur une table suffi samment grande pour qu aucun composant ne puisse tomber Vérifiez que vous avez toutes les pièces avant de commencer le montage Vérifiez l emballage afin de détecter de possibles éléments apparemment manquants Examinez tous les éléments Vous devez avoir III IV V VI I II Description Quan tité Phot...

Страница 39: ...idad Taladro eléctrico AVERTISSEMENT VOIR LES ÉTAPES D INSTALLATION À LA FIN DE CE MANUEL Télécommande Installation du ventilateur Allumer Eteindre ventilateur Changer le sens de la rotation I Vitesse 1 II Vitesse 2 III Vitesse 3 IV Vitesse 4 V Vitesse 5 VI Vitesse 6 Allumer Eteindre lumière III IV V VI I II III IV V VI I II ...

Страница 40: ...tion interrupteur mural du ou des ventilateurs et dans les 60 secondes qui suivent appuyez sur la touche de la télécommande pendant 6 secondes con tinues 2 Le voyant du ventilateur clignote et le ventilateur com mence à tourner pendant 90 secondes dans une direction Il s arrêtera et tournera automatiquement 90 secondes dans la direction opposée N appuyez sur aucune touche tant que le processus n e...

Страница 41: ... vous voulez synchro niser Puis répétez les points de 1 à 3 Une fois que le ventilateur est synchronisé et s il est éteint depuis le commutateur quand on rallume et que l on appuie sur une vitesse le ventilateur commence à tourner pendant 90 secondes à la vitesse maximale pour effectuer le démarrage Après 90 secondes le ven tilateur tourne à la vitesse sélectionnée Si le ventilateur est éteint dep...

Страница 42: ... l indique l image B Ceci vous permet de baisser le chauffage Remarque Éteignez le ventilateur baissez le différentiel et attendez que le ventilateur s arrête complètement avant de changer le sens de rotation des pales à l aide du commutateur à glissière III IV V VI I II Protection face aux surcharges Si le récepteur du ventilateur perçoit que le moteur fonc tionne à plus de 80W ce qui est un cas ...

Страница 43: ...nt Si après avoir effectué les étapes précédentes l oscillation n est pas résolue il est nécessaire d utiliser l équilibrage dynamique à l aide du kit fourni de la manière suivante 1 Allumez le ventilateur à vitesse maximale afin qu il y ait le plus d oscillation possible 2 Éteignez le ventilateur Sélectionnez une pale et placez le clip voir modèle dessus à mi chemin entre le support et l extrémit...

Страница 44: ...de ce manuel B Les vis de fixation des pales sont desserrées Suivez les instructions de la section Équilibra ge de ce manuel C Pales déformées Suivez les instructions de la section Équilibra ge de ce manuel 3 Bruit excessif du ventilateur lors qu il est fonction nement A Le fleuron touche le plafond Descendez le fleuron en vous assurant de gar der un espace d au moins 3mm avec le plafond B Les vis...

Страница 45: ...uer une décharge électrique 3 Utilisez simplement une brosse douce ou un chiffon sans peluche afin de ne pas rayer la finition Le plaqué or est recouvert d une couche de laque afin de minimiser la déco loration ou la perte de brillance 4 Il n est pas nécessaire de huiler le ventilateur Le moteur possède des coussins de lubrification permanente Remarque Le non respect de ces instructions entraîne l...

Страница 46: ...ance à osciller pen dant leur fonctionnement L oscillation de deux centimètres est tout à fait acceptable et ne suggère aucun dysfonctionne ment et ne peut provoquer sa chute si le montage au plafond a été réalisé en suivant correctement ce mode d emploi Ce ventilateur de plafond dispose d un système de montage en tièrement sécurisé grâce aux supports en acier et aux cadrans rotatifs qui permetten...

Страница 47: ...antit le bon fonctionnement de l appareil et les possibles réparations ou fourniture de pièces de rechange du modèle à cause des défauts de fabrication pendant une période de 2 ans à compter de la date de la livraison 10 ans exclusivement dans le cas du moteur du ventilateur Mais il n assume pas la responsabilité des dommages et préjudices causés par un mauvais emploi En cas de réclamation on devr...

Страница 48: ...ento de baixo aquecimento Este motor DC é alimentado de forma eficiente reduzindo a temperatura de funcionamento para menos de 50 C resultando numa refri geração mais eficaz do que outros motores padronizados de corrente alternada AC e aumentando a sua durabilidade Conforto Esta ventoinha com motor DC incorpora um controlo remoto de 6 velocidades um número superior ao número tradicional de velocid...

Страница 49: ...cm de distância de qualquer parede É importante resaltar que quan to maior seija a distância mais eficaz será o resultado de funcionamento da ventoinha Antes de avisar ao serviço técnico reco menda se ler a guía de soluções de flhos incluida no manual Precauções de segurança A informação contida nas páginas que se seguem foi elaborada para garantir uma utilização da sua ventoinha totalmente des pr...

Страница 50: ...ente protegido interruptor magnetotérmico e diferencial adequado ao consumo e especificações técnicas da ventoinha Use apenas o comando da ventoinha para a ligar ou desligar 6 Não se recomenda o uso deste tipo de ventoinhas em simultâneo com instalações de gás na mesma sala 7 A ventoinha deve estar totalmente parada antes de se inverter o sentido da rotação Desta forma evitará danos no motor e na ...

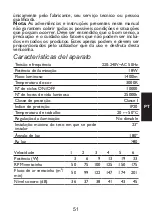
Страница 51: ...luz 80 Velocidade 1 2 3 4 5 6 Potência W 3 6 9 13 19 33 RPM ventoinha 50 75 100 125 150 175 Fluxo de ar ventoinha m3 min 50 99 122 147 174 201 Nível sonoro dB 36 37 38 41 43 45 únicamente pelo fabricante seu serviço tecnico ou pessoa qualificada Nota As advertências e instruções presentes neste manual não garantem cobrir todas as possíveis condições e situações que possam ocorrer Deve ser entendid...

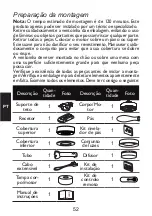
Страница 52: ...co especializado Retire cuidadosamente a ventoinha da embalagem evitando o uso de lâminas ou objetos cortantes que possam riscar qualquer parte Retirar todas a peças Colocar o motor sobre um pano ou super fície suave para não danificar o seu revestimento Manusear cuida dosamente o conjunto para evitar que a sua cobertura se dobre ou raspe A ventoinha deve ser montada no chão ou sobre uma mesa com ...

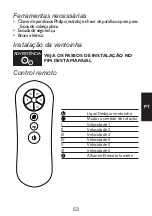
Страница 53: ...cada de segurança Broca elétrica ADVERTÊNCIA VEJA OS PASSOS DE INSTALAÇÃO NO FIM DESTA MANUAL Control remoto Instalação da ventoinha Ligar Desligar ventoinha Mudar o sentido de rotação I Velocidade 1 II Velocidade 2 III Velocidade 3 IV Velocidade 4 V Velocidade 5 VI Velocidade 6 Allumer Eteindre lumière III IV V VI I II ...

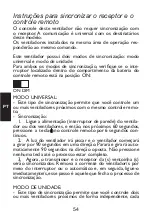
Страница 54: ...om o mesmo controle remo to Sincronização 1 Ligue a alimentação interruptor de parede do ventila dor ou dos ventiladores e então nos próximos 60 segundos pressione a tecla no controle remoto por 6 segundos con tínuos 2 A luz do ventilador irá piscar e o ventilador começará a girar por 90 segundos em uma direção Parará e girará auto maticamente 90 segundos na direção oposta Não pressione nenhuma te...

Страница 55: ... girará auto maticamente 90 segundos na direção oposta Não pressione nenhuma tecla até o processo estar completo 3 Agora o transmissor e o receptor do ventilador s serão sincronizados Remova a alimentação do ventilador usando o interruptor ou o automático e depois ligue o novamente esse passo é aquele que fecha o processo de sincronização 4 Para sincronizar outro ventilador e controle remoto você ...

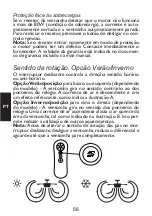
Страница 56: ...na ilustração B Isto per mite reduzir a utilização de outros aquecimentos Nota Antes de alterar o sentido de rotação das pás no inte rruptor deslizante desligue a ventoinha reduza o diferencial e aguarde até que a ventoinha pare completamente III IV V VI I II Proteção face às sobrecargas Se o recetor da ventoinha detetar que o motor não funciona a mais de 80W condição de sobrecarga a corrente é au...

Страница 57: ...os anteriores a oscilação não tiver sido solucio nada deve utilizar o nivelador dinâmico fornecido tal como se explica em seguida 1 Ligue a ventoinha na velocidade mais rápida para que se pro duza uma maior oscilação 2 Desligue a ventoinha Selecione uma das pás e coloque um clipe a meio caminho entre o suporte e a extremidade da pá ver figura 3 Ligue a ventoinha e verifique se a oscilação melhorou...

Страница 58: ...amento deste manual B Os parafusos de fixação das pás estão soltos Seguir as instruções indicadas na secção de Balanceamento deste manual C Pás deformadas Seguir as instruções indicadas na secção de Balanceamento deste manual 3 Ruído excessivo da ventoinha ao girar A A cobertura superior está a tocar no teto Baixar a cobertura assegurando uma sepa ração de teto não inferior a 3 mm B Os parafusos d...

Страница 59: ...par a ventoinha pois pode danificar o motor ou a madeira e causar descargas elétricas 3 Use apenas uma escova suave ou um pano que não ris que o acabamento O revestimento é lacado para minimizar a descoloração ou a perda de brilho 4 Não é necessário colocar óleo na ventoinha O motor contém rolamentos de lubrificação permanente Nota O não cumprimento destas instruções resulta na per da da garantia ...

Страница 60: ...nte o seu funcionamento A oscilação de dois centímetros é totalmente aceitável e não pressupõe nenhuma avaria nem originará a sua queda caso a montagem tenha seguido este manual de forma adequada Esta ventoinha de teto dispõe de um sistema de montagem totalmente seguro por meio de suportes de aço e esferas de união que permitem a rotação e evitam a vibração da estrutura do teto Note se que duas ve...

Страница 61: ...ta de entrega 10 anos exclusivamente no caso do motor do ventilador porém não pode respon sabilizar se por danos e ou prejuízos causados por uma má utilização do mesmo Para qualquer reclamação dever se á anexar a esta garantia o comprovante de compra A empresa compromete se a fazer a reparação total gratuita dos vícios ou defeitos orginados e dos danos e prejuízos directamente causados pelos mesmo...

Страница 62: ...mmotor wird effizient angetrieben wodurch seine Betriebstemperatur auf unter 50º C gesenkt wird Dies führt zu einer besseren Kühlung als bei einem Standard Wechselstrommotor und er höht seine Lebensdauer Komfort Dieser Ventilator mit Gleichstrommotor verfügt über eine Fernbedienung mit sechs Geschwindigkeitsstufen was die herkömmlicheAnzahl an Einstellungen bei Drehstrom motoren übertrifft und ein...

Страница 63: ...en entfernt ist mit denen die Schaufeln kollidieren könnten Es ist wichtig zu betonen dass je weiter diese Distanz ist desto effizienter ist die pro duzierte Luftströmung Bevor Sie den technischen Kundendienst in Anspruch nehmen wird empfohlen die der Bedienungsanleitung beigelegte Anlei tung zur Fehlerbehebung zu kosultieren Sicherheitsvorkehrungen Die Informationen auf den folgenden Seiten sind ...

Страница 64: ...etzklammern angebracht um die Unterbrechung sämtlicher Pole zu gewährleisten und soll bei Überspannungkategorie III die Abschaltung der Pole veranlassen Verwenden Sie die Steu erung des Lüfters nur um ihn ein oder auszuschalten 6 Es wird empfohlen diese Art vonVentilatoren nicht zu sammen und gleichzeitig mit Gasinstallationen im selben Raum zu verwenden 7 Der Ventilator darf sich nicht bewegen un...

Страница 65: ... tuationen ab die auftreten können Es wird angenommen dass gesunder Menschenverstand Vorsicht und Sorgfalt Faktoren sind die nicht in allen Produkten enthalten sein können Diese Faktoren können und dürfen nur von dem Benutzer geboten werden der diesenVentilator instand hält und genießt Merkmale des Gerätes Nennspannung und frequenz 220 240V AC 50Hz Lichtleistung 18W Lichtfluss 1400lm Lichtfarbtemp...

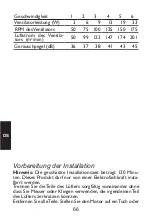
Страница 66: ... 38 41 43 45 Vorbereitung der Installation Hinweis Die geschätzte Installationszeit beträgt 120 Minu ten Dieses Produkt darf nur von einer Elektrofachkraft insta lliert werden Trennen Sie die Teile des Lüfters sorgfältig voneinander ohne dass Sie Messer oder Klingen verwenden die irgendeinen Teil des Lüfters zerkratzen könnten Entfernen Sie alleTeile Stellen Sie den Motor auf einTuch oder ...

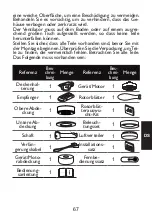
Страница 67: ...ungssatz 1 Bedienung sanleitung 1 eine weiche Oberfläche um eine Beschädigung zu vermeiden Behandeln Sie es vorsichtig um zu verhindern dass das Ge häuse verbogen oder zerkratzt wird Der Ventilator muss auf dem Boden oder auf einem ausrei chend großen Tisch aufgestellt werden so dass keine Teile herunterfallen können Stellen Sie sicher dass alle Teile vorhanden sind bevor Sie mit der Montage begin...

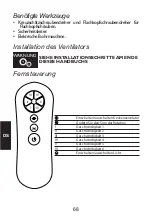
Страница 68: ... WARNUNG SIEHE INSTALLATIONSSCHRITTE AM ENDE DIESES HANDBUCHS Fernsteuerung Installation des Ventilators Einschalten ausschalten Deckenventilator Ändern Sie den Sinn der Rotation I Geschwindigkeit 1 II Geschwindigkeit 2 III Geschwindigkeit 3 IV Geschwindigkeit 4 V Geschwindigkeit 5 VI Geschwindigkeit 6 Einschalten ausschalten Licht III IV V VI I II ...

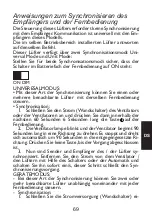
Страница 69: ...Strom Wandschalter desVentilators oder der Ventilatoren an und drücken Sie dann innerhalb der nächsten 60 Sekunden 6 Sekunden lang die Taste auf der Fernbedienung 2 DieVentilatorlampe blinkt und derVentilator beginnt 90 Sekunden lang in eine Richtung zu drehen Es stoppt und dreht sich automatisch um 90 Sekunden in die entgegengesetzte Ri chtung Drücken Sie keineTaste bis derVorgang abgeschlossen i...

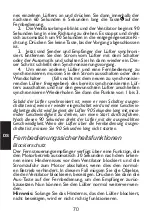
Страница 70: ...90 Sekunden in die entgegengesetzte Ri chtung Drücken Sie keineTaste bis derVorgang abgeschlossen ist 3 Jetzt sind Sender und Empfänger der Lüfter synchroni siert Entfernen Sie den Strom vom Lüfter mit dem Schalter oder derAutomatik und schalten Sie ihn dann wieder ein Die ser Schritt schließt den Synchronisierungsvorgang 4 Um einen anderen Lüfter und eine Fernbedienung zu synchronisieren müssen S...

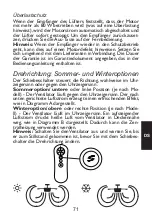
Страница 71: ... die Zen tralheizung verwendet werden Hinweis Schalten Sie den Ventilator aus und warten Sie bis er zum Stillstand gekommen ist bevor Sie mit dem Schiebes chalter die Drehrichtung ändern Überlastschutz Wenn der Empfänger des Lüfters feststellt dass der Motor mit mehr als 80 W betrieben wird was auf eine Überlastung hinweist wird der Motorstrom automatisch abgeschaltet und der Lüfter sofort gestopp...

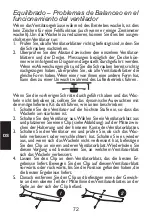
Страница 72: ...lten Sie das dynamische Auswuchten mit dem mitgelieferten Kit durchführen wie unten beschrieben 1 Schalten Sie denVentilator auf die höchste Stufe ein so dass das Wackeln am stärksten ist 2 Schalten Sie denVentilator aus Wählen Sie einVentilatorblatt aus und platzieren Sie einen Clip sieheAbbildung auf der Mitte zwis chen der Halterung und der hinteren Kante desVentilatorblattes 3 Schalten Sie den...

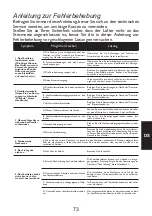
Страница 73: ... dieses Handbuchs C VerformteVentilatorblätter Befolgen Sie die Anweisungen im Abschnitt Austarie ren dieses Handbuchs 3 Übermäßiger Lärm während desVentila torbetriebes A Oberes Gehäuse berührt die Decke Senken Sie das obere Gehäuse ab und achten Sie dabei auf einen Abstand von mindestens 3 mm zur Decke B Ventilatorblattbefestigungsschrauben sind locker Ziehen Sie alle Befestigungsschrauben wiede...

Страница 74: ...oder das Holz beschädigen oder einen Stromschlag verursachen kann 3 Verwenden Sie nur eine weiche Bürste oder ein Mikro fasertuch um die Oberfläche nicht zu zerkratzen Das Fur nier ist mit einer Lackschicht versiegelt um Verfärbungen oder Glanzverlust zu minimieren 4 Es ist nicht notwendig den Ventilator zu ölen Der Mo tor enthält Lager mit einer Dauerschmierung Hinweis Die Nichteinhaltung dieser ...

Страница 75: ...u während des Betriebs zu wackeln Ein Wackeln von 2 cm ist völlig akzeptabel und weist weder auf eine Fehlfunktion des Ventilators hin noch verursacht es einen Sturz sofern er korrekt und gemäß den Anweisungen in dieser Anleitung an der Decke montiert wur de Dieser Deckenventilator verfügt über ein absolut sicheres Montagesystem bei dem Stahlklammern und Verbindungsku geln verwendet werden um die ...

Страница 76: ...jahren von Tag de Übergabe an 10 Jahre ausschließlich für den Ventila tormotor entstehen einschließlich Austausch vin Ersatzteilen durchgeführt werden schließt aber jeglichen Schadensersat zansprüche aus die durch Mißbrauch des Geräts entstehen Zur Geltendmachung der Gewährleistingsansprüche ist der Kaufticket zu zeigen Der Hersteller verpflichtet sich das fe hlerfhafte Gerät kostenlos und eunwand...

Страница 77: ...iscaldamento l efficienza di questo motore a co rrente continua gli permette di mantenere la sua temperatura durante il funzionamento al di sotto dei 50 C Questo per mette un raffreddamento migliore rispetto ai classici motori in corrente alternata e ne allunga il periodo di vita Comfort questo ventilatore con motore a corrente con tinua include un telecomando che permette di scegliere tra sei vel...

Страница 78: ...il flusso di aria prodotto Prima di contattare il serivizio tecnico si raccomanda leggere la guida di risoluzione degli errori inclusa in questo manuale Precauzioni di sicurezza Le informazioni contenute nelle pagine seguenti sono state stila te per permettervi di godere al massimo del vostro ventilatore 1 L installazione deve essere effettuata da personale qualificato nella realizzazione di insta...

Страница 79: ...onnesso correttamente a un circuito di installazione adeguatamente isolato dotato di un interrut tore magnetotermico differenziale adeguato per il consumo del ventilatore e per le specifiche tecniche Spegnere il ven tilatore solo attraverso il controllore 6 È sconsigliato l uso di questo tipo di ventilatore in stanze in cui sono presenti apparecchiature a gas 7 Il ventilatore non deve essere spost...

Страница 80: ... 2 3 4 5 6 Potenza del ventilatore W 3 6 9 13 19 33 Giri al minuto del ventila tore 50 75 100 125 150 175 Flusso d aria del ventilatore m3 min 50 99 122 147 174 201 Livello di rumore dB 36 37 38 41 43 45 12 la di luce di questa lampada debe essere únicamente rim piazzata dal fabbricante dal serivizio técnico o da persone qualificate Nota Non è garantito che le importanti avvertenze e le is truzion...

Страница 81: ...allato solo da un elettricista qualificato Separare attentamente le varie parti del ventilatore evitando l uso di taglierini o lame che potrebbero graffiare una delle sue parti Rimuovere tutti i pezzi Posizionare il motore su di uno straccio o su una superficie morbida per non danneggiarne le finiture Maneggiarlo con cura per non ammaccare o graffiare l involucro esterno Il ventilatore dev essere ...

Страница 82: ...llare il ventilatore Strumenti necessari Cacciaviti per viti Philips e a testa piatta Scala di sicurezza Trapano elettrico Accendi Spegni ventilatore Cambiare il senso di rotazione I Velocità 1 II Velocità 2 III Velocità 3 IV Velocità 4 V Velocità 5 VI Velocità 6 Accendi Spegni luce III IV V VI I II ...

Страница 83: ... Sincronizzazione 1 Collegare l alimentazione interruttore a muro della ventola o delle ventole e solo allora entro i successivi 60 secondi premere il tasto sul telecomando per 6 secondi continui 2 La luce della ventola lampeggerà e la ventola inizierà a ruotare per 90 secondi in una direzione Si fermerà e ruoterà automaticamente di 90 secondi nella direzione opposta Non premere alcun tasto fino a...

Страница 84: ...ollegare solo la ventola che si desidera la sincronizzazione Quindi ripeti i punti da 1 a 3 Una volta che il ventilatore è stato sincronizzato se viene spento dall interruttore quando si riaccende e si seleziona una velocità il ventilatore comincia a girare per 90 secondi alla velocità massimi ma permessa necessario per reallizare il suo avviamento e riscalda mento Una volta che i 90 secondi sono ...

Страница 85: ...to nel diagramma B Questo permette di risparmiare sul riscaldamento Nota Prima di cambiare il verso del ventilatore con l interru ttore spegnerlo abbassare il differenziale e aspettare che si sia fermato completamente Protezione dal sovraccarico Se il dispositivo rileva che la potenza del motore supera gli 80W indice di sovraccarico la corrente al motore verrà au tomaticamente interrotta e il vent...

Страница 86: ...llazione per siste è possibile effettuare il bilanciamento dinamico col kit incluso nella confezione come spiegato 1 Accendere il ventilatore alla massima velocità in modo da produrre la massima oscillazione 2 Spegnere il ventilatore Scegliere una pala e posizionare su di essa una molletta come nel diagramma a metà della sua lunghezza 3 Accendere il ventilatore per controllare se le oscillazio ni ...

Страница 87: ...re le istruzioni nella sezione Bilanciamento di questo manuale C Le pale sono deformate Seguire le istruzioni nella sezione Bilanciamento di questo manuale 3 Il ventilatore emette troppo rumore durante l uso A La cupola superiore tocca il soffitto Abbassare la cupola superiore assicurandosi che la sua distanza dal soffitto non sia inferiore ai 3 mm B Le viti nelle giunture delle pale sono allentat...

Страница 88: ...ttriche 3 Usare solo pennelli morbidi o panni in microfibra per non graffiare la finitura La vernice è sigillata da uno strato di lacca per minimizzare la perdita di colore o di lucentezza 4 Non è necessario oliare il ventilatore Il motore contie ne dei cuscinetti a lubrificazione permanente Nota il mancato rispetto di queste istruzioni comporta la perdita della garanzia dell apparecchiatura Servi...

Страница 89: ...ttrici emettono rumore Far funzionare il ventilatore con componenti allentati viti non strette in maniera adeguata o pale deformate in seguito a una pulizia troppo vigorosa può causare rumore eccessivo e os cillazioni che non saranno coperte della garanzia Eseguendo una manutenzione regolare per stringere questi elementi e pulire attentamente può prevenire questi problemi Oscillazioni Tutti i vent...

Страница 90: ... dal magazzino e sono sottoposti a verifica durante il trasporto Garanzia Il produttore garantisce il corretto funzionamento dell appa recchiatura e l eventuale riparazione o fornitura di pezzi di ricambio del modello a causa di difetti di fabbricazione per 2 anni dalla data di consegna 10 anni esclusivamente nel caso del motore del ventilatore ma non può essere ritenuta res ponsabile per danni e ...

Страница 91: ...91 Instalación ventilador Installing the ceiling fan Installation du ventilateur Instalação da ventoinha Installation des ventilators Installare il ventilatore 1 2 3 4 5 6 7 8 ...

Страница 92: ...92 9 10 11 12 13 14 15 16 ...

Страница 93: ...93 17 18 19 20 21 22 23 24 A B NO INCLUIDO NOT INCLUDED OFF Click ...

Страница 94: ...94 25 26 27 28 29 30 31 ON ON ...

Страница 95: ...bilidad que los productos abajo indicados han sido fabricados en conformidad con los siguientes estándares europeos SULION declare under our own responsibility that the products lis ted below have been manufactured in accordance with the following European standards SULION déclare sous sa responsabilité que les produits ont été fa briqués en conformité avec les normes européennes suivants SULION d...

Страница 96: ......
Отзывы: