


3
Warning: THIS APPLIANCE MUST BE EARTHED
SECTION 2
– CONTROLS and OPERATION
Hotplates
All hotplates are controlled by 6 position heat switches to provide variable temperatures from Setting 1
(lowest)
progressively increasing to Setting 6
(highest)
.
Circular, energy saving hotplates embodies a temperature limiting device. This automatically cuts off part of the
element circuit should the plate become overheated when left on without a pot upon it.
When this occurs, full element circuit will be automatically restored when a pot is placed upon hotplate.
A neon indicator lamp adjacent to each control indicates that the plate is ON.
The requisite setting for simmering or fast boiling pots of various sizes will quickly be found by experience. For
efficient operation of hotplates, it is essential that good contact is made between hotplate and utensil.
Ground-based pots should be used and hotplate surface must be in good condition. Spillage should not be allowed
to accumulate around plate edges as this will burn on and become difficult to remove. The spillage tray is positioned
below hotplates and can be readily withdrawn for emptying and cleaning when appliance has cooled down.
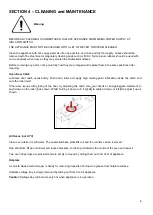
Caution:
The spillage tray will become very hot during operation of appliance.
Important
To ensure long life of hotplates and to conserve electricity, DO NOT leave plate switched on when
they are not in use, particularly at high settings.
If, for any reason, it is considered necessary to maintain a plate hot when it is not being used, turn
control to a low setting, no greater than 3.
Oven
The oven temperature is controlled by a thermostat.
The amber neon, when lit, indicates that current is being supplied to the elements. It will go out when oven has
reached selected temperature.
The cooking chart provides thermostat settings, time required, etc, but for the best performance
– these instructions
should be followed.
Oven Light (OTC model)
The internal lights are controlled by a round black push button located on control panel.
Press and hold button to switch lights on. To switch off, release button.
Grid Shelves
Two oven shelves are supplied and there are five shelf positions. If two shelves are used at one time, space at least
two runners apart, e.g. 2 and 4
(1 is at the top)
.


