4.16
Decoding
<SHIFT><DECODE>
This key sequence gives access to decoding facilities. A full explanation will be given
in the associated handbook which will be provided with the firmware upgrade.
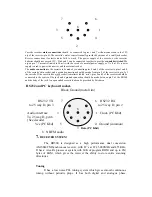
A data slicer interface is provided in the receiver which converts the audio into a bi-
polar square wave output on the din connector. (pin 3) this output is suitable for
Hamcom and Jvfax type PC programs which use DSR for data transfer. COMMS has
to be enabled by pressing <SHIFT><COMMS> to activate the output, and a special
lead will be necessary to connect to a PC. Pin 3 on the receiver can be connected to
DSR within the RS232 lead but this can cause problems with database use and should
be connected via a switch if this method is to be used.
4.17
Bands (Scanning between frequency limits)
<BANDS>
In band mode 99 band set ups can be stored which allows the user to scan defined
frequency ranges with individual mode, scan type and any step size.
A band can be selected by pressing
<BAND>
and using the
<UP>
and
<DOWN>
keys or the tune wheel.
<SHIFT><TEXT>
can be used to find a band by its name
when in band mode.
Pressing
<BAND>
again gives the start frequency and another key press gives the end
frequency, a final key press displays the step size. At each stage a frequency can be
entered from the keypad, and mode and the scan type can be set by pressing
<SHIFT><SCAN>
. Having set up a band pressing
<SCAN>
will scan through the
specified frequency range,
<UP>
and <
DN>
reverses the scan direction, and the band
can also be manually tuned within the specified range.
Automem (see section 4.12) can be used in band mode to add active frequencies to a
group.
4.18
Skip frequencies
<SHIFT><SKIP>
When SKIP is selected in the scan setup menu, (option 2, shown highlighted with
square brackets), a bank of user definable frequencies are checked by the scanner
each time a signal is encountered, if the frequency corresponds with a frequency
within the skip bank the scan will continue. This means that a band can be searched
for new frequencies whilst ignoring spurii or signals that are already known about.
Skip frequencies are added to the skip list by first tuning to the required frequency and
then pressing <
SHIFT><SKIP>
and selecting 1. Add to skip list. The skip list can be
viewed by pressing key 2 and pressing <UP> and <DOWN> to scroll through the
entries. Entries are deleted by pressing option 1. Delete entry. Remember to switch
skip off if not required, by pressing <SHIFT><SCAN> option 2.
4.19
Priority channel
<SHIFT><PRIO>
Содержание RD500
Страница 1: ......
Страница 27: ...This graph shows the response curves for the CW filter selections 9 SPECIFICATIONS...
Страница 31: ......

