


35
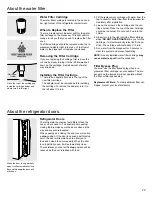
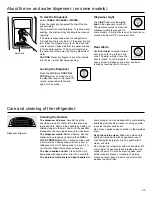
About the ice and water dispenser. (on some models)
To Use the Dispenser
Select CUBED, CRUSHED or WATER.
Press the glass gently against the top of the dis-
penser cradle.
The spill shelf is not self-draining. To reduce water
spotting, the shelf and its grille should be cleaned
regularly.
If no water is dispensed when the refrigerator is
first installed, there may be air in the water line sys-
tem. Press the dispenser arm for at least two min-
utes to remove trapped air from the water line and
to fill the water system. To flush out impurities in
the water line, throw away the first six glassfuls of
water.
CAUTION: Never put fingers or any other objects
into the ice crusher discharge opening.
Door Alarm
Dispenser Light
Locking the Dispenser
Spill Shelf
Press the LOCK or LOCK CON-
TROLS pad for 3 seconds to lock
the dispenser and control panel. To
unlock, press and hold the pad
again for 3 seconds.
The LIGHT pad turns the night
light in the dispenser on and off.
The light also comes on when the
dispenser cradle is pressed. On
some models, if this light burns out, it should be re-
placed with a 6 watt 12 V maximum bulb.
Use Door Alarm to sound if either
door is open for more than 3 min-
utes. The alarm will stop once the
door is closed. For LCD models, a
popup screen will appear. The alarm can be si-
lenced by touching the LCD screen.
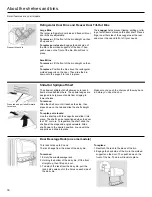
Care and cleaning of the refrigerator.
Dispenser drip area.
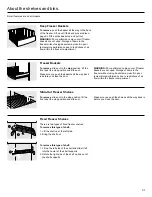
Cleaning the Outside
The dispenser drip area, beneath the grille,
should be wiped dry. Water left in this area may
leave deposits. Remove the deposits by adding un-
diluted vinegar to the well. Soak until the deposits
disappear or become loose enough to rinse away.
The dispenser cradle. Before cleaning, lock the
dispenser by pressing and holding the LOCK or
LOCK CONTROLS pad for 3 seconds. Clean with
warm water and baking soda solution—about a
tablespoon (15 ml) of baking soda to a quart (1 li-
ter) of water. Rinse thoroughly and wipe dry.
The door handles and trim. Clean with a cloth
dampened with soapy water. Dry with a soft cloth.
The stainless steel panels and door handles (on
some models), can be cleaned with a commercially
available stainless steel cleaner. A spray-on stain-
less steel cleaner works best.
Do not use appliance wax or polish on the stainless
steel.
Keep the outside clean. Wipe with a clean cloth
lightly dampened with kitchen appliance wax or
mild liquid dish detergent. Dry and polish with a
clean, soft cloth.
Do not wipe the refrigerator with a soiled dish cloth
or wet towel. These may leave a residue that can
erode the paint. Do not use scouring pads, pow-
dered cleaners, bleach or cleaners containing
bleach because these products can scratch and
weaken the paint finish.
Содержание FQ8925X
Страница 1: ...1 225D3076P002 rev 3...
Страница 17: ...17 Instrucciones de instalaci n DIMENSIONES Y ESPECIFICACIONES...
Страница 40: ...40 Installation Instructions DIMENSIONS AND SPECIFICATIONS...
Страница 47: ...47...
Страница 48: ...48...


