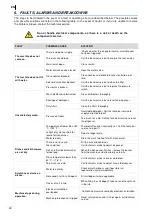
Fagor Evo Concept Series Скачать руководство пользователя страница 41


41 

Machine stops and fills 

with water when it is 

washing. 

Pressure switch pipe blocked. 

Empty the tub and clean thoroughly. 

Pressure switch faulty. 

Call the technical service to replace it. 

Overflow incorrectly mounted. 

Mount overflow correctly. 

The machine does not 

start with the wash cycle. 

Door is not closed properly. 

Close the door correctly and if it is seen to re-open 

alone, call the technical services to adjust the 

tensioneers. 

Door micro switch faulty. 

Call the technical service to replace it. 

Machine does not drain 
completely. 

Machine not levelled correctly. 

Level the machine In the event of doubt, please 

contact your technical service. 

Pressure switch faulty. 

Call the technical service to replace the pressure 

switch. 


NOTE: If a fault occurs and is not listed in the above table, please call the 
technical  service.  The  manufacturer  reserves  the  right  to  modify  the 
technical characteristics with prior warning. 


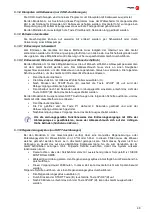
6.1  Error diagnosis (MOD.B) 

ERROR  DESCRIPTION


CONSEQUENCE 

OPEN DOOR 

The ON/OFF LED lights up for 0.5 seconds and then remains unlit for 2 seconds 

before  lighting  up  again.  This  continues  as  long  as  the  door  is  open  and  the 

selected cycle is unfinished. 

TANK FILL 

The ON/OFF LED light up twice for 0.5 seconds each time and then remains unlit 

for 2 seconds, then lighting up again twice. This continues while the water in the 

tank does not reach the correct level in the specified time. 

TANK DRAINAGE 

The  ON/OFF  LED  lights  up  three  times  for  0.5  seconds  each  time  and  then 
remains  unlit  for  2  seconds,  then  lighting  up  again  three  times.  This  continues 

while the drainage pump does not drain the water in the tank to the correct level in 

the specified time. 

BOILER HEATING 

The ON/OFF LED lights up four times for 0.5 seconds each time and then remains 
unlit  for  2  seconds,  then  lighting  up  again  four  times.  This  continues  while  the 

water in the boiler does not reach the correct temperature in the specified time. 

TANK HEATING  

The ON/OFF LED lights up five times for 0.5 seconds each time and then remains 

unlit for 2 seconds, then lighting up again five times. This continues while the water 

in the tank does not reach the correct temperature in the specified time. 

BOILER FILL 

Le voyant ON/OFF s'allume six fois pendant 0,5 secondes à chaque fois et reste 

éteint pendant 2 secondes avant de se rallumer six fois, et ainsi de suite tant que 

la chaudière n'a pas atteint le niveau correct dans le temps imparti. 


7.  RECYCLING THE PRODUCT 

The WEEE  symbol  used  for  this  product  indicates  that  it  cannot  be  treated  as  domestic  waste.  Disposing 

correctly  of  the  product  will  help  to  protect  the  environment.  For  further  information  about  the  recycling  of 

these  products,  please  contact  the  relevant  office  in  your  local  authority,  or  the  company  responsible  for 

waste disposal or the manufacturer who supplied this product. 

To  dispose  of  all  or  part  of  the  product,  directives  2002/95/EC  and  2002/96/EC  and 

successive  amendments  and/or  applicable  legislative  decrees  must  be  observed.  The 

manufacturer guarantees the absence of hazardous substances in the EEE used complaint 
to directive 2002/95/CE. 
In  the  event  of  failure  to  comply  with  the  above,  the  user  will  be  subject  to  the  penalties 
established by each of the member countries of the community. 
Cut  the  electric  cable  so  that  it  is  unusable.  Only  those  plastic  parts  bearing  the  recycle 
symbol can be recycled. 

Содержание Evo Concept Series

Страница 1: ...ILISATION ET D ENTRETIEN EN INSTALLATION USAGE AND MAINTENANCE INSTRUCTIONS DE INSTALLATIONS GEBRAUCHS UND WARTUNGSANLEITUNG IT ISTRUZIONI PER L INSTALLAZIONE L USO E LA MANUTENZIONE CODE 12114010 REV...

Страница 2: ...UCCIONES TIERRA DE PROTECCI N LISEZ LES INSTRUCTIONS TERRE DE PROTECTION PLEASE READ INSTRUCTIONS PROTECTIVE EARTH ANLEITUNG GR NDLICH LESEN SCHUTZ ERDE LEGGERE LE ISTRUZIONI TERRA DI PROTEZIONE ESPA...

Страница 3: ...abrillantador Entrada detergente Equipotencial Prise d eau Tuyau vidange Gaine lectrique R glette raccordement Lustrant entr e D tergent entr e quipotentialit Water inlet Drain hose Electric s cable C...

Страница 4: ...accordement Lustrant entr e D tergent entr e quipotentialit Water inlet Drain hose Electric s cable Connection strip Rinse aid inlet Detergent inlet Equipotential Wasseranschlu Schlauch Wasserauslauf...

Страница 5: ...5 3 4 5 6 MOD A MOD B B A C D I H F E G J K L M N O P Q R E...

Страница 6: ...6 GU AS R PIDAS DE FUNCIONAMIENTO GUIDES RAPIDES DE FONCTIONNEMENT QUICK START UP GUIDES ABGEK RZTE BEDIENUNGSANLEITUNG GUIDAS RAPIDA DI FUNZIONAMENTO MOD A...

Страница 7: ...7 MOD B...

Страница 8: ...log a del panel de mando MOD B p g 5 13 5 1 3 Encendido de la m quina 13 5 1 4 Llenado y calentamiento 13 5 1 5 Preparaci n de la vajilla 14 5 1 6 Selecci n de lavado 14 5 1 7 Interrupci n de ciclo de...

Страница 9: ...os materiales como lesiones El lavavajillas debe estar bien nivelado y en ning n caso debe estar estrangulado o atrapado ning n cable el ctrico manguera de agua o manguera de desag e a o apoye encima...

Страница 10: ...mplazamiento y nivelaci n Esta m quina dispone de patas regulables para su perfecta colocaci n se hace girando la pata a la altura deseada Es muy importante que la m quina est nivelada ya que as se op...

Страница 11: ...VER IMAGEN Conexi n directa de la manguera de entrada de agua Conexi n por bomba de presi n F FILTRO H MANGUERA DE AGUA B ELECTRO BOMBA DE PRESI N instalaci n hidr ulica de la m quina se han de segui...

Страница 12: ...ento recomienda que el detergente y la regulaci n del dosificador lo realice un t cnico cualificado en productos qu micos para poder tener un lavado m s efi Si la presi n de red hidr ulica es inferior...

Страница 13: ...ar unos minutos Una vez llena la cuba de lavado comenzar el calentamiento tanto del calder n como de la cuba Se puede comenzar el proceso de lavado pero no se recomienda ya que el agua del interior de...

Страница 14: ...ede realizar de las siguientes formas Apagando la m quina el ciclo se detiene por completo Abriendo la puerta posteriormente el ciclo contin a cerrando la puerta Al final del ciclo de lavado extraer e...

Страница 15: ...l aliviadero y esperar a que vac e el tanque Una vez vaciado el tanque y con la puerta abierta seleccionar el ciclo de regeneraci n manteniendo pulsado el bot n P1 durante 3 segundos hasta que quede e...

Страница 16: ...ue le realice las revisiones pertinentes Limpieza del filtro de agua Limpieza de cal en las resistencias Revisi n del estado de las juntas Revisi n del estado de los componentes Regulaci n de los dosi...

Страница 17: ...ficador Temperatura de la cuba inferior a 50 C 122 F Termostato averiado o mal tarado Llame al servicio t cnico para su reparaci n Duraci n del ciclo corto para la cantidad de suciedad de la vajilla E...

Страница 18: ...ecuada en el tiempo estipulado 5 CALENTAMIENTO DEL TANQUE El led del ON OFF se enciende cinco veces durante 0 5 segundos cada vez y queda apagado durante 2 segundos para volver a encenderse cinco vece...

Страница 19: ...ns des symboles du tableau de commande MOD B page 5 24 5 1 3 Mise en marche de la machine 24 5 1 4 Remplissage et r chauffement 24 5 1 5 Pr paration de la vaisselle 24 5 1 6 S lection du programme de...

Страница 20: ...aisselle doit tre bien mis niveau et aucun c ble lectrique tuyau d eau ou tuyau de vidange ne doit jamais tre trangl ou pi g montez pas dessus ou n appuyez pas d objets lourds sur le lave vaisselle ca...

Страница 21: ...en place et nivellement Cette machine dispose de pieds r glables pour tre parfaitement mise en place cela se fait en tournant le pied l hauteur d sir e Il est tr s important que la machine soit parfai...

Страница 22: ...psi bar kPa Kg cm 200 2 03 29 4 400 4 07 Si la pression de r seau est sup rieure celle recommand e il faut placer un r gulateur de pression sur la prise de sortie VOIR IMAGE 3 page 5 Si la pression du...

Страница 23: ...aussi bien durant le rin age que le remplissage la dose de d tergent doit tre r gl e d s l installation du composant afin que l utilisateur puisse disposer d un lavage optimal d s le d but recommando...

Страница 24: ...id ale pour un correct lavage de vaisselle un avertissement lumineux indiquera l utilisateur que la machine est pr te La temp rature que doit atteindre la machine est de 85 C 185 F dans la chaudi re d...

Страница 25: ...era lev e 5 1 8 Rin age froid uniquement versions COLD Les versions COLD disposent d un programme de rin age froid Dans les mod les A pour ex cuter ce programme maintenez le s lecteur de cycle sur la...

Страница 26: ...FR 26...

Страница 27: ...t 3 secondes jusqu ce que le voyant s allume en continu Fermer la porte le cycle de r g n ration commence alors et le voyant clignote pendant toute la dur e de celui ci Au bout de 20 minutes environ l...

Страница 28: ...les r sistances Contr le de l tat des joints V rification de l tat des composants R glage des doseurs Serrage des bornes des connexions lectriques Si le c ble d alimentation est endommag il doit tre r...

Страница 29: ...sionnement en d tergent ad quat Exc s de produit lustrant Appelez le service technique pour qu il proc de au r glage du doseur Temp rature de la cuve inf rieure 50 C 122 F Thermostat en panne ou mal t...

Страница 30: ...a pompe n a pas vidang le r servoir jusqu au niveau correct dans le temps imparti 4 CHAUFFE DE LA CHAUDI RE Le voyant ON OFF s allume quatre fois pendant 0 5 secondes chaque fois et reste teint pendan...

Страница 31: ...l panel symbols B MOD page 5 36 5 1 3 Switching on the machine 36 5 1 4 Filling and heating 36 5 1 5 Preparation of the dishes 37 5 1 6 Selecting the wash cycle 37 5 1 7 Stopping the wash cycle and en...

Страница 32: ...use of the appliance may cause The dishwasher should be correctly levelled and care taken to ensure that none of the electric cables water or drainage hoses are trapped or kinked on top of the dishwa...

Страница 33: ...imum operation it is essential that the machine is correctly levelled The flooring on which the machine must be able to bear the full weight of the machine Inspect final location of the machine prior...

Страница 34: ...essure is higher than the recommended pressure a pressure regulator must be SEE FIGURE 3 page 5 If the mains water pressure is lower than the recommended pressure a pressure pump should be mounted at...

Страница 35: ...electrical connection The tub should have an opening in which the dispenser is fitted If this is not the case make a 12 hole above the maximum water level to mount the corresponding bushing the deter...

Страница 36: ...t to heat up Although it is possible to start the wash process this is not recommended as the water inside the machine is not yet at the ideal temperature When the machine has reached the ideal temper...

Страница 37: ...wash cycle For safety reasons if the door is open the wash cycle will not start 5 1 7 Stopping the wash cycle and end of wash cycle The wash cycle can be stopped in the following ways By switching off...

Страница 38: ...e used for washing To run the regeneration cycle proceed as follows Select regeneration cycle I Press the START B button the START button light B comes on After 20 minutes the START button light B goe...

Страница 39: ...e salt rinse aid and detergent levels at the start of each day the technical service twice a year to have the machine serviced Cleaning of water filter Cleaning of limescale on the resistors Inspectio...

Страница 40: ...thoroughly Presence of foam Unsuitable detergent Call the technical service to supply correct detergent Too much rinse aid Call the technical service to reset the dispenser Temperature of lower tub a...

Страница 41: ...pump does not drain the water in the tank to the correct level in the specified time 4 BOILER HEATING The ON OFF LED lights up four times for 0 5 seconds each time and then remains unlit for 2 seconds...

Страница 42: ...2 Symbole auf dem Bedienfeld MOD C seite 5 47 5 1 3 Einschalten des Ger tes 47 5 1 4 F ll und Aufheizvorgang 48 5 1 5 Vorbereiten des Geschirrs 48 5 1 6 Auswahl des Sp lvorgangs 48 5 1 7 Unterbrechun...

Страница 43: ...Elektrokabel noch Wasserschl uche oder Ablassschl uche abgeklemmt oder gequetscht auf das Ger t klettern oder sich an diesem abst tzen Keine schweren Gegenst nde auf dem Geschirrsp ler ablegen da sei...

Страница 44: ...taplers oder einer hnlich F rdervorrichtung bewegen um Sch den am Aufbau des Ger tes zu vermeiden Das Ger t zum vorhergesehenen Standort bringen und erst hier auspacken Alle bei der Verpackung eingese...

Страница 45: ...den Anschluss des Ger tes an das Wassernetz muss die Qualit t des Wassers analysiert werden Werkseitig wird folgende Wasserg te empfohlen max 60 C Wasserh rte gesamt 5 10 fH franz sische H rtegrade 7...

Страница 46: ...rch wird ein Vakuum erzeugt das dazu f hrt dass der Klarsp lmitteldosierer die Fl ssigkeit absorbiert die Dosiervorrichtung muss bei der Installation des Ger tes eingestellt werden da der Anwender nur...

Страница 47: ...tsorgungsstelle f r weitere Informationen Entsorgen Sie alle Verpackungselemente gem den jeweils g ltigen Bestimmungen GEBRAUCHS UND WARTUNGSANLEITUNG DIE IM VORLIEGENDEN HANDBUCH ENTHALTENEN ANWEISUN...

Страница 48: ...ufheizvorgangs des Tages dazu kommen dass die Temperaturwerte f r das Ger t die vorher genannten Werte berschreiten was aber vollkommen normal ist Sollten Sie allerdings w hrend des Aufheizvorgangs be...

Страница 49: ...atisch gestartet Den berlauf nach 160 Sekunden wieder ordnungsgem einsetzen erlischt das Licht der Taste START B Kann das Ger t ausgeschaltet werden Bei den Modellen B Ausgenommen SOFT Ausf hrungen di...

Страница 50: ...2Reinigung zum Feierabend Zum Feierabend m ssen die Filter Sp larme Klarsp larme sowie alles weitere Zubeh r gr ndlich gereinigt werden Eine gr ndliche Reinigung ist die wichtigste Voraussetzung f r e...

Страница 51: ...erilisierte T cher benutzt Es wird empfohlen das Ger t stets mit der optimalen Temperatur zum Sp len zu be da Reinigung und Desinfektion so ebenfalls optimal ausfallen Den Sp lraum mindestens zweimal...

Страница 52: ...n Klarsp lmittel vorhanden Den Beh lter f r fl ssiges Klarsp lmittel auff llen Zu wenig fl ssiges Klarsp lmittel vorhanden Wenden Sie sich an den Kundendienst um die Einstellung der Dosiervorrichtung...

Страница 53: ...s geleert hat 4 BEIM AUFHEIZEN DES KESSELS Die LED EIN AUS viermal 0 5 Sekunden lang aufleuchtet und dann 2 Sekunden lang erlischt um dann erneut aufzuleuchten Dieser Vorgang wiederholt sich so lange...

Страница 54: ...gia del pannello comandi MOD B pag 5 59 5 1 3 Accensione della macchina 59 5 1 4 Riempimento e riscaldamento 59 5 1 5 Preparazione delle stoviglie 60 5 1 6 Selezione del lavaggio 60 5 1 7 Interruzione...

Страница 55: ...zione improprie come la manipolazione possono causare danni materiali e lesioni La lavastoviglie deve essere ben livellata e in nessun caso deve essere soffocata o intrappolata da eventuali cavi elett...

Страница 56: ...li per un livellamento perfetto deve essere ruotato il piede all altezza desiderata molto importante che l apparecchio sia ben livellato poich solo in questo modo si ottimizza il suo funzionamento Il...

Страница 57: ...ella presa di uscita un regolatore di pressione VEDI FIGURA 3 pag 5 Se la pressione della rete superiore a quella raccomandata necessario montare nella pompa di pressione sull uscita della rete idraul...

Страница 58: ...schema elettrico La vasca deve essere fornita di un foro per l installazione del dosatore altrimenti eseguire un foro di 12 sopra il livello massimo dell acqua per montare le boccole corrisponden il d...

Страница 59: ...ggio Il processo di riempimento pu durare alcuni minuti Quando la vasca di lavaggio piena inizier a riscaldarsi il caldaia e la vasca possibile iniziare il processo di lavaggio anche se non raccomanda...

Страница 60: ...continua a mantenere chiusa la porta Alla fine del ciclo di lavaggio estrarre il cestello e lasciare asciugare le stoviglie per evaporazione Togliere le stoviglie dal cestello con le mani pulite facen...

Страница 61: ...ndere fino a quando il serbatoio completamente vuoto Una volta scaricato il serbatoio e con la porta aperta selezionare il ciclo di rigenerazione mantenendo premuto il tasto P1 per 3 secondi fino a qu...

Страница 62: ...une Pulizia del filtro dell acqua del calcare nelle resistenze Revisione dello stato delle guarnizioni Revisione dello stato dei componenti Regolazione dei dosatori Serraggio dei morsetti dei collegam...

Страница 63: ...servizio tecnico per eseguire una nuova regolazione del dosatore Temperatura della vasca inferiore a 50 C 122 F Termostato difettoso o mal calibrato Contattare il servizio tecnico per la riparazione...

Страница 64: ...o nel tempo prestabilito il serbatoio fino a raggiungere il livello d acqua corretto 4 RIEMPIMENTO DELLA CALDAIA Il led di ON OFF si accende quattro volte per 0 5 secondi ogni volta e resta spento per...

Страница 65: ......

Страница 66: ...Fagor Industrial S Coop B Sancholopetegui 22 Aptdo 17 20560 O ATI ESPA A Tel 34 943 71 80 30 Fax 34 943 71 81 81 info fagorindustrial com www fagorindustrial com...

Отзывы: