Hardware configuration.
CNC 8070
5.
CENTRAL
UNIT + MONITO
R (ETX PLATFORM).
Conn
ecti
ons.
·88·
(R
EF
: 1911)
5.12.6 Connection to an Ethernet network (Fast Ethernet).
The Ethernet connection enables the CNC to be configured as another node in the local
network, thus being able to communicate with other CNCs or PCs to transfer files, run
telediagnoses, etc. The Ethernet connection also enables direct connection (point to point
connection) to another CNC or PC.
Connector.
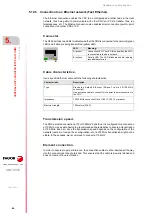
The RJ45 port has two LEDs to indicate whether the CNC is connected to the network (green
LED) and if data are being transmitted (yellow LED).
Cable characteristics.
Use a specific Ethernet cable with the following characteristics.
Transmission speed.
The CNC permits a connection at 10 or 100 MHz; by default, it is configured for a connection
at 10 MHz. Use a cable having the recommended characteristics to ensure a transmission
at 100 MHz. Even so, since the transmission speed depends on the configuration of the
network (number of nodes, their configuration, etc.) a 100 MHz transmission might not be
stable. In these cases, we recommend to connect at 10 MHz,
Element connection.
In order to ensure proper performance, the connection cable must be inserted all the way
into the connectors so they're latched. This ensures that the cable is properly latched and
does not come off due to vibration.
Characteristic.
Description.
Type.
Standard shielded Ethernet 10Base-T cable (10/100 MHz
connection).
Use a crossed cable to connect for the point to point connection to
the CNC.
Impedance.
10/100 MHz connection Cat.5 (100
- 120
) or greater.
Maximum length.
100 meters (328 ft).
LED.
Meaning.
A (green)
Connection LED. The LED turns on when the CNC
is connected to the data network.
B (yellow)
Activity LED. The LED blinks when data is being
received/transferred.
A
B
Содержание CNC 8070
Страница 1: ...Ref 1911 8070 CNC Hardware configuration...
Страница 8: ...BLANK PAGE 8...
Страница 14: ...BLANK PAGE 14...
Страница 18: ...BLANK PAGE 18...
Страница 22: ...BLANK PAGE 22...
Страница 24: ...BLANK PAGE 24...
Страница 26: ...BLANK PAGE 26...
Страница 28: ...Hardware configuration CNC 8070 1 PREVIOUS INFORMATION 28 REF 1911...
Страница 38: ...Hardware configuration CNC 8070 2 CONFIGURATION General diagram for U60 Q7 A platform 38 REF 1911...
Страница 94: ...Hardware configuration CNC 8070 6 CENTRAL UNIT MONITOR Q7 A PLATFORM 94 REF 1911 C70 15AT...
Страница 184: ...Hardware configuration CNC 8070 8 LCD 15SVGA PASSIVE MONITOR LCD15 SVGA Overall connection 184 REF 1911...
Страница 272: ...Hardware configuration CNC 8070 18 INSTALLING A SENSOR FOR GAP CONTROL LASER MODEL 272 REF 1911...
Страница 273: ...Hardware configuration CNC 8070 273 User notes REF 1911...
Страница 274: ...Hardware configuration CNC 8070 274 User notes REF 1911...
Страница 275: ...Hardware configuration CNC 8070 275 User notes REF 1911...


