


Facnor - LS / LX / RS / RX reefing and furling systems - Installation manual
4- ASSEMBLY STAGES :
4.1 – ASSEMBLY OF THE HALYARD DEFLECTOR*
Slip the disk around the forestay, screw pointing up.
Assemble the two half bushings
above
the deflector disk and
around the forestay, the “female” part pointing up.
Fit the bushing into the halyard deflector. Then tighten the
screw (fig. F), which will fix the bushing in place.
*NOTE : for LS/LX330 models, the halyard deflector wheel has
been replaced by a block diverting the halyard and this is to be
riveted onto the mast (see page p29 for further explanations).
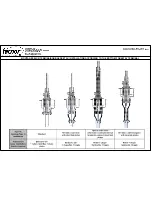
4.2- ASSEMBLY OF THE TOP CAP AND THE TOP SECTION
4.2.1
4.2.2
4.2.3
4.2.4
4.2.1- Slip the stainless steel plate and then the top cap around the forestay. Block the plate
by slipping it into the notches on the cap, designed for this purpose.
4.2.2- Around the forestay, assemble a 1
st
bushing, then a 2
nd
, the “male” part pointing up. Fit
the bushings together, and give the bottom bushing a quarter turn.
IMPORTANT : These two bushings are now joined.
4.2.3- Put the bushing set into the cap, then give another quarter turn to the bushings.
IMPORTANT : Doing this ensures that the bushings are fixed in place in the top
cap.
4.2.4- Take the top section and fix it snugly into the top cap. If assembly is not possible, give
the bushings a half turn in the cap.
Place the 2 pins into the holes in the top cap and the stainless steel plate. Then, tap them into
the section grooves with a mallet.
The pins are simply used to fix the cap. Therefore, do not hit too hard or you may
damage the cap.
23
top
Female part
top
top
top
top
F
Male part
Give the
bushing
a
quarter
turn
Give both
bushing a
quarter
turn
together
Stainless
steel plate
English


