background image


Facnor - LS / LX / RS / RX reefing and furling systems - Installation manual


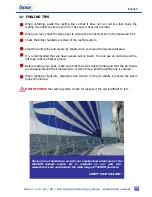
11- FURLING TIPS 
 

When unfurling, guide the reefing line so that it does not run out too fast. Keep the 
reefing line under control as you furl. Take care it does not override. 


When you reef, check the Genoa car to ensure the correct tension on the leach and foot.  
 

Check that other halyards are clear of the reefing system. 


Cleat the furling line and secure jib sheets when you have the required sail area. 


It is recommended that you have a spare sail on board. You can use an old Genoa with a 
luff tape to fit the Facnor groove. 

 
Before leaving your boat, make sure that the sail is tightly furled and that the jib sheets 

are wrapped around the furled sail two or three times, and the reefing line is secured. 

 
When reefing in light airs, maintain some tension on the jib sheets to ensure the sail is 

properly rolled up. 


DO NOT FORCE

 the reefing system. Check for reasons if the sail is difficult to furl. 


Please do not hesitate to contact our experienced sales team or the 

FACNOR dealers whose list is available on our web site 

www.facnor.com


and discover the wide range of FACNOR products.


ENJOY YOUR SAILING 


31

English 

Содержание LS

Страница 1: ...G S Y S T E M S F R U S U K R e v 2 0 1 0 R A C E D E V E L O P E D T E C H N O L O G Y N O T I C E d e M O N T A G E I N S T A L L A T I O N M A N U A L U N E T E C H N O L O G I E I S S U E D E L A...

Страница 2: ...d flecteur de drisse p 8 4 2 Montage du bouchon de profil et du profil haut P 8 4 3 Mise en place du curseur p 9 4 4 Assemblage des profils p 9 4 5 Mise en place du tube t lescopique p 9 4 6 Mise en p...

Страница 3: ...standard de 2 m tres manchon palier noir form de 2 demi paliers entr e de voile tambour Fixation basse du tambour 2 montages possibles cf p 10 axe avec bagues nylon crou ou kit ridoir lattes inox cint...

Страница 4: ...24 28 32 36 40 44 2 NOTA la quantit contenue dans les sachets peut tre sup rieure au nombre de vis ou paliers n cessaires 2 1 2 Options Option avale ridoir Kit ridoir montage cf p 11 Kit cordage mont...

Страница 5: ...n 2m Nbre de profils Externes en 1m Nbre de manchons Tube t lescopique 7M30 3 0 2 1 8M40 3 1 3 1 10M40 4 1 4 1 12M40 5 1 5 1 14M50 6 1 6 1 16M50 7 1 7 1 18M50 8 1 8 1 20M50 9 1 9 1 22M50 10 1 10 1 2 3...

Страница 6: ...de le rincer plusieurs fois dans la saison pour retirer le d p t salin 3 2 LES PRECAUTIONS AVANT LE MONTAGE Profils lectriquement conducteurs L enrouleur de g nois est constitu de profils aluminium qu...

Страница 7: ...uciforme r f Pozi drive n 2 ou n 3 pour les mod les LS LX330 pour les vis de fixation des profils Pr paration des profils Afin de faciliter le montage nous conseillons de pr parer les profils A savoir...

Страница 8: ...ssembler un 1er palier puis un 2 me la partie m le vers le haut Embo ter les paliers l un dans l autre et tourner le palier du dessous d un quart de tour IMPORTANT Ces deux paliers sont maintenant sol...

Страница 9: ...du manchon introduire le palier dans le profil sup rieur jusqu faire co ncider les per ages du manchon avec ceux du profil sup rieur Mettre les deux vis Rep G en place Puis serrer les 4 vis Rep G H p...

Страница 10: ...mbler un palier au dessous du tube t lescopique le c t m le vers le haut Introduire le palier dans le tube t lescopique et le tourner d un quart de tour IMPORTANT De cette fa on le palier est bloqu da...

Страница 11: ...LATION ACCORDING TO THE BOTTOM FORESTAY TERMINAL FICHE TECHNIQUE ENROULEUR RANGE FURLING SYSTEM DATA SHEET FACNOR S A S Parc d Activit s B P 222 F 50550 SAINT VAAST LA HOUGUE tel 33 0 2 33 88 50 22 fa...

Страница 12: ...les deux languettes en plastique souple Rep S dans les rainures situ es de chaque c t de l embase du tambour Fixer le haut des lattes du kit ridoir Facnor lattes inox cintr es Rep T au tambour l aide...

Страница 13: ...descendre d un trou 100 mm plus bas Avoir un jeu de 40 mm 139mm entre la rondelle d flecteur de drisse et le bas du sertissage de la terminaison haute de l tai La position id ale de l entr e de voile...

Страница 14: ...OUR DU TAMBOUR QUAND LA VOILE EST ROULEE IL DOIT TOUJOURS RESTER QUELQUES TOURS DE CORDAGE DANS LE TAMBOUR 6 ORIENTATION DU GUIDE DROSSE GAMME LS 6 1 Desserrer la vis Rep Z l g rement afin de lib rer...

Страница 15: ...sitionner environ 50 mm du bouchon de profil 9 CONVERSION EN ETAI CREUX TAMBOURS DEMONTABLES LX RX RS La conversion de votre enrouleur LX RX ou RS en tai creux permet d abaisser le point d amure et de...

Страница 16: ...eur est quip de cette option Voile hiss e et tarqu e distance rondelle d flecteur terminaison basse tai 40mm minimum 139mm maximum distance curseur bouchon de profil 75mm minimum 150 mm maximum Valeur...

Страница 17: ...utiliser une ancienne voile en adaptant une ralingue sur le guindant Avant de quitter le bord s assurer que la voile soit enroul e correctement et que l coute fasse quelques tours autour de l tai Par...

Страница 18: ...sembling foil sections p 24 4 5 Fitting the telescopic section p 24 4 6 Fitting the feeder p 25 4 7 Fitting the bushing into the telescopic section p 25 4 8 Fixing the telescopic section in the drum p...

Страница 19: ...2 meter standard section connector black bushing split into 2 half bushings sail feeder drum Lower drum fixing 2 possible assemblies see p 24 pin with nylon bushes or turnbuckle kit stainless steel cu...

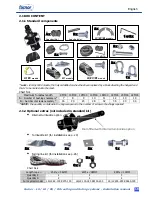
Страница 20: ...NOTE the quantity contained in the bag is superior to the number of screws or bushings required 2 1 2 Optional extras not included in standard kit Internal turnbuckle option Turnbuckle kit for install...

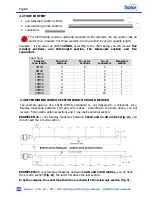
Страница 21: ...elescopic section 7M30 3 0 2 1 8M40 3 1 3 1 10M40 4 1 4 1 12M40 5 1 5 1 14M50 6 1 6 1 16M50 7 1 7 1 18M50 8 1 8 1 20M50 9 1 9 1 22M50 10 1 10 1 2 3 DETERMINING WHICH SECTION LENGTH SHOULD BE USED The...

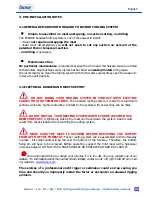
Страница 22: ...ng system is made from aluminium sections which are highly conductive Contact by the system with power lines can be fatal DO NOT INSTALL YOUR REEFING SYSTEM WHEN STORMY WEATHER HAS BEEN FORECAST A lig...

Страница 23: ...for the section screws Preparing foil sections We recommend you prepare the sections before assembly This involves fixing a connector fig D to all of the twin groove sections apart from one The latter...

Страница 24: ...slipping it into the notches on the cap designed for this purpose 4 2 2 Around the forestay assemble a 1st bushing then a 2nd the male part pointing up Fit the bushings together and give the bottom b...

Страница 25: ...tay With the help of the connector push the bushing all the way up into the top section until the connector holes coincide with those of the top section Fit both screws fig G then slowly and firmly ti...

Страница 26: ...lescopic section the male side pointing up Fit the bushing to the telescopic section and give it a quarter turn IMPORTANT Doing this ensures that the bushing is fixed in place at the bottom of the tel...

Страница 27: ...s situated on either side of the drum s base Fix the top of the stainless steel link plates fig T found in the Facnor turnbuckle kit to the drum with the screws provided fig U Lightly grease both thre...

Страница 28: ...ections have descended at least 50mm before the screw slots into place Otherwise proceed to the next hole 100mm below Leave a margin of 40 139 mm between the halyard deflector and the bottom of the fo...

Страница 29: ...a figure eight knot as shown FURL A FEW EXTRA TURNS AROUND THE DRUM WHEN THE SAIL IS FURLED UP THERE SHOULD BE ALWAYS A FEW TURNS REMAINING AROUND THE DRUM 6 ADJUSTING THE FURLING LINE GUIDE LS RANGE...

Страница 30: ...be positioned around 50mm from the top section cap when your sail is fully hoisted 9 CHANGING FURLING SYSTEM INTO HEADFOIL LX RX RS REMOVABLE DRUMS Changing your LX RX or RS furling system into headfo...

Страница 31: ...the sail is hoisted and the halyard is tensioned correctly distance between halyard deflector bottom end of the top forestay terminal 40mm minimum 139mm maximum distance between halyard swivel top cap...

Страница 32: ...at you have a spare sail on board You can use an old Genoa with a luff tape to fit the Facnor groove Before leaving your boat make sure that the sail is tightly furled and that the jib sheets are wrap...

Страница 33: ...ine Grove Circle CHARLOTTE NC 28206 USA TEL 1 704 597 15 02 FAX 1 704 597 09 61 e mail facnor sparcraft us com CODE 0 GENNAKER FURLERS EMMAGASINEURS RC FURLING REEFING SYSTEMS ENROULEURS RC MAINSAIL R...

Отзывы: