Appendix C
Elevation Studies & 3-D Dipstick Topo Maps
C-5
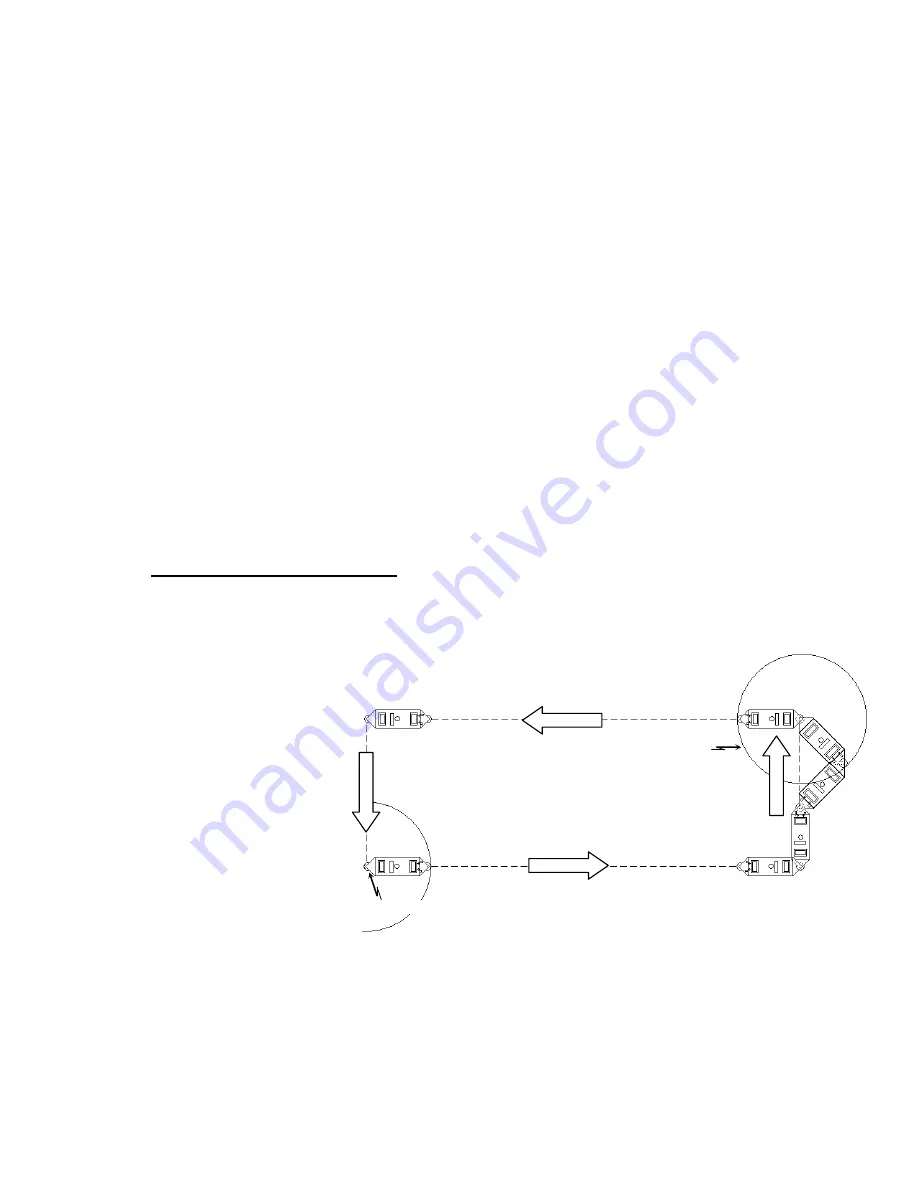
First Leg
Third Leg
F
our
th
L
eg
S
ec
ond
L
eg
Start
/
End Point
You draw this circle
After you have gone as far as you want to, say 50 ft, stop and mark a circle around the front foot. Don't stop the run on
the pocket computer, just stop rotating the Dipstick
for a moment while you mark the surface. Now turn the Dipstick
so you march
across
to the opposite line , stopping when the front foot is on the left (North) line at a point just opposite
where you stopped a moment ago. It is important that this point be exactly across from the 50th step, because these are
the two points you are going to compare. Mark a circle on the surface around your front foot again. It doesn't matter if
the front foot is the switch end or the battery end, so long as it's the front foot. Then turn West and march back on the
North line until you are at the end of the line opposite where you started at the beginning. Stop and mark this point by
circling around the front foot. Finally, turn South and march back across to where you started from.
It is imperative that you end up with one end of the Dipstick
exactly on top of the paint spot where you started.
Terminate the collection of data at this point.
Record the locations of the turning points and the end point on the run
Notes
by step number, i.e.: 50, 56, 106, 112. In
this example, let's assume the box is 6 steps wide. You start at the paint mark, and the 50th reading is taken with the
battery end of the Dipstick
over the first turning point. The second turning point is 6 steps later, at 56, and the last
turning point is at 106, across from the starting point. The run is ended with the battery end of the Dipstick® forward,
with the foot right over the paint mark, at step # 112. You will need these turning points for the analysis later.
Go to the spot on the South line where the circle is on the surface at the 50th step. (The first turning point from the first
box) Start a second box here, again going East along the South line for 50 steps. Mark the turning location, turn North,
and march to the North line. Finish this box just like the first box. Point # 106 of the second box should be right on top
of point # 56 from the first box, and point # 112 (the end point) from the second box should be right on top of point # 50
from the first box, which is at the same point as the start point of the second box. Record the locations of the turning
points and the end point on the run
Notes
by step number, i.e.: 50, 56, 106, 112.
8.
General Info on Collecting Data
If you need the two long legs of the box to be parallel at an arbitrary distance apart, (not an even number of steps apart)
say for measuring in wheelpaths, here's how to make the short transverse legs land exactly on top of the opposite
wheelpath: When you reach the end point on the first wheelpath, press <Enter> to stop the run, and mark a circle around
the Moon foot at that location. Now pick up your Dipstick
and go across and mark the desired location directly
opposite. Use the Dipstick
to draw a
circle around this point on the surface.
Draw the circle so it is tangent to the
outer edge of the Moon foot as shown in
the drawing. Then go back to where you
stopped collecting data and carefully put
the Dipstick
down exactly on the Moon
foot circle at the end of the first leg.
Now you can "Append" or extend your
run from this point. Select the box run
you have already started, then use
<Collect> <Append> to re-start this run.
The computer will tell you which foot
should be forward. (In this case,
"forward" is to the left, or “up” in the
drawing)
Press <Enter> to continue taking data towards the circle across the aisle. At the point where you would step across the
circle,
don't step over the circle,
but
put the foot down exactly tangent to the circle. (Anywhere on the circle)
This
will require that you "step off" at a slight angle as shown in the picture above. Your next step will always put you
exactly on the desired spot at the center of the circle. You will also have to use this procedure to get exactly back on to
the starting point of the run.
Содержание Dipstick 2200 Series
Страница 2: ...This page is intentionally blank...
Страница 7: ...DIPSTICK 2277 PARTS LIST v The Dipstick 2277 Case Behind the Top Foam Lid...
Страница 10: ...This page is intentionally blank...
Страница 24: ...This page is intentionally blank...
Страница 42: ...This page is intentionally blank...
Страница 60: ...This page is intentionally blank...
Страница 68: ...This page is intentionally blank...
Страница 80: ...This page is intentionally blank...
Страница 86: ...This page is intentionally blank...
Страница 94: ...This page is intentionally blank...


