Appendix A
Collecting Elevation Profile Data in Wheelpaths
A-3
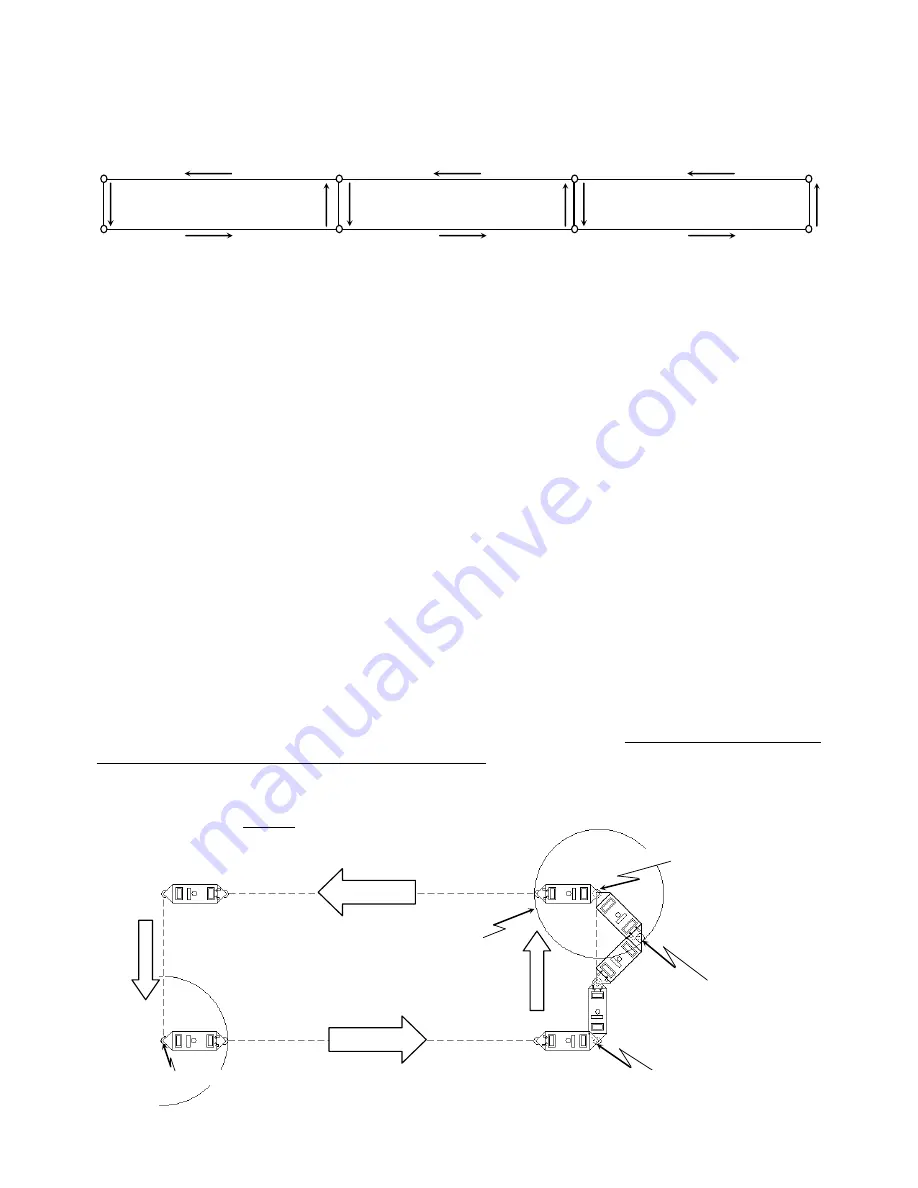
COLLECTING THE REMAINING BOXES
7.
Go to the point you marked on the pavement called "B1 250". Set the Dipstick down with
the rear "moon" foot directly on top of the circle at step 250. Draw a 1-ft (300-mm) circle
around the start/end point. You can do this by just setting the Dipstick foot on the start/end
spot and holding a crayon next to the other foot of the Dipstick and turn it in a circle. When
you have finished making this circle, walk across to the left wheelpath and make a similar 1-
ft (300-mm) circle at "B1 256".
8.
Collect a new Run called "B2" just like the first box, but taking you another 250 steps down
the highway.
9.
Continue to collect additional Boxes in a similar manner until you reach the point on the
highway that you want to use as the "end" of today’s data.
The boxes do not have to be 250
steps long, nor do they all need to be the same length.
However, we have found that it is
easier to keep track of what you are doing if you always try to use a standard collection
"box", and make notes whenever you vary from the standard.
10.
Note that if the highway bends around a curve instead of staying perfectly straight, one of the
wheelpaths will be longer than the other is. In this case, continue to always use 90
angles
when you go around a corner. The short transverse legs will all be the same lengths because
the wheelpaths are a constant distance apart, but the left (or right) wheelpath may be a few
steps longer than the other wheelpath.
You may have wondered why you need to draw the 1-ft (300-mm) circles around the corners
of the boxes.
These circles will help you to match up the wheelpath profiles so they hit exactly on
the correct point. When you are "closing the loop" by making the last step on Box1, if the highway
is not perfectly straight, or if you have turned at 89
instead of 90
,
or if the distance between
wheelpaths is not an integer multiple of 1 ft, (300 mm)
then the last step will not land exactly on the
start point. If you need the two long legs of the box to be parallel at an arbitrary distance apart, (not
an integer number of steps apart) say for measuring in wheelpaths, here's how to make the short
transverse legs land
exactly
on top of the opposite wheelpath:
Start/end Box 1
Point 250 Box 1/Start/end Box 2
Point 506 Box 1
Point 250 Box 2/Start/end Box 3
Point 256 Box 1/Point 506 Box
2
Point 256 Box 2/Point 506 Box
3
Point 256 Box 3
Point 250 Box 3
Box 1
Box 2
Box 3
Start
/
End Point
Left wheelpath
Right wheelpath
4
th
L
eg
(1
st
Leg of the Box)
(3
rd
Leg of the Box)
2
nd
L
eg
3. Draw this 12 inch/300 mm circle next
2. Draw a small circle around the Moon Foot here too
4. Then as you walk the 2
nd
leg,
step off tangent to this circle here.
1.
Draw a small circle around the Moon Foot here
Содержание Dipstick 2200 Series
Страница 2: ...This page is intentionally blank...
Страница 7: ...DIPSTICK 2277 PARTS LIST v The Dipstick 2277 Case Behind the Top Foam Lid...
Страница 10: ...This page is intentionally blank...
Страница 24: ...This page is intentionally blank...
Страница 42: ...This page is intentionally blank...
Страница 60: ...This page is intentionally blank...
Страница 68: ...This page is intentionally blank...
Страница 80: ...This page is intentionally blank...
Страница 86: ...This page is intentionally blank...
Страница 94: ...This page is intentionally blank...


