FabLab impression 3D Скачать руководство пользователя страница 4

Filament 3D Printing (0.10$/g) 1 / 2 


a)

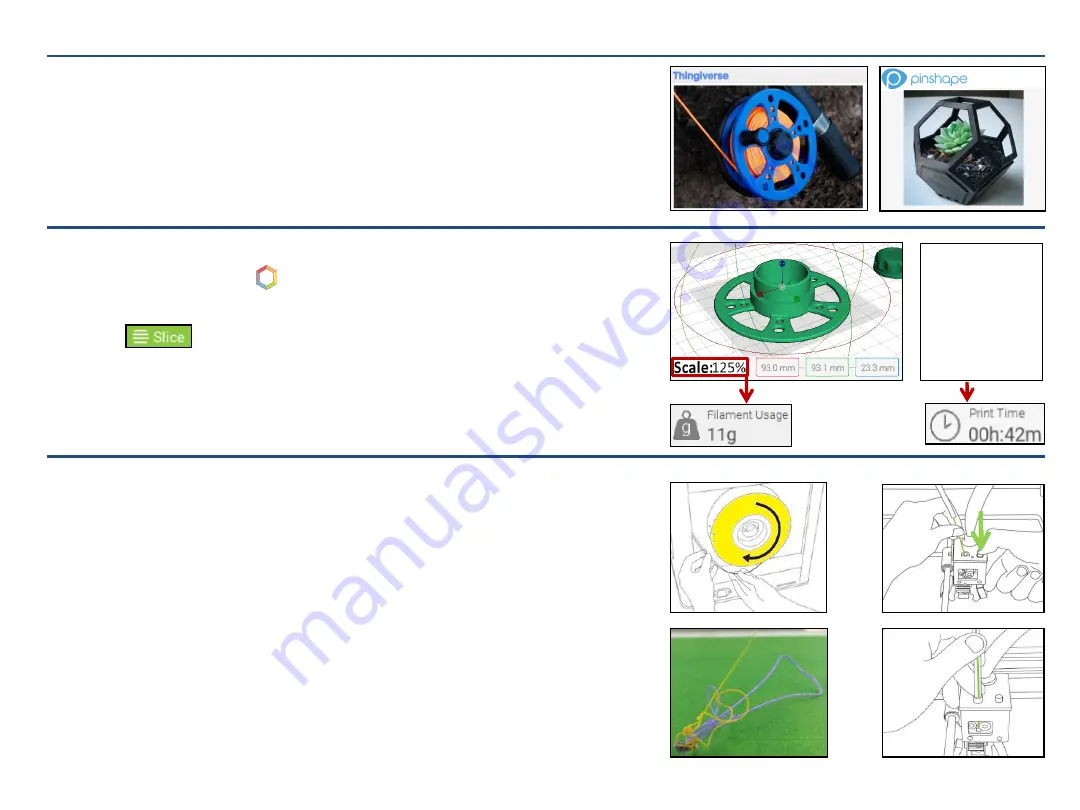
Find a model from the Internet.  

Trusted websites: 

Thingiverse, Pinshape, Instructables 

and

 My Mini Factory.


b) Download the 3D model files in .obj or .stl format. 

(Complex models are often packaged as .zip files containing multiple .obj or .stl files) 


     1. Finding a 3D model


2. 3D Model Setup in Tinkerine Suite


a)

Open 

Tinkerine Suite (     ) 

and 

import 

your downloaded file(s). 

b) Adjust (or not) the model scale to modify its weight and print time. 
c)

Click on               . 

d) Validate the final 

result’s

 printability with Fab Lab staff.  

e)

Click on 

Save for Print

, then on 

Sd Card

f)

Eject


the SD Card.


3. Changing the Filament Color 


a)

With the front menu wheel, select 

Wizard

,


then 

New Filament


b)

Let the printer heat, then remove the old filament.  

c)

Rewind the old filament spool and place it back on the display case.  

d)

Place the new filament spool on the wheels behind the printer. 

e)

Insert the filament in the back tube as shown on 

picture A

f)

Press the button on top of the print head (

picture B

) and push the 

filament inside the hole on its left. 

g)

Push the new filament until the old filament color runs out (

picture C

).


h)

Set the filament tube back in the printhead hole (

picture D

). 


You can 

modify the 

model scale to 

fit your budget 

or time 

availability 

Содержание impression 3D

Страница 1: ......

Страница 2: ......

Страница 3: ...c un employé du Fab Lab e Cliquer sur Save for Print puis sur Sd Card f Éjecter la carte SD 3 Changer la couleur du filament a Du menu avant roulette selectionner Wizard puis New Filament b Laisser l imprimante se réchauffer puis retirer l ancien filament c Rembobiner la bobine de l ancien filament puis la replacer sur l étagère d Placer la nouvelle bobine sur les roues arrière de l imprimante e I...

Страница 4: ... staff e Click on Save for Print then on Sd Card f Eject the SD Card 3 Changing the Filament Color a With the front menu wheel select Wizard then New Filament b Let the printer heat then remove the old filament c Rewind the old filament spool and place it back on the display case d Place the new filament spool on the wheels behind the printer e Insert the filament in the back tube as shown on pict...

Страница 5: ...nte 5 Démarrer l impression a Sélectionner Print à l aide de la roue du menu b Sélectionner votre modèle 3D à partir de la liste de fichiers c Laisser l imprimante se réchauffer et imprimer votre modèle 6 Retirer l impression du plateau a À l aide d une spatule retirer l impression lentement en débutant par un coin Il se peut que le ruban adhésif se déchire durant le retrait du modèle b Remplacer ...

Страница 6: ...he Printer Platform 5 Starting the Print a Select Print with the front menu wheel b Select your 3D model from the file list c Let the printer heat and print your model 6 Removing the Print From the Print Bed a Using a spatula remove the print slowly starting from a corner Some masking tape may be torn in the process b Replace any torn masking tape with new one Thank you for cleaning the printing s...

Отзывы: