background image


EN 


1
0


10 

ELECTRICAL CONNECTION 

•  Connect the Hood to the Mains power sup-

ply, inserting a two-pole Switch with a con-
tact aperture of at least 3 mm. 

•  Remove the Metal grease filters (see par. 

on “Maintenance”) and make sure that the 
power supply Cable is properly inserted in 
the Suction fan socket. 

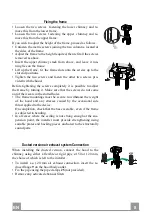
•  Take the wires indicated in fig.1 and pass 

them through the slot formed on the galva-
nized diffuser support, as shown in fig.2


• Position the finishing plug 27 over the 

housing in the diffuser support, fixing it us-
ing a screw 12e (2.9 x 9.5) and applying the 
2 cable clamp elements 26  as indicated in 
figs. 3 and 4


•  Connect the Controls Connector fig. 5
•  Connect the Lighting Connector fig. 6
•  Store both the Connectors in the Protective 

box 24 and close it with 2 Screws 12e (2.9 
x 9.5), provided. 


•  Remove the protective film from the dou-

ble-sided adhesive on the connection box, 
and fix it inside the motor compartment fig. 
7


Содержание TRATTO ISOLA SP EG8 X/V A90

Страница 1: ...Instructions Manual Manuel d Instructions Bedienungsanleitung Manual de instrucciones...

Страница 2: ...SUGGESTIONS 14 CARACTERISTIQUES 15 INSTALLATION 17 UTILISATION 21 ENTRETIEN 22 INHALTSVERZEICHNIS EMPFEHLUNGEN UND HINWEISE 24 CHARAKTERISTIKEN 25 MONTAGE 27 BEDIENUNG 31 WARTUNG 32 NDICE CONSEJOS Y S...

Страница 3: ...3 3 64 65 68 73 74 SA...

Страница 4: ...r than for which it has been designed Never leave high naked flames under the hood when it is in operation Adjust the flame intensity to direct it onto the bottom of the pan only making sure that it d...

Страница 5: ...EN 5 5 CHARACTERISTICS Dimensions 650 290 898 70 90 132 433 150 350 740 740 940 572 Min 500mm Min 650mm...

Страница 6: ...opy Air Outlet Extension made of 2 Half sections 14 1 1 Air Outlet Connector Extension 15 1 Air Outlet Connector 24 1 Connection box 25 Pipe clamps not included 26 2 Cable clamps 27 1 Finishing plug R...

Страница 7: ...ilings with wall thickness of 20 mm drill 10 mm immediately insert the Dowels 11 supplied For wooden beam ceilings drill according to the wood screws used For wooden shelf drill 7 mm For the power sup...

Страница 8: ...rame by turning it Make sure that the screws do not come out of their seats in the slotted holes The frame mountings must be secure to withstand the weight of the hood and any stresses caused by the o...

Страница 9: ...the extension pieces 14 1 is hori zontally and vertically aligned with the chimney outlets Otherwise remove the lower chimney and adjust the position by inverting the extension pieces for air outlet...

Страница 10: ...rmed on the galva nized diffuser support as shown in fig 2 Position the finishing plug 27 over the housing in the diffuser support fixing it us ing a screw 12e 2 9 x 9 5 and applying the 2 cable clamp...

Страница 11: ...for about 2 seconds After 10 minutes of functioning it turns off automatically This function can be interrupted by means of pressing any of the buttons S1 Led Fixed Indicates that the Metal grease fi...

Страница 12: ...al reset Switch off the lights and extractor motor Press button T3 for at least 3 seconds until the leds start to flash Cleaning the filters The filters are washable and must be cleaned when the LED S...

Страница 13: ...D flashes twice Activated charcoal filter saturation alarm ENABLED LED flashes once Activated charcoal filter saturation alarm DISABLED Replacing the activated charcoal filter Alarm signal reset Switc...

Страница 14: ...te Ne pas laisser les flammes libres forte intensit quand la hotte est en service Toujours r gler les flammes de mani re viter toute sortie lat rale de ces derni res par rapport au fond des marmites C...

Страница 15: ...FR 1 5 15 CARACTERISTIQUES Encombrement 650 290 898 70 90 132 433 150 350 740 740 940 572 Min 500mm Min 650mm...

Страница 16: ...0 mm 14 1 Rallonge Sortie Air du Corps de Hotte en 2 moiti s 14 1 1 Rallonge Raccord Sortie de l Air 15 1 Raccord Sortie de l Air 24 1 Bo tier de branchement 25 Colliers de serrage serre tube non comp...

Страница 17: ...vec paisseur r sistante de 20 mm 10 mm in s rer imm diatement les Chevilles 11 fournies avec l appareil Plafond en Poutrage en Bois en fonction des Vis Bois utilis es tag re en Bois 7 mm Passage du C...

Страница 18: ...contr lant que les vis ne sortent pas du logement de l illet de r glage La fixation du Treillis doit tre solide en fonction du poids de la Hotte et des contraintes provoqu es par les pouss es lat ra l...

Страница 19: ...au des bouches de la chemin e aussi bien en horizontal qu en vertical Si tel ne devait pas tre le cas retirer la Chemin e inf rieure et ajus ter la position en inversant les Rallonges Raccord 14 1 ou...

Страница 20: ...upport du diffuseur galva nis comme indiqu dans la fig 2 Placer le bouchon de finition 27 sur le lo gement du support du diffuseur et le fixer l aide d une vis 12e 2 9 x 9 5 et appliquer les deux gain...

Страница 21: ...rs de cuisson Elle peut tre ins r e en pressant pour 2 se condes environ la touche Elle s teint en automatique apr s 10 minutes de fonctionnement On peut l teindre manuellement en pressant n importe q...

Страница 22: ...alarme teindre les Lumi res et le Moteur d aspiration Appuyer sur la touche T3 pendant 3 secondes au moins jus qu au clignotement de confirmation des dels Nettoyage Filtres Ils peuvent tre lav s au la...

Страница 23: ...Del Alarme de saturation Filtre anti odeur au Charbon actif ACTIV E 1 clignotement Del Alarme de saturation Filtre anti odeur au Charbon actif D SACTIV E Remplacement filtre au charbon actif Remise l...

Страница 24: ...alteter Haube niemals unbedeckt lassen Die Intensivit t der Flamme ist so zu regulieren dass sie den Topfboden nicht ber ragt Frittierger te m ssen w hrend des Gebrauchs stets beaufsichtigt werden ber...

Страница 25: ...DE 2 5 25 CHARAKTERISTIKEN Platzbedarf 650 290 898 70 90 132 433 150 350 740 740 940 572 Min 500mm Min 650mm...

Страница 26: ...erung Luftaustritt Haubenk rper bestehend aus 2 Halbschalen 14 1 1 Verl ngerung Anschluss Luftaustritt 15 1 Anschluss Luftaustritt 24 1 Anschlussdose 25 Rohrschellen nicht enthalten 26 2 Kabeldurchg n...

Страница 27: ...Decke aus Hohlkammer Ziegeln mit 20 mm Wandungsst rke 10 mm sofort die mitge lieferten D bel 11 einf gen Holzbalkendecke je nach verwendeten Holzschrauben Holz Tr gerplatte 7 mm Durchgang f r das Spe...

Страница 28: ...f zu achten ist dass die Schrauben nicht aus dem Sitz des Regellang loches austreten Wir verweisen auf die Notwendigkeit einer absolut sicheren Befestigung des Teleskopger sts die sowohl dem Eigenge w...

Страница 29: ...horizontal wie auch vertikal ber einstimmen Sollte dies nicht der Fall sein den unteren Kaminteil entfernen und die Position korrigieren indem die Verl ngerungen 14 1 miteinander vertauscht oder das H...

Страница 30: ...inkten Verteilerhalte rung f hren Das Abschlussst ck 27 an der Verteilerhal terung anbringen und mit einer Schraube 12e 2 9 x 9 5 fixieren Die 2 Kabeldurch gangsgummiteile 26 wie in Abb 3 und 4 darges...

Страница 31: ...wicklung geeignet Wird durch 2 langes Dr cken auf diese Taste aktiviert Nach 10 Minuten schaltet sich das Gebl se automatisch auf die vorher gew hlte Stufe zur ck Kann auch manuell unterbrochen werden...

Страница 32: ...Mindestens 3 Sekunden lang die Taste T3 dr cken bis die Leds zur Best tigung zu blinken beginnen Filterreinigung Die Filter k nnen im Geschirrsp ler gewaschen werden und sind dann zu reinigen wenn di...

Страница 33: ...beginnen 2 maliges Blinken der Leds S ttigungsanzeige Aktivkohle Geruchsfilter AKTIVIERT 1 maliges Blinken der Leds S ttigungsanzeige Aktivkohle Geruchsfilter DEAKTIVIERT Austauschen der Aktivkohle Fi...

Страница 34: ...uada No dejar llamas libres de fuerte intensidad mientras la campana est funcionando Regular siempre las llamas de manera que stas no sobresalgan lateralmente con respecto al fondo de las ollas Contro...

Страница 35: ...ES 3 5 35 CARACTER STICAS Dimensiones 650 290 898 70 90 132 433 150 350 740 740 940 572 Min 500mm Min 650mm...

Страница 36: ...Salida de Aire Cuerpo Campana formada por 2 Semicascos 14 1 1 Extensi n Racor Salida Aire 15 1 Racor Salida Aire 24 1 Caja de conexiones 25 Bra adeiras para tubos no incluido 26 2 Pasacable 27 1 Tap n...

Страница 37: ...tacos para hormig n empleados Cielo de ladrillos huecos con espesor resistente de 20 mm 10 mm inserir r pidamente los Tacos 11 en dotaci n Cielo con vigas de madera seg n los tornillos para madera emp...

Страница 38: ...moviendo el armaz n prestando atenci n a que los tornillos no sobresalgan de la sede del ojal de regulaci n La fijaci n del armaz n debe ser segura hay que considerar el peso de la campana y el esfuer...

Страница 39: ...menea inferior y ajustar la posici n invirtiendo las prolongaciones del racor 14 1 o quitando la prolon gaci n del cuerpo de la campana 14 Si inclu da en la dotaci n correspondiendo con una de las lar...

Страница 40: ...obtenido en el soporte difusor galvanizado como se indica en la figura 2 Posicionar el tap n de acabado 27 en el asiento del soporte difusor y fijarlo con un tornillo 12e 2 9 x 9 5 y aplicar los 2 pa...

Страница 41: ...el pulsante Se apaga automaticamente al cabo de 10 minutos de iniciar el funcionamiento Puede apagarse manualmente apre tando cualquier pulsante S1 Led Fijo Alarma que se ala la saturaci n de los Fil...

Страница 42: ...IGRASA MET LICOS Reset de la se al de alarma Apagar las Luces y el Motor de aspiraci n Apretar el pulsante T3 durante 3 segundos hasta el relampa gueo de confirmaci n de los leds Limpieza de los filtr...

Страница 43: ...b n activo ACTIVADO 1 relampagueo del Led Alarma saturaci n Filtro antiolor al Carb n activo DESACTIVA SUBSTITUCION FILTRO ANTIOLOR AL CARBON ACTIVO Reset de la se al de alarma Apagar las luces y el M...

Страница 44: ...GR 4 4 44 650 mm I 120 mm 650 mm min...

Страница 45: ...GR 4 5 45 650 290 898 70 90 132 433 150 350 740 740 940 572 Min 500mm Min 650mm...

Страница 46: ...20 mm 14 1 2 14 1 1 15 1 24 1 25 26 2 27 1 11 4 10 12c 6 2 9 x 6 5 12e 2 2 9 x 9 5 12f 2 M4 x 80 12g 4 M6 x 80 12h 4 5 2 x 70 12q 4 3 5 x 9 5 21 1 22 8 6 4 23 4 M6 1 12c 7 1a 7 1 22 23 12h 7 1b 2 2 1...

Страница 47: ...GR 4 7 47 21 20 mm 10 mm 11 7 mm 10 mm 4 5 mm 20 mm 12h 12g 22 23...

Страница 48: ...GR 4 8 48 2 2 1 1 150 120 mm o 120 mm 9 25 9 150 120 25 25...

Страница 49: ...GR 4 9 49 14 14 15 14 14 1 15 14 15 14 1 2 12c 2 9 x 6 5 2 12c 2 9 x 6 5 14 1 14 1 14 8a 8b 14 1 2 12f 2 12f A 4 12q 4 22 8b 8a 12c 12c A B 22 12f 12q...

Страница 50: ...GR 5 0 50 3 mm 1 2 27 12e 2 9 x 9 5 2 26 3 4 5 6 24 2 12e 2 9 x 9 5 7 1 2 3 4 5 6 7...

Страница 51: ...GR 5 1 51 0 1 LED L 0 1 T1 0 1 1 T2 T3 T4 2 10 S1 Led 100 200 T4 T3 T2 T1 L S1 2 3 4 I F...

Страница 52: ...GR 5 2 52 1 5 V LR03 AAA T3 3 led led S1 2...

Страница 53: ...GR 5 3 53 led S1 4 1 led 3 T1 led T1 T4 2 Led 1 Led T3 3 led 20 W...

Страница 54: ...RU 5 4 54 650 I 120 650 mm min...

Страница 55: ...RU 5 5 55 650 290 898 70 90 132 433 150 350 740 740 940 572 Min 500mm Min 650mm...

Страница 56: ...120 14 1 2 14 1 1 15 1 24 1 25 26 2 27 1 11 4 10 12c 6 2 9 x 6 5 12e 2 2 9 x 9 5 12f 2 M4 x 80 12g 4 M6 x 80 12h 4 5 2 x 70 12q 4 3 5 x 9 5 21 1 22 8 6 4 23 4 M6 1 12c 7 1a 7 1 22 23 12h 7 1b 2 2 1 2...

Страница 57: ...RU 5 7 57 21 20 10 11 7 10 4 5 20 12h 12g 22 23...

Страница 58: ...RU 5 8 58 2 2 1 1 150 120 120 9 25 9 150 120 25 25...

Страница 59: ...RU 5 9 59 14 14 15 14 14 1 15 14 15 14 1 2 12c 2 9 x 6 5 2 12c 2 9 x 6 5 14 1 14 1 14 8a 8b 14 1 2 12f 2 12f A 4 12q 4 22 8b 8a 12c 12c A B 22 12f 12q...

Страница 60: ...RU 6 0 60 3 1 2 27 12e 2 9 x 9 5 2 26 3 4 5 6 24 2 12e 2 9 x 9 5 7 1 2 3 4 5 6 7...

Страница 61: ...RU 6 1 61 T1 L T1 1 T2 T3 T4 2 10 S1 100 200 T4 T3 T2 T1 L S1 2 3 4 I F...

Страница 62: ...RU 6 2 62 1 5 LR03 AAA 3 3 1 4 S1 2...

Страница 63: ...RU 6 3 63 S1 4 T1 3 T1 1 4 2 1 T3 4 20...

Страница 64: ...SA 6 4 64 65 I 120 650 mm min...

Страница 65: ...SA 6 5 65 650 290 898 70 90 132 433 150 350 740 740 940 572 Min 500mm Min 650mm...

Страница 66: ...20 150 1 9 1 14 1 1 14 1 15 1 24 2 25 2 26 1 27 10 4 11 2 9 6 5 6 12 c 2 9 9 5 3 12 e M4 80 2 12 f M 6 80 4 12 g 5 2 70 4 12 h 9 5 x 3 5 4 12 q 1 21 6 4 4 22 M6 4 23 1 12c 7 1a 7 1 22 23 12h 7 1b 2 2...

Страница 67: ...SA 6 7 67 21 20 10 11 7 10 4 5 20 12 H 4 4 12 G 22 23...

Страница 68: ...SA 6 8 68 2 2 1 1 120 150 120 9 25 9 150 120 25 25...

Страница 69: ...14 15 14 1 14 15 14 15 14 1 12 c 2 9 x 6 5 12 c 2 9 x 6 5 1 14 1 14 14 8 a 8 b 1 14 12f 12f A B 4 12q 4 22 8b 8a 12c 12c A B 22 12f 12q SA 6 8 69...

Страница 70: ...SA 7 0 70 1 2 27 12e 2 9 9 5 26 3 4 5 6 24 12e 2 9 905 7 1 2 3 4 5 6 7...

Страница 71: ...SA 7 1 71 1 0 L 1 0 ON OFF T1 1 0 ON T2 ON T3 ON T4 FIXED FLASHING 10 S1 LED FIXED 100 FLASHING 200 T4 T3 T2 T1 L S1 2 3 4 I F...

Страница 72: ...SA 7 2 72 1 5 LR AAA T3 3 S1...

Страница 73: ...SA 7 3 73 S1 4 T1 T1 T4 T3 3 20...

Страница 74: ......

Страница 75: ......

Страница 76: ...436002315_ver4...

Отзывы: