


JP
2
0
20
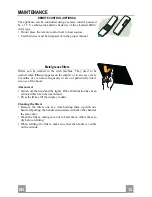
電気接続
•
レンジフードが、外
部
フ
ァ
ンや
給
気
シャ
ッ
タ
ーなどの外
部
換気設
備
と
共
に電気接続
されて使用される場合は、以下の指示にしたがってください。
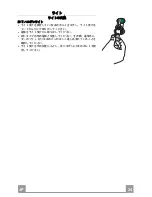
6.
ボ
ル
トを
ゆ
るめてカ
バ
ーをは
ず
してください。
7.
ボ
ル
ト
Vx
を
ゆ
るめて外
部装
置の
A/B
の
線
を
金属製
の
線止
めに通してください。
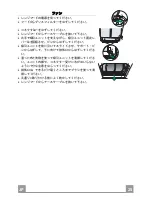
8.
アース
線
の接続が必要な場合は、
C
の
線
をも
線止
めに通し、さらに
緑/黄色
の
線
の
位
置にある
端
子ボードに接続させてください。
9.
外
部装
置の
線
(外
部
換気設
備
出力
連
動
線
A/B
)を、
オ
レンジ
色
の
線
の
位
置にあ
る
端
子ボードに接続させてください。
10.
ボ
ル
ト
Vx
を
締
め、カ
バ
ーを
元
通りに取り付けてください。
•
レンジフードの
緑/黄色
のアース
線
に家庭のアース
線
を接続してください。
•
レンジフードを主要電源に接続してください。
(
重
要)外
部
換気設
備
の最
大
電力
―1
00
W
A
B
C
Vx
Содержание Stilo Isola
Страница 1: ...Stilo Isola...
Страница 3: ...JP 3 3 15 16 18 22 23...
Страница 5: ...EN 5 5 CHARACTERISTICS Dimensions...
Страница 15: ...JP 1 5 15 120mm 2...
Страница 16: ...JP 1 6 16...
Страница 18: ...JP 1 8 18 21 20mm 10mm 11 7mm 10mm 2 4 5mm 20mm 12h 12g 22 23...
Страница 19: ...JP 1 9 19 2 2 2 8 8 2 2 1 1 150mm 150mm 10 10 150 25...
Страница 20: ...JP 2 0 20 6 7 Vx A B 8 C 9 A B 10 Vx A B C Vx...
Страница 23: ...JP 2 3 23 LR03 AAA 1 5V FF 2 24h function E...
Страница 24: ...JP 2 4 24 20 W 2 2 2...
Страница 25: ...JP 2 5 25 Ca Lb Ca Lb...
Страница 26: ......
Страница 27: ......