


EN
9
9
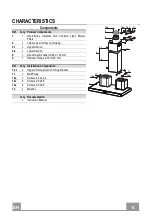
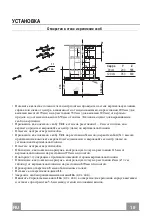
Hood body installation
• Before hooking the hood body it is necessary to tighten 2 Vr
screws placed in the fixing points of the body.
• Hook the hood body on the 12a screws.
• Tighten completely 12a support screws.
• The correct hood body position can be levelled with Vr screws.
• Fix the hood definitively by tightening the 12a screw together
with the 13 washer in the security hole.
12a
Vr
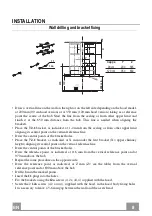
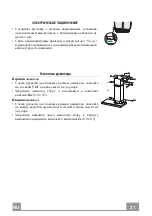
Connections
DUCTED VERSION AIR EXHAUST SYSTEM
When installing the ducted version, connect the hood to the
chimney using either a flexible or rigid pipe ø 150 or 120 mm,
the choice of which is left to the installer.
• To install a ø 120 mm air exhaust connection, insert the
reducer flange
9
on the hood body outlet.
• Fix the pipe in position using sufficient pipe clamps (not
supplied).
• Remove possible charcoal filters.
9
ø 120
ø 150
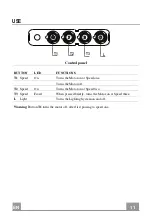
RECIRCULATION VERSION AIR OUTLET
• Cut a hole ø 125 mm in any shelf that may be positioned over
the hood.
• Insert the reducer flange
9
on the hood body outlet.
• Connect the flange to the outlet on the shelf over the hood by
using a flexible or rigid pipe ø120 mm.
• Fix the pipe in position using sufficient pipe clamps (not
supplied).
• Fix the air outlet grid
8
on the recirculation air outlet by using
the 2 screws
12e
(2,9 x 9,5) provided.
• Ensure that the activated charcoal filters have been inserted.
9
ø 125
8
12e
Содержание STILO DX/SP A90
Страница 1: ...Instruction Manual...
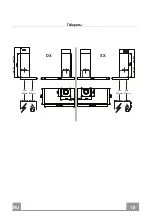
Страница 7: ...EN 7 7 Dimensions SX DX min 730 max 1000 min 730 max 1000 Min 500mm Min 650mm Min 500mm Min 650mm...
Страница 14: ...RU 1 4 14 650 I 120 0 04 2...
Страница 15: ...RU 1 5 15 3 8...
Страница 16: ...RU 1 6 16 2 4...
Страница 18: ...RU 1 8 18 SX DX min 730 max 1000 min 730 max 1000 Min 500mm Min 650mm Min 500mm Min 650mm...
Страница 20: ...RU 2 0 20 2 Vr 12a 12 Vr 12 13 12a Vr 150 120 120 9 9 120 150 125 9 120 8 2 12e 2 9 x 9 5 9 125 8 12e...
Страница 21: ...RU 2 1 21 3 7 2 1 4 12c 2 9 x 9 5 2 12c 2 9 x 9 5 2 1 2 2 7 2 1 12c 12c...
Страница 22: ...RU 2 2 22 T2 T1 L T3 T1 T2 T3 L T1...
Страница 23: ...RU 2 3 23 2 4...
Страница 25: ......
Страница 26: ......
Страница 27: ......
Страница 28: ...436005061_ver3...


