Faber PELLICANO Cabinet Rangehood Скачать руководство пользователя страница 7

Version 07/11 - Page 7

Rangehood Control Panel

The control panel is located on the front edge of the rangehood.  

The position and function of each control button are indicated 

in 

FIGURE 9

.

Light On/Off Button ( L )

On/Off switch for the halogen  lights.    Push the button in to 

turn the light ON, push again to turn the light OFF.

Blower Indicator Light  ( I )

Lights up to indicate blower is ON.

Blower On/Off and Speed Buttons ( 1, 2, 3 )

Push button (1) to turn ON and OFF the blower.  This button 

must be pushed in for the blower to operate regardless of 

speed chosen.  Button (1) operates the blower on LOW 

speed.  Push button (2) for MEDIUM speed.  Push button 

(3) for HIGH speed.

Cleaning

The stainless steel grease filters should be cleaned frequently 

in hot detergent solution or washed in the dishwasher.   Clean 

exterior  surfaces  with  a  commercially  available  stainless 

steel cleaner.  Abrasives and scouring agents can scratch 

stainless  steel  finishes  and  should  not  be  used  to  clean 

finished surfaces.

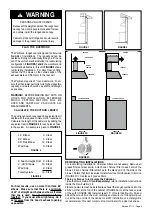
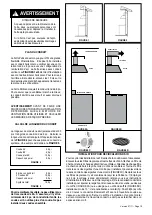
Replacing the Halogen Lamps

Before you begin, make sure that the rangehood is turned 

off and that the other lamps have had sufficient time to cool.  

Halogen bulbs burn extremely hot and serious injury could 

result from touching a hot bulb.  To replace the lamp, pull 

from it's socket and reinsert new bulb.

An alternative method to replace the lamps is to use a 1 

1/4" suction cup (

FIGURE 10

). Attach the suction cup to 

the bulb and pull firmly down on the bulb and replace with 

a new lamp.  

• This rangehood uses 20 watt halogen lamps.
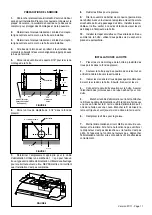
WIRING  DIAGRAM

FIGURE 9

USE  AND  CARE  INFORMATION

This rangehood system is designed to remove smoke, cooking 

vapors and odors from the cooktop area.

For Best Results

Start the rangehood several minutes before cooking to develop 

proper airflow.  Allow the unit to operate for several minutes 

after cooking is complete to clear all smoke and odors from the 

kitchen.

0

1

2

3

4

5

6

7

8

9

Cr

ea

to

 d

a.

R

ev

 :

Ve

:

D

O

LC

C

O

R

R

AD

O

Mate

rial

i: 

no

de

ve

no

 co

nte

ne

re

 P

b,

 Cr6+

H

g,

 P

BB

pb

de

ai

 se

nsi

 d

el

la

 d

ire

tti

va 

2002/95 

CE

SC

H

EM

EL

ET

T.

M

8-

4V

 3

PU

LS

.S

AL

D

FA

R

U

L

N

on

 r

ile

va

re

 q

uo

te

 d

al 

gr

af

ic

no

ap

po

rta

re

 m

od

ific

he

 s

en

za

 l'a

uto

riz

za

zio

ne

 d

'u

ff

ic

io

 p

ro

ge

tta

zio

ne

te

rm

in

i d

i le

gg

ci 

ris

er

via

m

la

 p

ro

pr

ie

ta

' d

el 

pr

es

en

te

 d

is

eg

no

 c

on

 d

iv

ie

to

 d

i r

ip

ro

du

zio

ne

 to

ta

le

 o

 p

ar

zia

le

Co

de

 :

D

is

eg

no

 N

 :

D

at

a:

15

.S

et

.2

01

0

43

60

05

05

7

H

90

_0

56

BLK

WH

T

Y-G

W

IR

IN

G

 B

O

X

W

H

T

BL

K

N

L

Y-G

LI

N

IN

120Vac

60Hz 

~

FABER

R

1

SW

4

SW

3

SW

2

SW

1

LP

1

N

WH

T

BLU

A

BLU

1
2
3

6

5

4

7
8
9

1

2

3

6
5
4

9
8

7

RED

M8 

4V

120V 

~

WH

T

BR

W

BLU

L

BR

W

0-

1

BLK

OR

G

Y-G

G

R

GR

Y

M

ID

BK/BR

BLK

M

A

X

W

H

/O

OR

G

V

RED

0-

LI

G

H

T

R

VLT

TOROID

AL

TR

AN

SF

O

R

M

ER

WH

T

4

3

BLK

RED

2

1

BLK

RED

2

1

RED

VLT

4

3

VLT

H

AL

O

G

EN

LA

M

PS

FU

SE

FIGURE 10

FUSE REPLACEMENT (IF NEEDED)

FUSE: Model 5 X 20 5A time delay

1. Remove the filters

2. Remove the screws fixing the fuseholder box.

3. Open the fuseholder (bayonet fixing)

4. Replace the fuse with another of the same type

5. Replace the fuseholder box and the filters

Содержание PELLICANO Cabinet Rangehood

Страница 1: ...ad cabinets on both sides of this unit must be a minimum of 18 above the cooking surface or countertop Consult the cooktop or range installation instructions given by the manufacturer before making an...

Страница 2: ...ugh wood must be sanded until smooth A hole through metal must have a grommet WARNING TO REDUCE THE RISK OF FIRE OR ELEC TRIC SHOCK do not use this fan with any solid state speed control device WARNIN...

Страница 3: ...pareils combustion Suivez les conseils et mesuresdes curit dufournisseurtelsqueceuxpubli s par l Association Nationale de la Sauvegarde contre l Incendie et l Association Am ricaine d Ing nieurs de Ch...

Страница 4: ...tors Power Supply Cable 1 Wall or Roof Cap All Metal Ductwork OPTIONAL ACCESSORIES AVAILABLE Charcoal Filter Kit For recirculating installations only replace charcoal filters as needed part FILTER1 24...

Страница 5: ...and straight as possilbe WARNING BEFORE MAKING ANY CUTS OR HOLES FOR INSTALLATION DETERMINE WHICH VENTING METHOD WILL BE USED AND CAREFULLY CALCULATE ALL MEASUREMENTS FIGURE 1 FIGURE 2 ceiling enclos...

Страница 6: ...train relief in power supply cable opening so that clamping screws are inside of rangehood 10 Attach damper to exhaust opening on top of the range hood using the two small screws from the hardware pac...

Страница 7: ...e suction cup to the bulb and pull firmly down on the bulb and replace with a new lamp This rangehood uses 20 watt halogen lamps WIRING DIAGRAM FIGURE 9 USE AND CARE INFORMATION Thisrangehoodsystemisd...

Страница 8: ...umbing 2 Service calls to repair or replace range hood light bulbs fuses or filters Those consumable parts are excluded from warranty coverage 3 Repairs when your range hood is used for other than nor...

Страница 9: ...de conduit C ble d alimentation 1 capuchon de mur ou de toit Conduit en m tal ACCESSOIRES POUR L INSTALLATION Filtres au Charbon Pour installation sans conduit part FILTER1 Recyclage du kit 4 gril de...

Страница 10: ...pas installer deux coudes ensemble INSTALLATION POUR RECIRCULATION D AIR FIGURE 1 FIGURE 2 plafond sof t inclus vue de c t hotte cuisine de la surface l armoire plafond l espace ouvert vue de c t hott...

Страница 11: ...r le trou veiller ce qu il soit facile de visser les vis de bridage l int rieur de la hotte 10 Installer le clapet anti reflux sur l ouverture de sortie au sommet de la hotte utiliser deux petites vis...

Страница 12: ...tigner le fini en acier inoxydable et ils ne devraient pas tre employ s pour nettoyer les surfaces de finition Remplacement de la lumi re halog ne Avant d essayer de remplacer les ampoules s assurer q...

Страница 13: ...r les fusibles de votre maison ou pour corriger votre c blage ou votre syst me de plomberie 2 Les appels de service pour remplacer ou r parer les ampoules les fusibles ou les filtres de votre hotte de...

Страница 14: ......

Отзывы: