


Version 07/11 - Page 4
TOOLS NEEDED FOR INSTALLATION
• Saber Saw or Jig Saw
• Drill
• 1 1/4" Wood Drill Bit
• Scissors
• Pliers
• Phillips Screwdriver
• Flat Blade Screwdriver
• Wire Stripper or Utility Knife
• Metal Snips
• Measuring Tape or Ruler
• Level
• Pencil
• Caulking Gun
• Duct Tape
PARTS SUPPLIED FOR INSTALLATION
• 1 Hardware Package
• 1 Literature Package
PARTS NEEDED FOR INSTALLATION
• 2 Conduit Connectors
• Power Supply Cable
• 1 Wall or Roof Cap
• All Metal Ductwork
OPTIONAL ACCESSORIES AVAILABLE
•
Charcoal Filter Kit
For recirculating installations only,
replace charcoal filters as needed
part # FILTER1
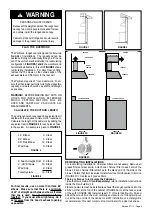
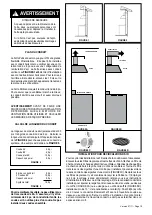
24” minimum
30” suggested maximum
bottom of hood to cooking surface
18” minimum
clearance upper
cabinet to
countertop
36”
70
5/16”
minimum
76
5/16”
maximum
to bottom of cabinet frame
24” or 30” or 36”
cabinet opening width
INSTALLATION CLEARANCES
PRODUCT DIMENSIONS
• Recirculating Kit (4" tall recirculation grill + charcoal filter)
- part# DUCTGRT30 for Pellicano 30"
- part# DUCTGRT36 for Pellicano 36"
Содержание PELLICANO Cabinet Rangehood
Страница 14: ......


