


12
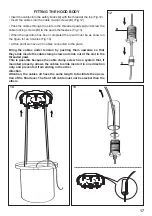
• Unfasten the 3 screws of 1.3 that join the parts of the Plate (of different shapes and/or sizes) using the
wrench provided.
• Insert the lamp holders
(12f)
in the position indicated in the figure 1.2, and secure them using the nuts.
• Take the Pawl
(14)
and secure it to the ceiling plate on the bracket in the position indicated in figure 1.3
using the Screw
(12g)
provided.
• Tighten the Screw fixing the bulb holders to the bracket, in such a way as to hold the latter between the
2 washers.
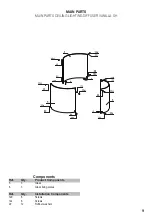
Sequence of operations - Installation
Preparing for installation:
• Preparation of the ceiling plate
• Drilling the ceiling to fix the ceiling plate
• Fixing the ceiling plate
• Connecting hood-plate cables
• Fitting the hood body
• Levelling the hood
• Electrical connections
• Disposal of packaging
Preparation of the ceiling plate
1
1.1
1.2
1.3
12f
14
12g


