EN
9
9
RECOMMENDATIONS AND SUGGESTIONS
The Instructions for Use apply to several versions of this appliance. Ac-
cordingly, you may find descriptions of individual features that do not ap-
ply to your specific appliance.
INSTALLATION
• The manufacturer will not be held liable for any damages resulting from
incorrect or improper installation.
• Check that the mains voltage corresponds to that indicated on the rating
plate fixed to the inside of the hood.
• For Class I appliances, check that the domestic power supply guarantees
adequate earthing.
• Connect the extractor to the exhaust flue through a pipe of minimum di-
ameter 120 mm. The route of the flue must be as short as possible.
• Do not connect the extractor hood to exhaust ducts carrying combustion
fumes (boilers, fireplaces, etc.).
• If the extractor is used in conjunction with non-electrical appliances (e.g.
gas burning appliances), a sufficient degree of aeration must be guaran-
teed in the room in order to prevent the backflow of exhaust gas. The
kitchen must have an opening communicating directly with the open air in
order to guarantee the entry of clean air.
USE
• The extractor hood has been designed exclusively for domestic use to
eliminate kitchen smells.
• Never use the hood for purposes other than for which it has ben designed.
• Never leave high naked flames under the hood when it is in operation.
• Adjust the flame intensity to direct it onto the bottom of the pan only, mak-
ing sure that it does not engulf the sides.
• Deep fat fryers must be continuously monitored during use: overheated oil
can burst into flames.
• Do not flambè under the range hood; risk of fire
• This appliance is not intended for use by persons (including children) with
reduced physical, sensory or mental capabilities, or lack of experience
and knowledge, unless they have been given supervision or instruction
concerning use of the appliance by a person responsible for their safety.
• Children should be supervised to ensure that they do not play with the
appliance.
MAINTENANCE
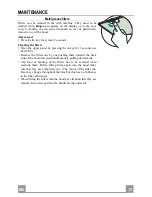
• Switch off or unplug the appliance from the mains supply before carrying
out any maintenance work.
• Clean and/or replace the Filters after the specified time period.
• Clean the hood using a damp cloth and a neutral liquid detergent.
Содержание Mirror WH PRO X-V A80
Страница 1: ...Instructions Manual Manuel d Instructions Bedienungsanleitung Manual de instrucciones...
Страница 6: ...GR 6 6 53 54 56 59 61...
Страница 7: ...RU 7 7 64 65 67 70 72...
Страница 8: ...SA 8 8 75 76 78 81 84...
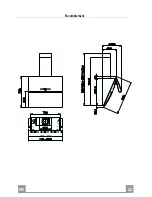
Страница 11: ...EN 1 1 11 Dimensions...
Страница 22: ...FR 2 2 22 Encombrement...
Страница 33: ...DE 3 3 33 Platzbedarf...
Страница 44: ...ES 4 4 44 Dimensiones...
Страница 53: ...GR 5 3 53 I 120 mm...
Страница 55: ...GR 5 5 55...
Страница 57: ...GR 5 7 57 Vr 11a B 11a 3mm 1 A Vr 11 1 L B L A 11a Vr 11 o150 120 mm o120 mm 9 150 9 120...
Страница 59: ...GR 5 9 59 A 1 B C D 10 I E 100 m3 h I F 30 G Reset 2 100 200 C H 5 I 1 L 1 1 5 F Delay B A D C E G F I H L...
Страница 60: ...GR 6 0 60 1 5 V LR03 AAA T1 T2 T3 2 T4 2 T5 2 T6 T7 Delay 24h 2 24 T1 T6 T2 T3 T4 T5 T7...
Страница 61: ...GR 6 1 61 2 G 2 1 A...
Страница 62: ...GR 6 2 62 C 4 E 5 E 3 D C C G 2 1 A A B A B 20 W...
Страница 63: ...GR 6 3 63...
Страница 64: ...RU 6 4 64 I 120...
Страница 66: ...RU 6 6 66...
Страница 68: ...RU 6 8 68 Vr 11a B 2 11a 3 1 Vr 11 L 1 B L A 11a Vr 11 150 120 120 9 150 9 120...
Страница 70: ...RU 7 0 70 A 1 B C D 10 I 100 24 F 30 G 2 100 200 5 I 1 L 1 3 1 F 5 B A D C E G F I H L...
Страница 71: ...RU 7 1 71 1 5 LR03 AAA T1 T2 T3 2 T4 2 T5 2 T6 T7 24 2 24 T1 T6 T2 T3 T4 T5 T7...
Страница 72: ...RU 7 2 72 G 2 1...
Страница 73: ...RU 7 3 73 4 5 3 D G 2 1 A B 20...
Страница 74: ...RU 7 4 74...
Страница 75: ...SA 7 5 75 I 120...
Страница 77: ...SA 7 7 77...
Страница 79: ...SA 7 9 79 Vr 11 a B 11 a 3 A Vr 11 L B L A 11a Vr 11 120 150 120 9 150 9 120...
Страница 80: ...SA 8 0 80 12c 2 9 12 5 5 8 12d 2 9 9 5 16 12c 12d 8 A 7 2 1 4 12 C 2 9 x 9 5 12c 2 1 2 2 2 7 2 1 12c...
Страница 81: ...SA 8 1 81 on off A B C I 10 D 24 100 3 E 30 F 100 C 200 G H on off I L F B A D C E G F I H L...
Страница 82: ...SA 8 2 82 1 5 LR AAA T1 on off T2 T3 on off T4 T5 T6 T7 24 24 T1 T6 T2 T3 T4 T5 T7...
Страница 83: ...SA 8 3 83 G A...
Страница 84: ...SA 8 4 84 C 4 E 5 E D 3 C C G A A B A B 20...
Страница 85: ...SA 8 5 85...
Страница 86: ......
Страница 87: ......


