


FR
2
9
29
Filtres anti-odeur au charbon actif (version filtrante)
Il ne peut être ni lavé ni récupéré, il faut le changer quand le symbole C s’affiche ou au moins
tous les 4 mois. Il faut tout d’abord activer le signal d’alarme.
Activation du signal d’alarme
• Pour les hottes en version filtrante, l’alarme indiquant la saturation des filtres doit être acti-
vée au moment de l’installation ou ultérieurement.
• Éteindre les lumières et le moteur d’aspiration.
• Appuyer sur la touche E pendant 5 sec. environ, jusqu’à ce que les deux derniers segments
et toute la ligne en pointillés de la barre Moteur s’allument sur l’afficheur.
• Relâcher la touche E, l’icône “Horloge” commencera à clignoter.
• Appuyer sur la touche D dans les 3 secondes qui suivent pour activer/désactiver les filtres
au C.A.
• Le symbole C s’allume : alarme de saturation du filtre au C.A. ACTIVÉE
• Le symbole C s'éteint : alarme de saturation du filtre au C.A. DÉSACTIVÉE
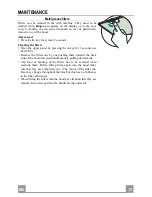
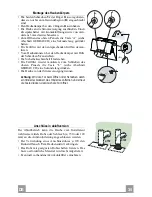
REMPLACEMENT DU FILTRE ANTI-ODEUR AU CHARBON ACTIF
Rétablissement du signal d’alarme
• Appuyer sur la touche G pendant au moins 2 secondes.
Remplacement du Filtre
• Si la porte est fermée, appuyer sur la touche A pendant environ
1 seconde pour l’ouvrir (Voir EMPLOI).
• Retirer les Filtres à graisse.
• Retirer les filtres anti-odeur au charbon actif saturés, selon les
indications (A).
• Placer les nouveaux filtres, selon les indications (B).
• Remonter les Filtres à graisse.
A
B
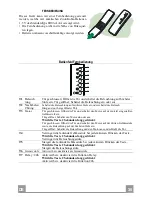
Eclairage
REMPLACEMENT LAMPES
Lampe halogène de 20 W.
• Sortir la Lampe de la Douille en exerçant une légère traction.
• Remplacer par une nouvelle lampe possédant les mêmes carac-
téristiques, en veillant à ce que les deux fiches soient correc-
tement insérées dans le logement de la Douille.
Содержание Mirror WH PRO X-V A80
Страница 1: ...Instructions Manual Manuel d Instructions Bedienungsanleitung Manual de instrucciones...
Страница 6: ...GR 6 6 53 54 56 59 61...
Страница 7: ...RU 7 7 64 65 67 70 72...
Страница 8: ...SA 8 8 75 76 78 81 84...
Страница 11: ...EN 1 1 11 Dimensions...
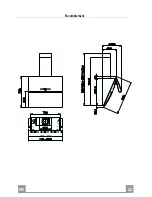
Страница 22: ...FR 2 2 22 Encombrement...
Страница 33: ...DE 3 3 33 Platzbedarf...
Страница 44: ...ES 4 4 44 Dimensiones...
Страница 53: ...GR 5 3 53 I 120 mm...
Страница 55: ...GR 5 5 55...
Страница 57: ...GR 5 7 57 Vr 11a B 11a 3mm 1 A Vr 11 1 L B L A 11a Vr 11 o150 120 mm o120 mm 9 150 9 120...
Страница 59: ...GR 5 9 59 A 1 B C D 10 I E 100 m3 h I F 30 G Reset 2 100 200 C H 5 I 1 L 1 1 5 F Delay B A D C E G F I H L...
Страница 60: ...GR 6 0 60 1 5 V LR03 AAA T1 T2 T3 2 T4 2 T5 2 T6 T7 Delay 24h 2 24 T1 T6 T2 T3 T4 T5 T7...
Страница 61: ...GR 6 1 61 2 G 2 1 A...
Страница 62: ...GR 6 2 62 C 4 E 5 E 3 D C C G 2 1 A A B A B 20 W...
Страница 63: ...GR 6 3 63...
Страница 64: ...RU 6 4 64 I 120...
Страница 66: ...RU 6 6 66...
Страница 68: ...RU 6 8 68 Vr 11a B 2 11a 3 1 Vr 11 L 1 B L A 11a Vr 11 150 120 120 9 150 9 120...
Страница 70: ...RU 7 0 70 A 1 B C D 10 I 100 24 F 30 G 2 100 200 5 I 1 L 1 3 1 F 5 B A D C E G F I H L...
Страница 71: ...RU 7 1 71 1 5 LR03 AAA T1 T2 T3 2 T4 2 T5 2 T6 T7 24 2 24 T1 T6 T2 T3 T4 T5 T7...
Страница 72: ...RU 7 2 72 G 2 1...
Страница 73: ...RU 7 3 73 4 5 3 D G 2 1 A B 20...
Страница 74: ...RU 7 4 74...
Страница 75: ...SA 7 5 75 I 120...
Страница 77: ...SA 7 7 77...
Страница 79: ...SA 7 9 79 Vr 11 a B 11 a 3 A Vr 11 L B L A 11a Vr 11 120 150 120 9 150 9 120...
Страница 80: ...SA 8 0 80 12c 2 9 12 5 5 8 12d 2 9 9 5 16 12c 12d 8 A 7 2 1 4 12 C 2 9 x 9 5 12c 2 1 2 2 2 7 2 1 12c...
Страница 81: ...SA 8 1 81 on off A B C I 10 D 24 100 3 E 30 F 100 C 200 G H on off I L F B A D C E G F I H L...
Страница 82: ...SA 8 2 82 1 5 LR AAA T1 on off T2 T3 on off T4 T5 T6 T7 24 24 T1 T6 T2 T3 T4 T5 T7...
Страница 83: ...SA 8 3 83 G A...
Страница 84: ...SA 8 4 84 C 4 E 5 E D 3 C C G A A B A B 20...
Страница 85: ...SA 8 5 85...
Страница 86: ......
Страница 87: ......


