Faber INLT28SSV Скачать руководство пользователя страница 14

14

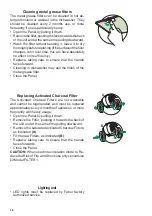
Cleaning metal grease filters

The metal grease filters can be cleaned in hot de

-

tergent solution or washed in the dishwasher. They 

should be cleaned every 2 months use, or more 

frequently if use is particularly heavy. 

•  Open the Panel by pulling it down.

• 

Remove the filter, pushing the lever towards the back 

of the unit and at the same time pulling downward.

• 

Wash the filter without bending it, leave it to dry 

thoroughly before replacing (if the surface of the filter 

changes color over time, this will have absolutely 

no effect on its efficiency).

•  Replace, taking care to ensure that the handle 

faces forward.

• 

Cleaning in dishwasher may dull the finish of the 

metal grease filter.

•  Close the Panel.

Replacing Activated Charcoal Filter

The Activated Charcoal Filters are not washable 

and cannot be regenerated, and must be replaced 

approximately every 4 months of operation, or more 

frequently with heavy usage.

•  Open the Panel by pulling it down.

•  Remove the Filter, pushing it towards the back of 

the unit and at the same time pulling downward.

•  Remove the saturated Activated Charcoal Filters, 

as indicated 

(A)

•  Fit the new Filters, as indicated 

(B)

.

•  Replace, taking care to ensure that the handle 

faces forwards.

•  Close the Panel.

CAUTION: 

When used in recirculation mode, to Re-

duce the Risk of Fire and Shock use only conversion 

kit Model FILTER 1.

Lighting unit

•  LED lights must be replaced by Faber factory 

authorized service.

EN 

77

INSTALLATION


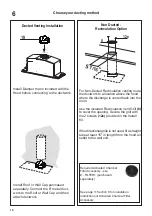
Fitting the Hood canopy 

BEFORE FITTING THE HOOD TO THE WALL UNIT, PROCEED AS FOLLOWS: 

• Disconnect the wires to the Commands at the connectors.


• Disconnect the wires to the Light at the con-

nectors.

• The Hood can be installed directly on the

underside of the wall unit (Minimum 650 mm

from the Cooker Hob).

• Create an opening in the bottom of the wall unit,

as shown.

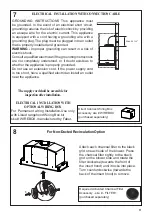
• Insert the hood until the side supports snap into

place.

• Fasten using the 10 screws 

12a

 provided.

• Lock in position by tightening the screws 

Vf

 from

underneath the hood.


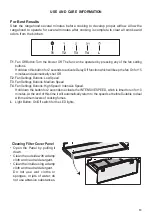
• Open the suction panel by turning the specific knob.

• Disconnect the panel from the hood canopy by sliding the

fixing pin lever.

• Remove grease filters.

• Screw the Frame into place

using the 6 screws 

12f

, re-

connect the wires to the

Commands and Light, re-

place the metal grease filter

and the Panel.

260

13

495 - 675

Содержание INLT28SSV

Страница 1: ...INLT28SS600 Installation Instructions Use and Care Information Instructions d installation Utilisez et d entretien Instrucciones de instalaci n Informaci n de uso y cuidado IN LIGHT...

Страница 2: ...with your back to an exit Based on Kitchen Firesafety Tips published by NFPA WARNING TO REDUCE THE RISK OF FIRE OR ELECTRIC SHOCK do not use this fan with any solid state speed control device WARNING...

Страница 3: ...tilation air Failure to follow venting requirements may result in a fire WARNING Cold Weather installations An additional back draft damper should be installed to minimize backward cold air flow and a...

Страница 4: ...ld be connected directly to the fused disconnect or circuit breaker through flexible armored or nonmetallic sheathed copper cable Allow some slack in the cable so the appliance can be moved if servici...

Страница 5: ...5 RANGEHOOD DIMENSIONS Min 24 Min 30 5 7 8 22 3 16 Min 2 3 8 Max 2 3 4 8 11 16 3 7 8 10 7 16 26 9 16 11 1 4 10 3 16 27 9 16 2 5 8 9 1 16...

Страница 6: ...mounting Qty Documentation 1 Instruction Manual Available Accessories Parts needed 6 Round Metal ductwork Direct Connect Wiring Box sku number WIREBOX Standard Liner 30 LINE30ST Standard Liner 36 LINE...

Страница 7: ...r Top 6 Install the rangehood 1 Non Ducted Recirculation Option Ducted Venting Installation Options 10 1 4 26 5 8 13 16 The Hood can be installed directly on the underside of the wall unit Minimum 24...

Страница 8: ...8 12a 4x 2 2x 2 3 6 5 Z Z 4 Fix the brackets with two screws as shown Remove the grease filters Open the filter panel cover by pulling it 1 11 16 1 3 8 3 15 16...

Страница 9: ...2x 3 2x 5 Insert the hood until the side supports snap into place Lock in position by tightening the screws Vf from underneath the hood Insert the Covers 3 in each of the two screws openings as shown...

Страница 10: ...hased separately See page 11 Section 8 for installation instructions of Activated Charcoal Filter Accessory Non Ducted Recirculation Option For Non Ducted Recirculation venting route the ductwork to a...

Страница 11: ...ust be plugged into an outlet that is properly installed and grounded WARNING Improper grounding can result in a risk of electric shock Consult a qualified electrician if the grounding instructions ar...

Страница 12: ...12 Replace the grease filters removed previously 9 10 Close the filter panel cover by pushing it back into place until the latch mechanism has secured it...

Страница 13: ...15 minutes and automatically shut Off T2 Fan Settings Buttons Low Speed T3 Fan Settings Buttons Medium Speed T4 Fan Settings Buttons High Speed Intensive Speed Hold down the button for 2 seconds to a...

Страница 14: ...ctivated Charcoal Filter The Activated Charcoal Filters are not washable and cannot be regenerated and must be replaced approximately every 4 months of operation or more frequently with heavy usage Op...

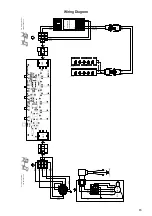
Страница 15: ...15 Wiring Diagram...

Страница 16: ...om accident alteration misuse abuse fire flood acts of God improper installation installation not in accordance with electrical or plumbing codes or Faber documentation or use of products not approved...

Страница 17: ...nevoiedesortiesetrouvederri revouspendantquevous teignezlesflammes D apr sleguide KitchenFiresafetyTips publi parlaNFPAaux tats Unis AVERTISSEMENT POURR DUIRELERISQUED INCENDIEOUDECHOC LECTRIQUE n uti...

Страница 18: ...ns afin de scellertouslesjointsdusyst medeconduits Utilisezuncalfeutragepourscellerlesouverturesdans le mur ext rieur ou le plancher autour du clapet Iln estpasrecommand d utiliserdesconduitsflexibles...

Страница 19: ...ionneur fusible ou au disjoncteur par un c ble flexible de cuivre avec blindage ou gaine non m tallique Laissez un peu de jeu dans le c ble pour permettre le d placement de l appareil si des travaux d...

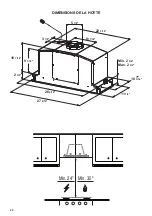
Страница 20: ...20 DIMENSIONS DE LA HOTTE 5 7 8 22 3 16 Min 2 3 8 Max 2 3 4 8 11 16 3 7 8 10 7 16 26 9 16 11 1 4 10 3 16 27 9 16 2 5 8 9 1 16 Min 24 Min 30...

Страница 21: ...3 8 pour le montage de la grille d vent de recyclage Qt Documentation 1 Mode d emploi Accessoires disponibles Pi ces requises Conduit m tallique 6 circulaire Bo tier de connexion directe no d article...

Страница 22: ...r la hotte 1 Option non canalis e avec recyclage d air Options d installation avec ventilation canalis e 10 1 4 26 5 8 13 16 La hotte peut tre install e directement sur la face inf rieure de l unit mu...

Страница 23: ...23 2 3 6 5 Z Z 4 Fixez les brides de fixa tion l aide de deux vis comme illustr Retirez les filtres graisse Ouvrez le panneau de protection du filtre en le tirant 12a 4x 2 2x 1 11 16 1 3 8 3 15 16...

Страница 24: ...x 3 2x 5 Ins rez la hotte jusqu ce que les appuis lat raux s enclenchent Verrouillez en serrant les vis Vf du dessous de la hotte Ins rez les capuchons 3 dans chacune des deux ouvertures comme illustr...

Страница 25: ...s par ment Consultez les instructions d installation du filtre charbon actif accessoire la page 26 Section 8 Option non canalis e avec recyclage d air Pour la ventilation avec recyclage sans canalisat...

Страница 26: ...rectement install e et mise la terre AVERTISSEMENT Une mise la terre inad quate peut entra ner un choc lectrique Consultezun lectricienqualifi sivousnecomprenezpas parfaitement les instructions de mis...

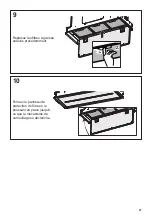
Страница 27: ...27 Replacez les filtres graisse enlev s pr c demment 9 10 Fermez le panneau de protection du filtre en le poussant en place jusqu ce que le m canisme de verrouillage se d clenche...

Страница 28: ...iquement le ventilateur apr s 15 minutes de marche T2 Boutons de r glage du ventilateur vitesse r duite T3 Boutons de r glage du ventilateur vitesse moyenne T4 Boutons de r glage du ventilateur Vitess...

Страница 29: ...du filtre charbon actif Les filtres charbon actif ne sont pas lavables et ne peuvent tre r g n r s Ils doivent tre remplac s environ tous les 4 mois d utilisation ou plus souvent en cas d utilisation...

Страница 30: ...30 Sch ma de c blage...

Страница 31: ...es d coulant d un accident d une modification de l utilisation incorrecte ou abusive d un incendie d une inondation d un cas de force majeure d une installation inad quate d une installation non confo...

Страница 32: ...cia una salida Basado en Consejos para luchas contra los incendios en las cocinas publicado por NFPA ADVERTENCIA PARAREDUCIRELRIESGODEDESCARGASEL CTRICASOINCEN DIOS nouseesteventiladorconning ndisposi...

Страница 33: ...beseruniforme Noinstaledoscodosjuntos Use cinta adhesiva para sellar todas las juntas en el sistema de conductos Utilice calafateo para sellar la pared exterior o la abertura del piso alrededor de la...

Страница 34: ...tamente a la desconexi n de fusible o disyuntor a trav s de un cable de cobre flexible blindado o no met lico Deje un poco de holgura en el cable para que el aparato pueda moverse si es necesario real...

Страница 35: ...35 DIMENSIONES DE LA CAMPANA 5 7 8 22 3 16 Min 2 3 8 Max 2 3 4 8 11 16 3 7 8 10 7 16 26 9 16 11 1 4 10 3 16 27 9 16 2 5 8 9 1 16 Min 24 Min 30...

Страница 36: ...laci n Cdad Documentaci n 1 Manual de instrucciones Accesorios disponibles Piezas necesarias Conductos met licos redondos de 6 N mero de SKU de la caja de cableado de conexi n directa WIREBOX LINE30ST...

Страница 37: ...stale la campana 1 Opci n de recirculaci n sin conducto Opciones de instalaci n con ventilaci n con conducto 10 1 4 26 5 8 13 16 Lacampanasepuedeinstalardirectamente en la parte inferior de la unidad...

Страница 38: ...38 2 3 6 5 Z Z 4 Fije los soportes con dos tornillos como se muestra Retire los filtros antigrasa Abra la tapa del panel del filtro tirando de ella 12a 4x 2 2x 1 11 16 1 3 8 3 15 16...

Страница 39: ...campana hasta que los soportes laterales encajen en su lugar Bloquee la posici n apretando los tornillos Vf desde debajo de la campana Inserte las cubiertas 3 en cada una de las dos aperturas de torni...

Страница 40: ...ja el conducto a una ubicaci n por encima de la campana donde la descarga se ventile en la sala Utilice la rejilla de ventilaci n de recircu laci n incluida para cubrir la abertura Fije la rejilla con...

Страница 41: ...instalado y conectado a tierra correctamente ADVERTENCIA una conexi n a tierra incorrecta puede provocar un riesgo de descarga el ctrica Consulte a un electricista calificado si las instrucciones de...

Страница 42: ...42 Reemplace los filtros de grasa retirados previamente 9 10 Cierre la tapa del panel del filtro presion ndola hasta que encaje en su sitio hasta que el mecanismo del seguro la bloquee...

Страница 43: ...pagar autom ticamente T2 Botones de ajuste del ventilador Baja velocidad T3 Botones de ajuste del ventilador Media velocidad T4 Botones de ajuste del ventilador Velocidad alta velocidad intensiva Mant...

Страница 44: ...e carb n activado Los filtros de carb n activado no son lavables y no se pueden regenerar y deben reemplazarse aproxima damente cada 4 meses de operaci n o con mayor frecuencia con un uso intensivo Ab...

Страница 45: ...45 Diagrama de cableado...

Страница 46: ...s contra cualquier defecto de materiales o mano de obra para el comprador original por un per odo de 1 a o a partir de la fecha de compra original requiere prueba de compra Esta garant a cubre mano de...

Страница 47: ...cuada en el cuarto cuando la campana de cocina se utiliza al mismo tiempo que los aparatos que consumen gas u otros combustibles Detallar acerca del m todo y frecuencia de limpieza Existe el riesgo de...

Страница 48: ...a ampara todas las piezas y componentes del producto e incluye la mano de obra as como el reemplazo de cualquier pieza o componente defectuoso sin costo adicional para el consumidor Se incluyen tambi...

Страница 49: ......

Страница 50: ......

Страница 51: ......

Страница 52: ...991 0524 748_04 180320 D004064_03...

Отзывы: