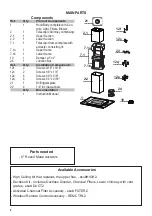
Faber GLASSY IS 36

6

10

MAIN PARTS

Available Accessories

- High Ceiling Kit that replaces the upper flue. - sku#HIGH2.

- Ductless Kit - Includes Ductless Diverter, Charcoal Filters, Lower chimney with vent 

grates - sku# DUCT2

- Activated Charcoal Filter Accessory - sku# FILTER2

- Wireless 

Remote Control Accessory - REMCTRL2

Parts needed

- 6" Round Metal ductwork

Components

Ref. 

Qty. 

Product Components

Hood Body, complete with: Con- 


trols, Light, Filters, Blower.

Telescopic Chimney comprising: 

2.1 

Upper Section

2.2 

Lower Section  

7.1 

Telescopic frame complete with  


extractor, consisting of: 

7.1a 

Upper frame 

7.1b 

Lower frame 

10 

Damper ø 5 

7/8

"

24 

Junction Box

Ref. 

Qty. 

Installation Components

12f 

Screws 3/16" x 9/16" 

12c 

Screws 1/8" x 1/4"

12e 

Screws 1/8" x 3/8"

12q 

Screws 1/4" x 9/16"

21 

Drilling template 

22 

1/4" int. dia washers


Qty. Documentation


Instruction Manual

1

2.2

2.1

21

7.1

12q

22

12c

12e

12f

24

7.1a

7.1b

Содержание GLASSY IS 36"

Страница 1: ...GLASIS36SSV GLASSY IS 36 Installation Instructions Use and Care Information Instructions d installation Utilisez et d entretien Instrucciones de instalaci n Informaci n de uso y cuidado...

Страница 2: ...with your back to an exit Based on Kitchen Firesafety Tips published by NFPA WARNING TO REDUCE THE RISK OF FIRE OR ELECTRIC SHOCK do not use this fan with any solid state speed control device WARNING...

Страница 3: ...DO NOT terminate the ductwork in an attic or other enclosed space DO NOT use 4 laundry type wall caps Flexible type ductwork is not recommended DO NOT obstruct the flow of combustion and ventilation a...

Страница 4: ...opper cable Allow some slack in the cable so the appliance can be moved if servicing is ever necessary A UL Listed 1 2 conduit connector must be provided at each end of the power supply cable at the a...

Страница 5: ...5 RANGEHOOD DIMENSIONS Min 24 Min 30...

Страница 6: ...duct Components 1 1 HoodBody completewith Con trols Light Filters Blower 2 1 Telescopic Chimney comprising 2 1 1 Upper Section 2 2 1 Lower Section 7 1 1 Telescopicframecompletewith extractor consistin...

Страница 7: ...7 Choose your ducting method Non Ducted Recirculation Ducted Venting Installation Requires Ductless Accessory Kit purchased separately 6...

Страница 8: ...Supply Cable Use caulking to seal around the hole A knockout for threading through the Power Supply from the ceiling is located on the top of the frame Do not connect the Power Cable to the Wiring Box...

Страница 9: ...need to adjust the height of the frame proceed as follows Unfasten the metric screws joining the two columns located at the sides of the frame 1 2 3 4 5 6 Adjust the frame to the height required then...

Страница 10: ...TE The chimney structure can reduce down to a 27 minimum height To reduce the height the middle section of the support structure needs to be removed Out of the box the minimum chimney length is 32 Ins...

Страница 11: ...ough the strain relief Next position the chimney support so that the large end of the keyhole slots are over the ceiling attachment screws or bolts Then push the chimney support so that the bolts are...

Страница 12: ...t on type wire connector 1 The UPPER CHIMNEY COVER C in FIGURE 13 attaches to the top of th support structure using tw screwsprovided GinFIGURE 13 If using the High Ceilin ChimneyKit usetheUPPER CHIMN...

Страница 13: ...MNEY COVER D in FIGURE 12 and snap in the VENT GRIDS C in FIGURE 12 supply cable connectors are ground wire from home power supply een ground screw power supply cable power supply cable connected to g...

Страница 14: ...od canopy Remove any activated charcoal filters Lift the hood canopy and engage the screws 12f in the slots as far as they will go 12q x 4 22 x 4 Working from below fix the hood canopy to the frame wh...

Страница 15: ...ntrol connector Cmd Placetheconnectorsinthejunctionbox24and close it using the 4 screws provided 14 12c x 2 Fix the junction box to the hood body using the 2 screws 12c provided H Make the Internal El...

Страница 16: ...al Filter Accessory sku FILTER2 purchased separately Attach a charcoal filter in the correct position and block it by the fixing hooks as shown Unlock the fixing hooks towards the back of the insert h...

Страница 17: ...off function which will keep the fan on for 15 minutes and automatically shut off T2 Fan settings buttons Low speed T3 Fan settings buttons Medium speed T4 Fan settings buttons High speed Intensive s...

Страница 18: ...handle faces forwards No water can be present in filters before installing back in hood Replacing Activated Charcoal Filter The filter is not washable and cannot be regener ated and must be replaced a...

Страница 19: ...19 Wiring Diagram 991 0439 886 H90 305 D002531_01...

Страница 20: ...om accident alteration misuse abuse fire flood acts of God improper installation installation not in accordance with electrical or plumbing codes or Faber documentation or use of products not approved...

Страница 21: ...e se trouve derri re vous pendant que vous teignez les flammes D apr s le guide Kitchen Firesafety Tips publi par la NFPA aux tats Unis AVERTISSEMENT POURR DUIRELERISQUED INCENDIEOUDECHOC LECTRIQUE n...

Страница 22: ...une meilleure efficacit la longueur des conduits et le nombre de coudes doivent tre le pluslimit squepossible Lediam tredesconduitsdevrait treuniforme N installezpasdeuxcoudes ensemble Utilisez un ru...

Страница 23: ...ermettre le d placement de l appareil si des travaux d entretien s av raient n cessaires Un raccord de conduit homologu par l UL de 1 2 doit tre install aux deux extr mit s du c ble d alimentation au...

Страница 24: ...24 DIMENSIONS DE LA HOTTE Min 24 Min 30...

Страница 25: ...1 Ch ssissup rieur 7 1b 1 Ch ssisinf rieur 10 1 Registre 57 8 24 1 Bo tedeliaison R f Qt Composants d installation 12f 2 Vis3 16 x9 16 12c 2 Vis1 8 x1 4 12e 4 Vis1 8 x3 8 12q 4 Vis1 4 x9 16 21 1 Gaba...

Страница 26: ...26 6 Choisissez la m thode de canalisation Exige la trousse d accessoires sans conduit achet e s par ment Sans canalisation recirculation Options d installation avec ventilation canalis e...

Страница 27: ...otte sera install e et marquez la clairement sur le plafond l aide d un crayon Un gabarit 21 pour le montage du socle est fournidansl emballage Utilisezcemod lepour indiquer les trous qui serviront fi...

Страница 28: ...3 4 5 6 R glez le ch ssis la hauteur requise puis remettezenplacetouteslesvisenlev escomme ci dessus D vissez les deux vis qui fixent la section inf rieure de la chemin e et d tachez la du ch ssis in...

Страница 29: ...ure de la chemin e peut r duire jusqu une hauteur minimale de 27 Pour r duire la hauteur la section m diane de la structure de support doit tre retir Hors de la bo te la longueur minimale de la chemin...

Страница 30: ...ur les vis ou boulons de fixation au plafond Poussez ensuite le socle de chemin e de fa on ce que les boulons s engagent dans lapartie troitedesencoches Serrezfermement les quatre vis ou boulons Lemon...

Страница 31: ...ow ground wire under the Green grounding screw Attach the White lead of the power supply to the White lead of the rangehood with a twist on type wire connector Attach the Black lead of the power suppl...

Страница 32: ...equire nversion onents are E 12 Do MPER M r ductless e LOWER VER B hould be placed by holes from ersionKit FIGURE UCTLESS over the the EASY UCTLESS ENSIONS into the FIGURE 12 DUCTLESS INSTALLATIONS De...

Страница 33: ...e la hotte Retirez tout filtre charbon actif Soulevez l auvent de la hotte et ins rez les vis 12f dans les fentes en les enfon ant le plus possible En passant par le dessous fixez l auvent de la hotte...

Страница 34: ...necteur de commande Cmd Placezlesconnecteursdanslabo tedeliaison 24 et refermez la l aide des 4 vis fournies Fixez la bo te de liaison au b ti de la hotte l aide des 2 vis 12c fournies R alisation des...

Страница 35: ...o d article FILTER2 achet s par ment Posez un filtre charbon l emplacement ad quat et bloquez le l aide des crochets de fixation comme illustr D verrouillez les crochets de fixation vers l arri re de...

Страница 36: ...nsive Tenez le bouton enfonc pendant environ 2 secondes pour activer la vitesse intensive pour une dur e de 10 minutes Apr s ce d lai la vitesse retournera automatiquement la vitesse s lectionn e pr c...

Страница 37: ...eau ne peut tre pr sente dans les filtres avant la r installation dans la hotte Remplacement du filtre charbon actif Le filtre n est pas lavable et ne peut pas tre r g n r Il doit tre remplac environ...

Страница 38: ...38 Wiring Diagram 991 0439 886 H90 305 D002531_01...

Страница 39: ...es d coulant d un accident d une modification de l utilisation incorrecte ou abusive d un incendie d une inondation d un cas de force majeure d une installation inad quate d une installation non confo...

Страница 40: ...REDUCIRELRIESGODEDESCARGAEL CTRICAOINCENDIO nouse este ventilador con ning n dispositivo de control de velocidad de estado ADVERTENCIA PARA REDUCIR EL RIESGO DE INCENDIOS DESCARGAS EL CTRICAS O LESION...

Страница 41: ...s espacios angostos o garajes TODAS LAS ABERTURAS DE LA PARED Y EL PISO DONDE EST INSTALADA LA CAMPA NA SE DEBEN SELLAR Esta campana requiere al menos 24 de espacio libreentre la parte inferior de la...

Страница 42: ...s locales de acuerdo con la clasificaci n el ctrica de esta unidad tal como se especifica en la placa de serie de caracter sticas situada en el interior de la unidad cerca del compartimiento de cablea...

Страница 43: ...43 DIMENSIONES DE LA CAMPANA Min 24 Min 30...

Страница 44: ...es Ref Cdad Componentes del Instalaci n 12f 4 Tornillos 1 4 x 3 1 8 12c 2 Tornillos 1 8 x 1 4 12e 4 Tornillos 1 8 x 3 8 12q 4 Tornillos 1 4 x 9 16 21 1 Plantilla de perforaci n 22 4 Arandelas de di me...

Страница 45: ...45 Requiere compra de accesorio de carb n activado 6 Elija su m todo de conducci n Sin conductos recirculaci n Instalaci n de ventilaci n conductos...

Страница 46: ...odeenerg a Use masilla para sellar alrededor del agujero Un punto de salida para pasar cables a trav s de la fuente de alimentaci n desde el techo se encuentra en la parte superior del marco No conect...

Страница 47: ...sita ajustar la altura del bastidor proceda de la siguiente manera Afloje los tornillos m tricos que unen las dos columnas ubicadas a los lados del bastidor 1 2 3 4 5 6 Ajuste el bastidor a la altura...

Страница 48: ...a chimenea puede reducir hasta una altura m nima de 27 Para reducir la altura la secci n central de la estructura de soporte necesita ser retirada Fuera de la caja la longitud m nima de la chimenea es...

Страница 49: ...ivo antitracci n A continuaci n coloque el soporte de la chimenea de forma que el extremo grande de las ranuras perforadas quede sobre los tornillos o pernos de fijaci n al techo A continuaci n empuje...

Страница 50: ...d of the rangehood with a twist on type wire connector Attach the Black lead of the power supply to the Black lead of the rangehood with a twist on type wire connector 1 The UPPER CHIMN COVER C in FIG...

Страница 51: ...RE 13 CHIMNEY COVER supplied with the kit Slide up and attach the UPPER CHIMNEY COVER 2 Attach the duct work to the DAMPER M in FIGURE 1 Makesuretosealalljointswith duct tape to prevent leaks 3 The LO...

Страница 52: ...a Retire cualquier filtro de carb n activado Levante el dosel de la campana y enganche los tornillos 12f en las ranuras todo lo posible 12q x 4 22 x 4 Trabajando desde abajo fije la capota de la campa...

Страница 53: ...de control Cmd Coloque los conectores en la caja de conexiones 24 y ci rrela con los 4 tornillos suministrados Realice la conexi n el ctrica interna Fije la caja de conexiones al cuerpo de la campana...

Страница 54: ...sku FILTER2 se compra por separado Coloque un filtro de carb n en la posici n correcta y bloqu elo con los ganchos de fijaci n como se muestra Desbloquee los ganchos de fijaci n hacia la parte poster...

Страница 55: ...2 segundos para activar la velocidad intensiva que est programada para ejecutarse durante 10 minutos Al final de este tiempo volver autom ticamente a la velocidad establecida anteriormente Adecuado pa...

Страница 56: ...cualquier otro l quido antes de volver a instalar los filtros despu s de la limpieza Reemplazo del filtro de carb n activado El filtro no es lavable no puede ser regenerado y debe ser reemplazado apro...

Страница 57: ...57 991 0439 886 H90 305 D002531_01 Diagrama de cableado...

Страница 58: ...r est n garantizados contra cualquier defecto de materiales o mano de obra para el comprador original por un per odo de 1 a o a partir de la fecha de compra original requiere prueba de compra Esta gar...

Страница 59: ...59...

Страница 60: ...991 0559 779_04 181220 D00005531_03...

Отзывы: