


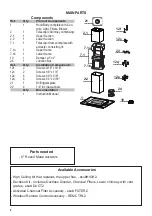


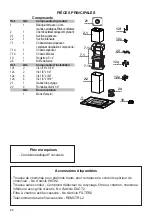


14
12
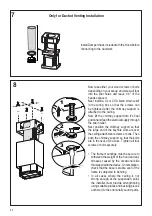
Screw the 2 screws 12f half way into the holes provided in the sides of the bottom of the frame.
Remove the grease filters from the hood canopy.
Remove any activated charcoal filters.
Lift the hood canopy and engage the screws 12f in the slots as far as they will go.
12q x 4
22 x 4
Working from below, fix the
hood canopy to the frame
where indicated, using the 4
screws 12q and 4 washers 22
provided, then tighten all the
screws securely.
12f
12f
1
2
3
Attachment of Hood Canopy
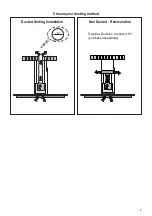
Содержание GLASSY IS 36"
Страница 5: ...5 RANGEHOOD DIMENSIONS Min 24 Min 30...
Страница 19: ...19 Wiring Diagram 991 0439 886 H90 305 D002531_01...
Страница 24: ...24 DIMENSIONS DE LA HOTTE Min 24 Min 30...
Страница 38: ...38 Wiring Diagram 991 0439 886 H90 305 D002531_01...
Страница 43: ...43 DIMENSIONES DE LA CAMPANA Min 24 Min 30...
Страница 57: ...57 991 0439 886 H90 305 D002531_01 Diagrama de cableado...
Страница 59: ...59...
Страница 60: ...991 0559 779_04 181220 D00005531_03...


