background image

Remove all packaging material before 
using the new refrigerator. This 
includes the foam base and all 
adhesive tape holding the refrigerator 
accessories inside and outside.

Clean both the inside and outside of 
the refrigerator with wet cloth (a little 
detergent could be added into the 
warm water to wash the cloth and 
then wipe it again with the clean 
water);

Prepare an independent two-pole 
socket with grounding contact for the 
refrigerator and it shall not share a 
multi-purpose socket with other 
electrical appliances;

Do connect grounding wire! The 
grounding pole of the socket shall be 
provided with a reliable grounding 
wire.

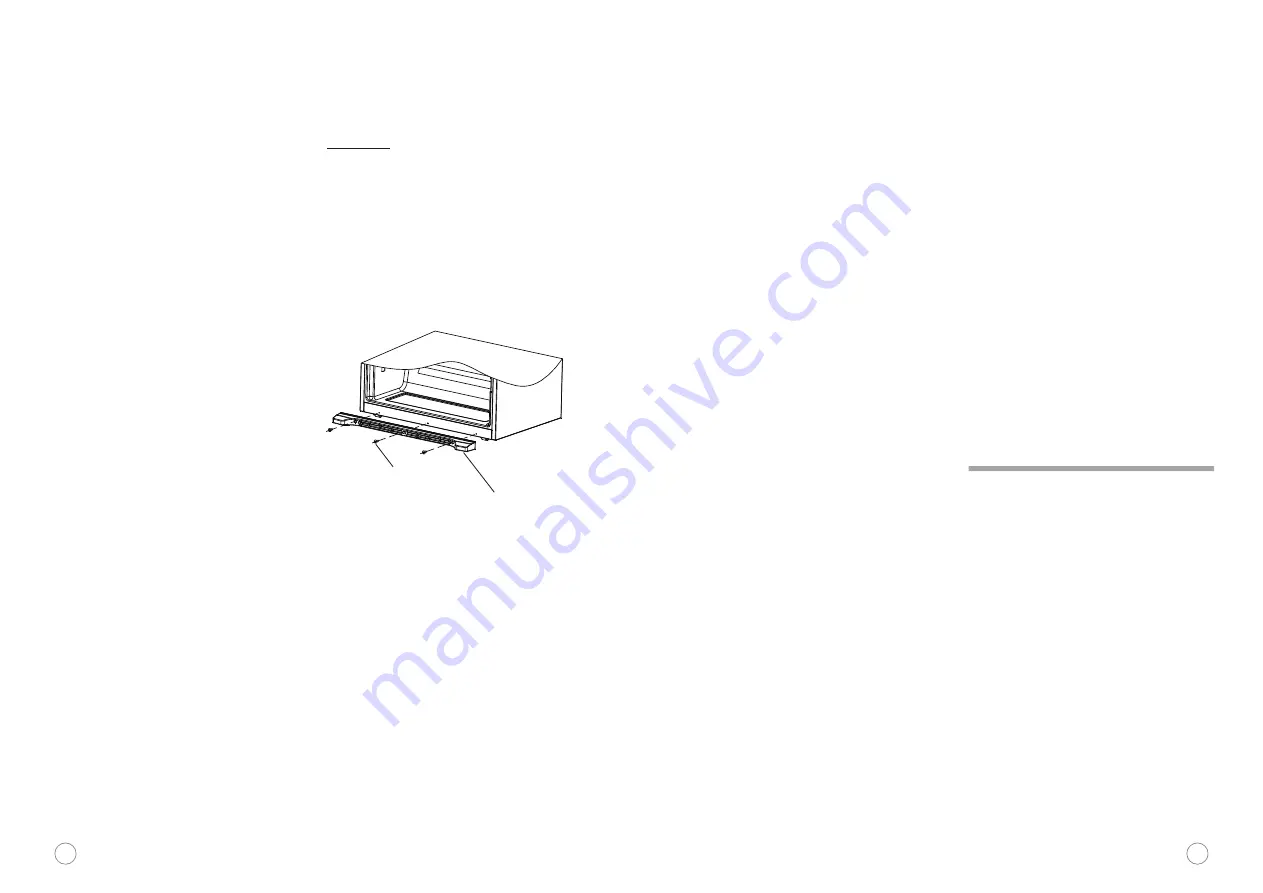
Open the refrigerator body and take 
out the accessory (decorative cover 
for bottom beam) and the three 
screws from the instruction 
packaging bag; then install them into 
the bottom beam as shown by the 
schematic diagram on the right.

The decorative cover for bottom 
beam is used as ornament, so you 
can choose not to install it. It won't 
affect the refrigerator's performance 
or conditions no matter whether you 
install it or not.

Installation

Transport and Placing of Your 
Refrigerator

Transport

Keep upright and avoid squeezing or 
vibration during transport. Avoid a 
slant angle over 45 degree during 
handling.

Avoid the door or top cap from being 
under excessive stress when moving; 
otherwise, it may become deformed.

Placing

Place your refrigerator in a well-
ventilated place and keep it from heat 
source and direct sunlight. Don't 
place it in any humid or wet place so 
as to avoid rust and weakening of 
insulation effect.

There shall be a space not less than 
30cm from the top of your refrigerator 
and not less than 10cm from both 
sides or the back of the refrigerator to 
the adjacent walls respectively. This 
requirement is good for open and 
close of the door and also for heat 
emission.

The refrigerator shall be placed on a 
flat and firm ground (if not flat, you 
can use the leveling legs for 
adjustment).

Keep Your Refrigerator Standing

Don't connect your refrigerator to the 
power supply immediately after it is 
placed vertically. You should keep it 
standing for at least 6 hours before 
switching it on in order to ensure it 
running well.

Make sure the power wire is not 
pinned by the refrigerator or other 
objects so as to avoid accidents 
arising from power wire faults. Please 
check the voltage scope of your 
refrigerator against the actual power 
supply before switching it on.

07

08

Attention

The refrigerator must be disconnected 
from the source of electrical supply 
before attempting the installation of 
accessory.

Don't use mechanical equipment or 
other methods to accelerate the 
defrosting process except the means 
recommended by the manufacturer.

Don't use any electrical appliances in 
the food storage compartments except 
the model recommended by the 
manufacture.

The R134a refrigerant and cyclopentane 
foaming material used in the refrigerator 
are inflammable. All waste and 
discarded refrigerators shall be placed 
away from naked fire and they are not 
allowed to burn.

Screws

Decorative cover for bottom beam

Содержание FRIGOR 719

Страница 1: ... scale 批 准 AUTHORIZE 0 美的冰箱事业部 MIDEA REFRIGERATION DIVISION 共 页 TOTAL SHEETS 第 页 NO OF SHEETS 技术要求 标记 MARKER 变更内容 修改日期 签名 1 尺寸 32K 2 印刷颜色 最后一页为彩色 其他为黑色印刷 3 制件必须满足QMB J53 005 产品说明书及其它类似印刷件技术规范 4 需要符合美的冰箱事业的最新版 QMB GC08 007 有害物质管理规定 的限值要求 5 产品需经过封样合格后方可进行批量生产 图纸为客户及业务确认使用 厂家需确保二维码可扫且正确 FABER 马来西亚 FRIGOR 719 FD LCD CB BCD540WE ST 说明书 16131000A23482 ...

Страница 2: ...Instruction Manual REFRIGERATOR MODEL FRIGOR 719 FD LCD ...

Страница 3: ...FABER FABER ...

Страница 4: ...rts to work don t touch the cold surface of the freezer compartment especially with wet hands to avoid hurting The gap between doors and between the door and refrigerator body is small Don t put your hands into these areas to avoid finger squeeze When you open the refrigerator s door don t let children approach sprinkle water onto rinse the refrigerator with water Don t put the refrigerator in wet...

Страница 5: ... Top lamp for freezer compartment Upper door for freezer compartment Lower door for freezer compartment Decorative cover for bottom beam 2 3 8 9 10 4 5 6 7 11 12 14 15 16 21 22 23 17 18 19 20 24 25 Product description Left door for refrigerator compartment Upper door for freezer compartment Lower door for freezer compartment Right door for refrigerator compartment Ice storage box Ice scoop Partiti...

Страница 6: ...at source and direct sunlight Don t place it in any humid or wet place so as to avoid rust and weakening of insulation effect There shall be a space not less than 30cm from the top of your refrigerator and not less than 10cm from both sides or the back of the refrigerator to the adjacent walls respectively This requirement is good for open and close of the door and also for heat emission The refri...

Страница 7: ...temperature around 2 8 it fails to ...

Страница 8: ... is conducted in the reverse order You should install the lower drawer body first and then install the rear stopper for the lower drawer as shown in Fig C Finally both sides of the drawer shall be connected to the position shown by the arrows respectively 6 The partition plate is installed into the corresponding slots and then is fixed with screws The position of the partition plate for the lower ...

Страница 9: ......

Страница 10: ...ll after ice cubes are melted Insert the ice cube box onto the rack according to original sequence and rotate to the locked position Take out and install the ice maker When the ice maker isn t used it could be taken out and the vacated space could be used as a part of the freezer compartment Push the Ice Maker button on the control panel at the refrigerator door and the icemaking sign disappears O...

Страница 11: ...ith that of the cold storage door handle Please note that during the assembly of the handle the direction of tapping hole is downward to the ground Remember a level refrigerator is necessary for getting the doors perfectly even If you need help review the previous section on leveling the refrigerator When the left doors is lower than the right door left Or the right doors is lower than the left do...

Страница 12: ...ther modes To de activate Energy Saving mode do any of the following 1 Select another mode 2 Press REF TEMP or FRZ TEMP to exit setup 3 ENERGYSAVING MODE button to exit the energy saving mode when any of the above situations occur Press 4 AUTO MODE to exit the energy saving mode when any of above situations occurs Press Auto mode This function will set the temperature of the refrigerator to 5 and ...

Страница 13: ...s C with a step of 1 C To set the temperature of the freezer compartment Press the FRZ TEMP button and the Freezer Temperature digital display will illuminate To change the temperature setting press the FRZ TEMP button again until the desired temperature is displayed The temperature of the freezer compartment can be adjusted between degrees C with a step of 1 C 15 and 24 Ice making switch To activ...

Страница 14: ...sk of child entrapment Before you throw away your old refrigerator or freezer 1 Take the doors 2 Leave the shelves in place so that children may not easily climb inside Please read the following contents before repair request If the situation doesn t turn better after you have checked all above items please contact with the after sales Service Centers If power cables are damaged please get it chan...

Страница 15: ......

Отзывы: