


23
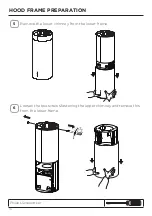
Phillips Screwdriver
• Place the chimney on the frame and attach it to the upper part of
the frame with the same screws removed previously. Make sure
to match the ductless holes with the ductless box exit inside the
frame if using the ductless application.
14
15
2
1
H2H
N4
• Remove the grease filters by pushing the handle backwards and
put the chimney from the bottom.
Содержание CYLINDRA ISOLA CYLNIS15SS600
Страница 10: ...10 B A D E F A C G...
Страница 42: ...42 B A D E F A C G...
Страница 74: ...74 B A D E F A C G...
Страница 97: ...97...
Страница 98: ...98...
Страница 99: ...99...
Страница 100: ...991 0603 869_01 200214 D00005024_00...


