


Removing the Fan Tray
ARX
®
6000 Hardware Installation Guide
6 - 7
Removing the Fan Tray
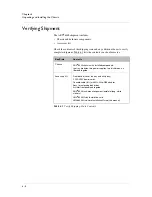
The fan tray is accessible from the front of the chassis. It is located at the top
of the switch.
1. Loosen the captive screws on either side of the fan tray, grasp the
handle, and slowly pull the fan tray toward you (see Figure 6.2).
Figure 6.2
Removing Fan Tray
2. Carefully slide the fan tray out of the top of the chassis and set
aside.
Removing the Power Supplies
The chassis contains two power supplies that are accessible from the front
panel. The top power supply is called power supply “A” in the CLI’s
show
chassis chassinfo
command. The bottom power supply is power supply “B.”
captive screws
Содержание ARX 6000
Страница 1: ...ARX 6000 Hardware Installation Guide 810 0001 00 ...
Страница 2: ......
Страница 5: ...Table of Contents ...
Страница 6: ......
Страница 10: ...Table of Contents x ...
Страница 12: ......
Страница 22: ...Chapter 1 1 12 ...
Страница 24: ......
Страница 30: ......
Страница 36: ...Chapter 3 Chassis Hardware 3 8 ...
Страница 38: ......
Страница 46: ......
Страница 52: ......
Страница 66: ......
Страница 80: ......
Страница 87: ...A Cable Connectors ARX 6000 Connectors Console Connector and Pinouts SFP Optical Connector ...
Страница 88: ......
Страница 92: ...Appendix A Cable Connectors A 6 ...
Страница 94: ......
Страница 100: ...Appendix B Removing and Replacing FRUs B 8 ...
Страница 101: ...Index ...
Страница 102: ......