4
5
SPECIFICATION
INSTALLATION
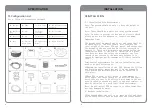
Ⅲ.INS
TALLA
TION
A1:SPA
pool
B1:Pump
E1:Hose
C1: Pool cover
C2:PVC
inflatable
cover
(optional)
G1:
Valve
wrench
J1:Back
water
cover
N1: Repair material
Manual
D1:Inflation
tube
H1: Plug lock H2: Key
K1: Hosel
L1: Waterproof
repair patch
F1:Filter
Cartridge
I1:Blocker
M1:Instruction
Ⅱ.Configuration List
Note: Check all accessories included
3.1
Installation
Site
Requirements
Note:
The
ground
should
be
able
to
bear
the
weight
of
the pool.
Note:
There
should
be
a
water
draining
system
around
Note: In order to prevent the danger of electric shock,
please do not use the adaptor to connect the pump.
Important
Tips:
The ground shall be smooth and flat, and there shall be
no sharp objects. The user should also consider the
total
weight
of
the
user,
SPA
and
water,
and
ensure
that
the ground in the use area has Sufficient strength to
support it. There is a good drainage system beside the
installation area. If the SPA is installed in a place
that
does
not
meet
the
safety
requirements,
any
loss
caused
is
not
covered
by
the
warranty
because
it
is
caused by improper use by consumers.1) Indoor installa-
tion:
Some
special
requirements
for
indoor
installation
that
need to be paid attention to:
◎During
the
installation
of
the
SPA,
during
the
filling
and
draining
water,
water
may
spill
on
the
ground.So
floor drains and moisture-proof must be installed in
this place.
◎When
SPA
is
used,
it
will
bring
a
large
amount
of
water
vapor,
and
there
should
be
no
articles
and
appli
-
ances
that
are
easy
to
be
affected
with
damp
in
the
use
area.In
order
to
ensure
air
quality
and
user
comfort,
it
must be installed in a good ventilated environment.
Note: Do not install SPA on carpets or other items that
are
easy
damaged
by
water.
2) Outdoor installation:
◎The
ground
where
spa
pool
is
on
must
be
flat
and
there
are no sharp objects such as branches and stones nearby.


