background image

COPYRIGHT © Hangzhou EZVIZ Software Co., Ltd.. ALL RIGHTS RESERVED.

Any and all information, including, among others, wordings, pictures, graphs are the properties of Hangzhou 

EZVIZ Software Co., Ltd. (hereinafter referred to as “EZVIZ”). This user manual (hereinafter referred to as “the 

Manual”) cannot be reproduced, changed, translated, or distributed, partially or wholly, by any means, without 

the prior written permission of EZVIZ. Unless otherwise stipulated, EZVIZ does not make any warranties, 

guarantees or representations, express or implied, regarding to the Manual.

About this Manual

The Manual includes instructions for using and managing the product. Pictures, charts, images and all other 

information hereinafter are for description and explanation only. The information contained in the Manual is 

subject to change, without notice, due to firmware updates or other reasons. Please find the latest version in 

the 

 ™ website (http://www.ezvizlife.com).

Revision Record

New release – January, 2019

Trademarks Acknowledgement

 ™, 

 ™, and other EZVIZ’s trademarks and logos are the properties of EZVIZ in various jurisdictions. 

Other trademarks and logos mentioned below are the properties of their respective owners.

Legal Disclaimer

TO THE MAXIMUM EXTENT PERMITTED BY APPLICABLE LAW, THE PRODUCT DESCRIBED, WITH ITS 

HARDWARE, SOFTWARE AND FIRMWARE, IS PROVIDED “AS IS”, WITH ALL FAULTS AND ERRORS, AND EZVIZ 

MAKES NO WARRANTIES, EXPRESS OR IMPLIED, INCLUDING WITHOUT LIMITATION, MERCHANTABILITY, 

SATISFACTORY QUALITY, FITNESS FOR A PARTICULAR PURPOSE, AND NON-INFRINGEMENT OF THIRD 

PARTY. IN NO EVENT WILL EZVIZ, ITS DIRECTORS, OFFICERS, EMPLOYEES, OR AGENTS BE LIABLE TO 

YOU FOR ANY SPECIAL, CONSEQUENTIAL, INCIDENTAL, OR INDIRECT DAMAGES, INCLUDING, AMONG 

OTHERS, DAMAGES FOR LOSS OF BUSINESS PROFITS, BUSINESS INTERRUPTION, OR LOSS OF DATA OR 

DOCUMENTATION, IN CONNECTION WITH THE USE OF THIS PRODUCT, EVEN IF EZVIZ HAS  BEEN ADVISED 

OF THE POSSIBILITY OF SUCH DAMAGES. 

TO THE MAXIMUM EXTENT PERMITTED BY APPLICABLE LAW, IN NO EVENT SHALL EZVIZ’S TOTAL 

LIABILITY FOR ALL DAMAGES EXCEED THE ORIGINAL PURCHASE PRICE OF THE PRODUCT. 

EZVIZ DOES NOT UNDERTAKE ANY LIABILITY FOR PERSONAL INJURY OR PROPERTY DAMAGE AS THE 

RESULT OF PRODUCT INTERRUPTION OR SERVICE TERMINATION CAUSED BY: A) IMPROPER INSTALLATION 

OR USAGE OTHER THAN AS REQUESTED; B) THE PROTECTION OF NATIONAL OR PUBLIC INTERESTS; C) 

FORCE MAJEURE; D) YOURSELF OR THE THIRD PARTY, INCLUDING WITHOUT LIMITATION, USING ANY 

THIRD PARTY’S PRODUCTS, SOFTWARE, APPLICATIONS, AND AMONG OTHERS.

REGARDING TO THE PRODUCT WITH INTERNET ACCESS, THE USE OF PRODUCT SHALL BE WHOLLY AT 

YOUR OWN RISKS. EZVIZ SHALL NOT TAKE ANY RESPONSIBILITES FOR ABNORMAL OPERATION, PRIVACY 

LEAKAGE OR OTHER DAMAGES RESULTING FROM CYBER ATTACK, HACKER ATTACK, VIRUS INSPECTION, 

OR OTHER INTERNET SECURITY RISKS; HOWEVER, EZVIZ WILL PROVIDE TIMELY TECHNICAL SUPPORT IF 

REQUIRED. SURVEILLANCE LAWS AND DATA PROTECTION LAWS VARY BY JURISDICTION. PLEASE CHECK 

ALL RELEVANT LAWS IN YOUR JURISDICTION BEFORE USING THIS PRODUCT IN ORDER TO ENSURE THAT 

YOUR USE CONFORMS TO THE  APPLICABLE LAW. EZVIZ SHALL NOT BE LIABLE IN THE EVENT THAT THIS 

PRODUCT IS USED WITH ILLEGITIMATE PURPOSES. 

IN THE EVENT OF ANY CONFLICTS BETWEEN THE ABOVE AND THE APPLICABLE LAW, THE LATTER 

PREVAILS.

Regulatory Information

FCC Information

This device complies with Part 15 of the FCC Rules. Operation is subject to the following two conditions: 

(1) This device may not cause harmful interference, and 

(2) This device must accept any interference received, including interference that may cause undesired

operation. 

Note: This product has been tested and found to comply with the limits for a Class B digital device, pursuant 

to Part 15 of the FCC Rules. These limits are designed to provide reasonable protection against harmful

interference in a residential installation. This product generates, uses, and can radiate radio frequency energy 

and, if not installed and used in accordance with the instructions, may cause harmful interference to radio

communications. However, there is no guarantee that interference will not occur in a particular installation.

If this product does cause harmful interference to radio or television reception, which can be determined by

turning the equipment off and on, the user is encouraged to try to correct the interference by one or more of

the following measures: 

—Reorient or relocate the receiving antenna. 

—Increase the separation between the equipment and receiver. 

—Connect the equipment into an outlet on a circuit different from that to which the receiver is connected. 

—Consult the dealer or an experienced radio/TV technician for help.

Содержание CSL2

Страница 1: ...www ezvizlife com Quick Start Guide 102026980 A...

Страница 2: ......

Страница 3: ...VICE TERMINATION CAUSED BY A IMPROPER INSTALLATION OR USAGE OTHER THAN AS REQUESTED B THE PROTECTION OF NATIONAL OR PUBLIC INTERESTS C FORCE MAJEURE D YOURSELF OR THE THIRD PARTY INCLUDING WITHOUT LIM...

Страница 4: ...cadmium Cd lead Pb or mercury Hg For proper recycling return the battery to your supplier or to a designated collection point For more information see www recyclethis info Industry Canada ICES 003 Co...

Страница 5: ...ECTO DISTINTO AL SOLICITADO B PROTECCI N DE INTERESES NACIONALES O P BLICOS C FUERZA MAYOR D EL USO INCLUYENDO POR USTED MISMO Y SIN LIMITACI N A UN TERCERO DE LOS PRODUCTOS SOFTWARE APLICACIONES ENTR...

Страница 6: ...Hg Para un reciclado adecuado devuelva la bater a a su proveedor o al centro de recolecci n designado Para obtener m s informaci n consulte www recyclethis info Cumplimiento con Industry Canada ICES 0...

Страница 7: ...Quick Setup Instruction Overview Appendix Lock Using Lock Settings Lock Installation Maintenance...

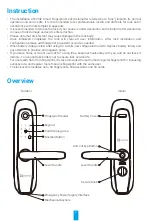
Страница 8: ...print password or card as needed When battery voltage is low after using for a while low voltage alarm alerts Replace battery timely and pay attention to positive and negative poles If you leave home...

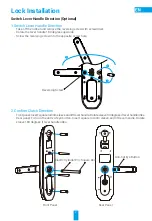
Страница 9: ...versing screw into the opposite screw hole Reversing Screw 2 Confirm Clutch Direction Front panel Insert square rod into sleeve and lift lever handle Rotate sleeve 90 degrees if lever handle idles Rea...

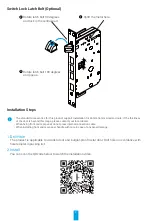
Страница 10: ...en doors If the thickness of the door is beyond this range please contact your local dealer When fixing front and rear panel do not press internal connection cable When installing front and rear panel...

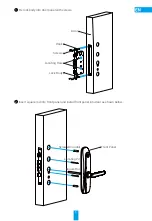
Страница 11: ...body into door panel with screws Door Screws Lock Body Locating Hole Hook 2 Insert square rod into front panel and install front panel into door as shown below Front Panel Square Rod Locating Pin Scr...

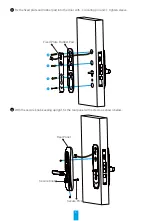
Страница 12: ...d plate and rubber pad into the door with locating pin and tighten sleeve Fixed Plate Rubber Pad 4 With the secure knob keeping upright fix the rear panel with screws as shown below Rear Panel Secure...

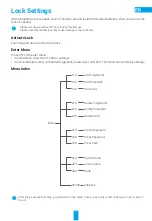
Страница 13: ...ress 3571 to enter menu In initial state enter short code for settings In non initial state verify with added fingerprint password or card first Then enter short code for settings Menu Index Menu 11 1...

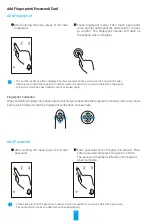
Страница 14: ...ant to delete the fingerprint Fingerprint which has been added cannot be added again Fingerprint Collection When collecting fingerprint please adjust your finger to maximize the fingerprint contact su...

Страница 15: ...o delete the card Card which has been added cannot be added again Delete Fingerprint Password Card Delete Fingerprint 1 After entering the menu press 21 to delete fingerprint 2 Enter fingerprint numbe...

Страница 16: ...nt verified password cannot be deleted For example if you verify with password 1 then password 1 cannnot be deleted Delete Card 1 After entering the menu press 23 to delete card 2 Enter card number an...

Страница 17: ...nt verified method cannot be cleared For example if you verify with fingerprint then fingerpints cannnot be cleared Initialize 1 After entering the menu press 3570 to initialize 2 Press to confirm Vol...

Страница 18: ...re open the door by password Scramble Password The smart lock applies scramble password function Scramble password increases safety and avoid password being peeped When entering password you can enter...

Страница 19: ...ld ones Do not place battery with the and in the wrong way around Dispose used batteries according to the local environmental protection law Alarms 1 Tamper Alarm Once being dismantled by force the lo...

Страница 20: ...phite powder or pencil powder into lock cylinder slot to ensure the key is inserted and removed smoothly on regular basis one year or six months However do not apply any grease to lubricate in case of...

Страница 21: ...front lock body and rear one loosens Ask professionals to check the lock after opening door with mechanical key Keypad damaged No response from fingerprint reader Fingerprint reader damaged Ask profe...

Страница 22: ...Configuraci n r pida Instrucciones Vista general Ap ndice Utilizaci n de la Cerradura Configuraci n de la Cerradura Instalaci n de la Cerradura Mantenimiento...

Страница 23: ...n su necesidad Cuando el voltaje de las bater as est bajo despu s de usarlas durante alg n tiempo se activar la alarma de bajo voltaje Reemplace las bater as a tiempo y tenga cuidado con los polos pos...

Страница 24: ...en el orificio opuesto Tornillo de Inversi n 2 Confirme la Direcci n del Agarre Panel frontal Inserte el perno cuadrado en el acoplador y levante la manija Gire el acoplador 90 grados si la manija no...

Страница 25: ...era de este rango por favor comun quese con su distribuidor local Al fijar el panel frontal y el posterior no presione el cable de conexi n interno Al instalar el panel frontal y el posterior tenga cu...

Страница 26: ...s tornillos Puerta Tornillos Cuerpo de Cerradura Orificio de Ubicaci n Gancho 2 Inserte el perno cuadrado en el panel frontal e instale el panel frontal en la puerta como se muestra a continuaci n Pan...

Страница 27: ...n los pasadores de ubicaci n y apriete los acopladores Placa Fija Protector de Caucho 4 Con la perilla de seguridad en posici n vertical fije el panel posterior con tornillos como se muestra a continu...

Страница 28: ...ara ingresar al men Si es la activaci n inicial ingrese el c digo corto para cada configuraci n Si no es la activaci n inicial identif quese primero con la huella dactilar contrase a o tarjeta previam...

Страница 29: ...ilar La huella dactilar que se ha agregado no se puede volver a agregar Recolecci n de Huellas Dactilares Al recolectar la huella dactilar por favor ajuste su dedo para maximizar la superficie de cont...

Страница 30: ...arjeta La tarjeta que se ha agregado no se puede volver a agregar Borrar Huella Dactilar Contrase a Tarjeta Borrar Huella Dactilar 1 Despu s de ingresar al men presione 21 para borrar la huella dactil...

Страница 31: ...ificada no puede borrarse Por ejemplo si se identifica con la contrase a 1 esa contrase a 1 no se puede borrar Borrar Tarjeta 1 Despu s de ingresar al men presione 23 para borrar la tarjeta 2 Ingrese...

Страница 32: ...o no puede borrarse Por ejemplo si se identifica con huella dactilar entonces las huellas dactilares no se pueden borrar Inicializar 1 Despu s de ingresar al men presione 3570 para inicializar 2 Presi...

Страница 33: ...rir la puerta por medio de contrase a Contrase a Oculta La cerradura inteligente utiliza la funci n de contrase a oculta La contrase a oculta aumenta la seguridad y evita que alguien esp e la contrase...

Страница 34: ...iejas No coloque la bater a con los polos y al rev s Desh gase de las bater as usadas de acuerdo con la ley de protecci n del medio ambiente local Alarmas 1 Alarma Antisabotaje Si es desmantelada por...

Страница 35: ...nserta y se retira sin problemas de forma regular un vez al a o o cada seis meses Sin embargo no aplique ninguna grasa para lubricar para evitar que la grasa se adhiera al resorte del tambor del pasad...

Страница 36: ...spu s de abrir la puerta con una llave mec nica El teclado est da ado No hay respuesta del lector de huellas dactilares El lector de huellas dactilares est da ado Solicite a profesionales que revisen...

Страница 37: ...Instala o r pida Instru es Vis o geral Ap ndice Uso da fechadura Configura es da fechadura Instala o da fechadura Manuten o...

Страница 38: ...do a tens o das pilhas estiver baixa ap s us las por algum tempo soar o alarme de tens o baixa Substitua as pilhas em tempo h bil e preste aten o aos polos positivos e negativos Caso voc saia de casa...

Страница 39: ...furo de parafuso oposto Parafuso de revers o 2 Confirmar a dire o da embreagem Painel frontal insira a haste quadrada na luva e levante a ma aneta Gire a luva 90 graus se a ma aneta ficar inativa Pai...

Страница 40: ...de madeira com espessura de 40 a 50 mm Se a espessura da porta for al m desta faixa contate seu revendedor local Ao fixar o painel frontal e o painel traseiro n o pressione o cabo de conex o interno...

Страница 41: ...a com parafusos Porta Parafusos Corpo da fechadura Furo de posicionamento Gancho 2 Insira a haste quadrada no painel frontal e instale o painel frontal na porta como mostrado abaixo Painel frontal Has...

Страница 42: ...ha na porta com o pino de posicionamento e aperte a luva Placa fixa Base de borracha 4 Mantendo a trava de seguran a para cima fixe o painel traseiro com os parafusos como mostrado abaixo Painel trase...

Страница 43: ...No estado inicial insira o c digo curto para as configura es No estado n o inicial verifique primeiro com a impress o digital adicionada a senha ou o cart o Em seguida insira o c digo curto para as c...

Страница 44: ...ue ser exigido se voc quiser exclu la A impress o digital adicionada n o pode ser adicionada novamente Captura da impress o digital Ao capturar a impress o digital ajuste seu dedo para otimizar a supe...

Страница 45: ...de ser adicionado novamente Excluir impress o digital senha cart o Excluir impress o digital 1 Depois de acessar o menu digite 21 para excluir a impress o digital 2 Insira o n mero da impress o digita...

Страница 46: ...ser exclu da Por exemplo se voc fizer a verifica o com a senha 1 a senha 1 n o poder ser exclu da Excluir cart o 1 Depois de acessar o menu digite 23 para excluir o cart o 2 Insira o n mero do cart o...

Страница 47: ...de ser exclu do Por exemplo se voc fizer a verifica o com impress o digital impress es digitais n o poder o ser eliminadas Inicializar 1 Depois de acessar o menu digite 3570 para inicializar 2 Pressio...

Страница 48: ...a fechadura antes de abrir a porta com a senha Senha embaralhada A fechadura inteligente usa a fun o de senha embaralhada A senha embaralhada aumenta a seguran a e evita que a senha seja espionada Ao...

Страница 49: ...se pilhas novas com pilhas velhas N o coloque as pilhas com os polos e invertidos Descarte as pilhas usadas de acordo com a legisla o ambiental local Alarmes 1 Alarme de viola o Caso seja for ada ou v...

Страница 50: ...fenda do cilindro da fechadura regularmente a cada ano ou seis meses para garantir que a chave seja inserida e removida suavemente Por m n o aplique graxa para lubrificar pois pode ficar grudada na mo...

Страница 51: ...mec nica pe a a um profissional para verificar a fechadura Teclado danificado Leitor de impress o digital sem resposta Leitor de impress o digital danificado Depois de abrir a porta com outros m todos...

Страница 52: ...s batteries where the malfunction is due to the normal aging of the product Cosmetic damage including but not limited to scratches dents and broken plastic on ports Any software even if packaged or so...

Страница 53: ...mibles como bater as donde el mal funcionamiento se deba al envejecimiento normal del producto Da os est ticos incluidos rayones marcas y pl stico roto en los puertos entre otros Software de terceras...

Страница 54: ...m que o mau funcionamento devido ao envelhecimento natural do produto Danos est ticos incluindo entre outros arranh es amassados e pl sticos quebrados nas portas Qualquer software mesmo se fizer parte...

Страница 55: ......
Отзывы: