background image

7

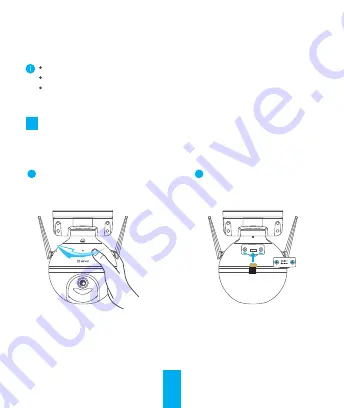
Remove the SD card slot cover using screw driver. Insert Micro SD card, 

and then initialize the card on the EZVIZ app.

Installation

Make sure the wall is strong enough to hold three times the weight of the camera. 

1

Insert Micro SD Card

Optional

Insert Micro SD Card

2

Rotate the camera 

counterclockwise as 

shown below

1

Camera working temperature: -30°C— 60°C.
Do not aim the camera lens at strong light such as sun or incandescent lamp. The 

strong light can cause fatal damage to the camera. 

Содержание CSC8W1F4

Страница 1: ...n Record New release January 2021 Trademarks Acknowledgement and other EZVIZ s trademarks and logos are the properties of EZVIZ in various jurisdictions Other trademarks and logos mentioned below are...

Страница 2: ...G WITHOUT LIMITATION USING ANY THIRD PARTY S PRODUCTS SOFTWARE APPLICATIONS AND AMONG OTHERS REGARDING TO THE PRODUCT WITH INTERNET ACCESS THE USE OF PRODUCT SHALL BE WHOLLY AT YOUR OWN RISKS EZVIZ SH...

Страница 3: ...a Name Description Solid Red Camera starting up LED Indicator Slow flashing Red Wi Fi connection failed Fast flashing Red Camera exception e g Micro SD card error Fast flashing Blue Camera ready for W...

Страница 4: ...EZVIZ app before using it Micro SD Card sold separately Press and hold for 5s to restart the cameara and all parameters will be restored to default settings Converts sound into an electrical signal Co...

Страница 5: ...3 Connect to Power Source Connect the camera to the power source Indicator flashing rapidly blue means that the camera has started up Outlet Power Adapter Purchase separately...

Страница 6: ...le Play Store Download and install the EZVIZ app Launch the app Create and register an EZVIZ user account by following the start up wizard 2 Add a camera to EZVIZ Log in to your account using the EZVI...

Страница 7: ...5 Log in to your account using EZVIZ app Wired Connection Connect the camera to the router with network cable purchase separately Router...

Страница 8: ...n the upper right corner to go to the Scan QR Code interface Add Device Scan the QR code on the bottom of the camera or on the cover of the Quick Start Guide Follow the EZVIZ app wizard to add your ca...

Страница 9: ...e wall is strong enough to hold three times the weight of the camera 1 Insert Micro SD Card Optional Insert Micro SD Card 2 Rotate the camera counterclockwise as shown below 1 Camera working temperatu...

Страница 10: ...be installed on the ceiling on the wall or on the pole 2 Install Camera Ceiling Mounted expansion screws are not needed for wooden walls Stick drilling template 1 Drill holes and install anchors 2 Ins...

Страница 11: ...9 Wall Mounted Stick drilling template 1 2 Install screws 3 expansion screws are not needed for wooden walls Drill holes and install anchors...

Страница 12: ...10 Pole Mounted Cable ties Purchase separately For detailed information please visit www ezviz eu...

Страница 13: ...11 Box Content Drilling Template Screw Kit Quick Start Guide Waterproof Kit Camera...

Страница 14: ...EPBR BR ADS 10RH 06 05010EPI IN ADS 12CG 06 05010EPC JP CS CV310 CS C3N CS C3W CS C3WN CS C3X CS SD1 CS C4W CS C4C CS CV228 CS C8W CS C8C CS W2H CS W3C WD1200G CS T8 B Shenzhen Honor Electronic Co Ltd...

Страница 15: ...ndard s Operation is subject to the following two conditions 1 this device may not cause interference and 2 this device must accept any interference including interference that may cause undesired ope...

Отзывы: