background image

2

Floodlight Camera Installation
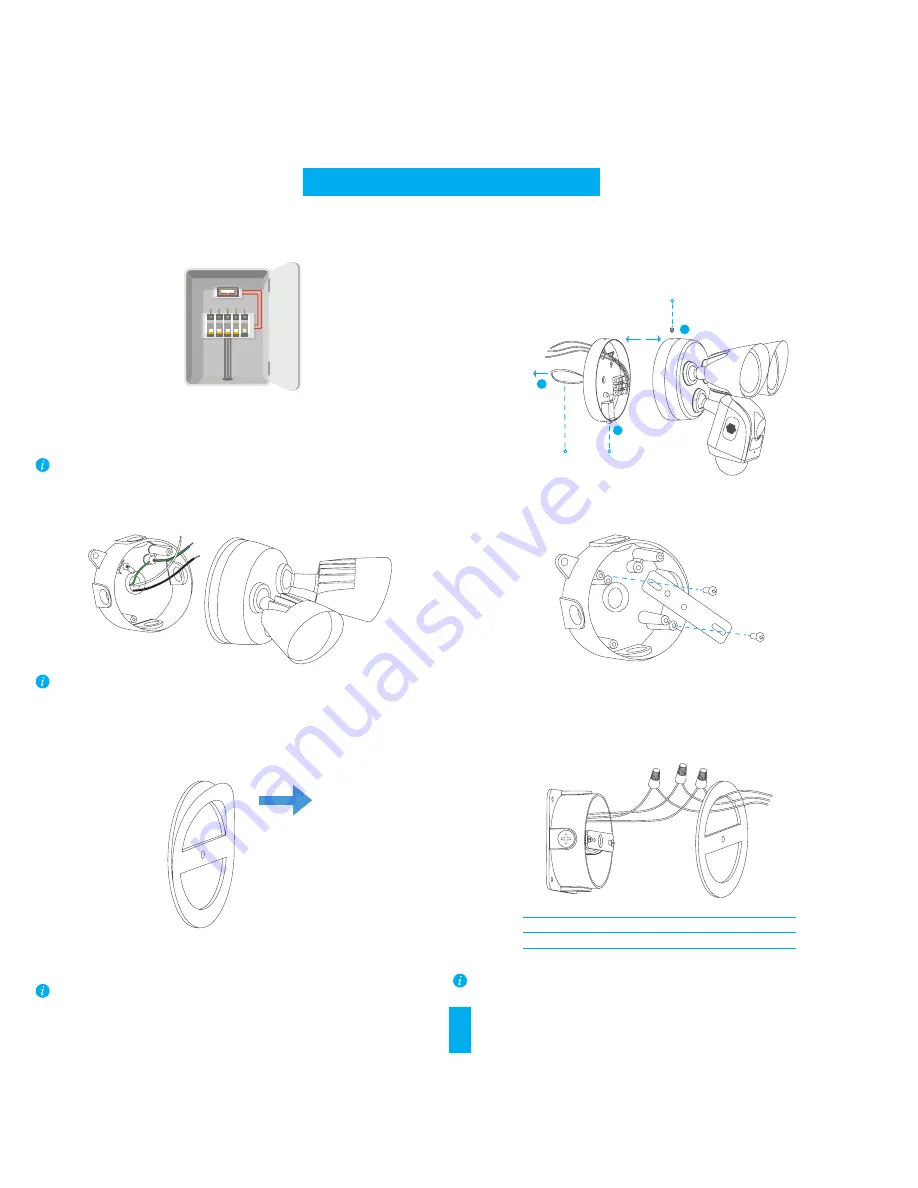
Step1

Shut down the electricity at the breaker that controls floodlight camera's 
circuit.

Step2

Pull the floodlight camera completely off the base.

Keep the breaker off at any time during the installation process. 

Unscrew the mounting base screw, then press the bottom button all the way down ,and pull the string to take the 
mounting base off.

Bottom Button

String

Mounting Base Screw

1

2

3

Step 3

Remove your existing floodlight from the junction box.

Step 4

Install the bracket to the junction box with the mounting screws.

Disconnect the three sets of wires from the floodlight, if there is any existing mounting bracket attached to 
your junction, remove that as well.

Step 5

Peel off the white tape from the gasket and stick the gasket to the 
mounting base.

Step 6

Connect the junction box and floodlight camera 3-wire connector.

Ensure the center hole lines up with the center one on the mounting base.

Wire from Junction box Connect to Matching Wire on Camera

Green/Copper-Ground

Green

Black-Hot

Black

White-Neutral

White

Match each color wire from the floodlight camera to the same color from the junction box (green to green, 
white to white, black to black).

Mounting Screw

Содержание CS-LC1-A0-1B2WPFRL

Страница 1: ...Quick Start Guide ...

Страница 2: ......

Страница 3: ... x1 Short Mounting Screw x2 Short Base Screw x1 Mounting Bracket x1 Screwdriver x1 Quick Start Guide x1 Floodlight Camera IP65 Junction Box Purchased Seperately Mounting Bracket Gasket Bracket Screw Bottom Button Floodlight Mounting Base Screw Mounting Base Wire Connector Bracket Screw ...

Страница 4: ...e bracket to the junction box with the mounting screws Disconnect the three sets of wires from the floodlight if there is any existing mounting bracket attached to your junction remove that as well Step 5 Peel off the white tape from the gasket and stick the gasket to the mounting base Step 6 Connect the junction box and floodlight camera 3 wire connector Ensure the center hole lines up with the c...

Страница 5: ...ad and install the app Launch the app and register for a user account following the start up wizard Step2 Add a floodlight camera to APP Log in the app From the app Home screen tap on the upper right hand corner to go to the scan QR code interface Scan the QR Code on the the Floodlight Camera Follow the app wizard to finish Wi Fi configuration If you want to change your floodlight camera s Wi Fi p...

Страница 6: ...e door cover back on microSD Card Recommended compatibility Class 10 Max 128GB Initialize the card in the app before using it Reset Button Hold for 5 seconds to restart and reset all parameters to default Initialize Memory Card 1 In the app check the memory card status by tapping on the Storage Status in the Device Settings interface 2 If the memory card status displays as Uninitialized tap to ini...

Страница 7: ...UD12652C ...

Отзывы: