background image

10

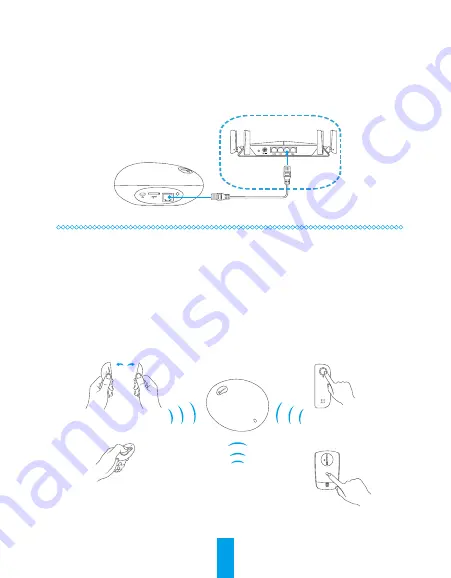
También puede seleccionar la conexión por cable. 

Paso 1:

 conecte el dispositivo a la interfaz LAN del router con un cable de red.

Paso 2:


agregue el dispositivo a la aplicación EZVIZ escaneando el código QR en la tapa de este manual o en la 

parte inferior del dispositivo.

SIM

RESET

IPC

ACCESS

Cable de red

Paso 3
Agregado de detectores

1

Activación del modo de Agregado de detectores

Con un solo clic en el botón de configuración se iniciará el mensaje de voz del modo de agregado 
de detectores.

2

Agregado de detectores 

Ubique el detector cerca del dispositivo (dentro de los 50 cm) y active la alarma manualmente. 
Escuchará un mensaje de voz del tipo del detector que indica que se agregó el detector 
correspondiente (se permiten hasta 32 detectores).

……

Содержание CS-A1S-32W

Страница 1: ...www ezvizlife com ...

Страница 2: ......

Страница 3: ...TY FOR PERSONAL INJURY OR PROPERTY DAMAGE AS THE RESULT OF PRODUCT INTERRUPTION OR SERVICE TERMINATION CAUSED BY A IMPROPER INSTALLATION OR USAGE OTHER THAN AS REQUESTED B THE PROTECTION OF NATIONAL OR PUBLIC INTERESTS C FORCE MAJEURE D YOURSELF OR THE THIRD PARTY INCLUDING WITHOUT LIMITATION USING ANY THIRD PARTY S PRODUCTS SOFTWARE APPLICATIONS AND AMONG OTHERS REGARDING TO THE PRODUCT WITH INTE...

Страница 4: ...tive 2014 53 EU the EMC Directive 2014 30 EU the RoHS Directive 2011 65 EU 2012 19 EU WEEE directive Products marked with this symbol cannot be disposed of as unsorted municipal waste in the European Union For proper recycling return this product to your local supplier upon the purchase of equivalent new equipment or dispose of it at designated collection points For more information see www recycl...

Страница 5: ...SIONES PERSONALES O DAÑOS A LA PROPIEDAD COMO RESULTADO DE LA INTERRUPCIÓN DEL PRODUCTO O LA TERMINACIÓN DEL SERVICIO CAUSADA POR A INSTALACIÓN O USO INCORRECTO DISTINTO AL SOLICITADO B PROTECCIÓN DE INTERESES NACIONALES O PÚBLICOS C FUERZA MAYOR D EL USO INCLUYENDO POR USTED MISMO Y SIN LIMITACIÓN A UN TERCERO DE LOS PRODUCTOS SOFTWARE APLICACIONES ENTREOTROS DEALGÚNTERCERO EN RELACIÓN AL PRODUCT...

Страница 6: ...ara un reciclado adecuado devuelva el producto a su proveedor local cuando adquiera un nuevo equipo de igual funcionalidadodesécheloenlospuntosderecoleccióndesignados Para obtenermás informaciónconsulte www recyclethis info 2006 66 EC directiva de batería Este producto contiene una batería que no puede desecharse como un residuo municipal no clasificado en la Unión Europea Consulte la documentació...

Страница 7: ...ANTS A INSTALLATION OU UTILISATION INCORRECTE OU DIFFÉRENTE DE L USAGE PRESCRIT B PROTECTION DES INTÉRÊTS NATIONAUX OU PUBLICS C CAS DE FORCE MAJEURE D UTILISATION Y COMPRIS SANS TOUTEFOIS S Y LIMITER DE PRODOUITS LOGICIELS APPLICATIONSETAUTRESDETIERSPARVOUSOU UNETIERCEPARTIE EN CE QUI CONCERNE LE PRODUIT DISPOSANT D UN ACCÈS À INTERNET L USAGE DU PRODUIT SE FERA ENTIÈREMENT À VOS PROPRES RISQUES ...

Страница 8: ...tent le marquage CE et sont donc conformes aux normes européennes harmoniséesenvigueurlistéesdansladirectiveCEM2004 108 CEetla directive LdSD2011 65 UE 2012 19 UE directive WEEE Les produits portant ce symbole ne peuvent pas être éliminés comme des déchets ménagers non triés dans l Union européenne Pour un recyclage adéquat renvoyez ce produit à votre fournisseur local après avoir acheté un nouvel...

Страница 9: ...is starting up Flashing Red An alarm occurs Solid Blue Device is running properly and the network is connected Slowly Flashing Blue Wi Fi connection has failed Flastly Flashing Blue Device is ready for the Wi Fi connection Power Interface For powering up the device Power Button When the device is not connected to the power outlet press it to power on or power off RESET Button Hold for 5 seconds to...

Страница 10: ...access to the Internet If your data plan provided by the carrier only includes limited mobile data communication duration etc please pay attention to the amount of data and or communication duration when using this device so as to avoid overuse You can also follow Step 2 2 to connect it to the Internet via router 2 Power on Plug the power cable into the device and then plug the power adapter into ...

Страница 11: ... upper right corner to go to the scanning QR code interface 2 Scan the QR Code on the cover of this manual or at the bottom of the device Follow the EZVIZ app wizard to finish Wi Fi configuration Please make sure your phone is connected to the 2 4GHz Wi Fi from the router for Wi Fi configuration Make sure the mobile phone is connected to the Wi Fi and the device has not connect to any Wi Fi yet or...

Страница 12: ...of the device SIM RESET IPC ACCESS Network Cable Step 3 Adding Detectors 1 Enabling the Adding Detectors Mode Single click the setting button and the voice prompt of the adding detectors mode is to start 2 Adding Detectors Take the detector close to the device within 50cm and trigger alarm manually A voice prompt of the type of the detector starts indicating the corresponding detector is added up ...

Страница 13: ...ight of the device The installation surface should be clean and flat 1 Place drill template onto the surface you have chosen to mount the device 2 For cement wall only Drill screw holes according to the template and insert three expansion screws 3 Use three metal screws to fix the device base according to the template 4 Install the device on the base and turn it 15 to secure it 1 2 5 Connect the p...

Страница 14: ...twork Voice Prompt Support human voice prompt and real time alarm External Interface Micro USB Interface 1 Others Power Supply 100 to 240 VAC 50 60Hz Backup Battery Built in rechargeable battery Power Capacity 4600 mAh standby time 10 hours Power Comsuption 5W Working Temperature 10 to 45 C 14 to 113 F Appendix Box Contents Device x 1 Base x1 USB Cable x1 drill template x1 Power Adapter x1 Ejectio...

Страница 15: ...do Rojo parpadeante Se produce una alarma Azul constante El dispositivo funciona correctamente y la red está conectada Luz azul que parpadea lentamente La conexión de Wi Fi ha fallado Luz azul que parpadea rápidamente El dispositivo está listo para la conexión Wi Fi Interfaz de alimentación Para encender el dispositivo Botón Power Encendido Si el dispositivo está conectado a la toma de corriente p...

Страница 16: ... se compra por separado Si el plan de datos que brinda su operadora incluye datos móviles limitados duración de comunicación etc preste atención a la cantidad de datos y o a la duración de la comunicación al utilizar este dispositivo para evitar un uso excesivo También puede seguir el Paso 2 2 para conectarlo a Internet a través del router 2 Encender Conecte el cable de alimentación al dispositivo...

Страница 17: ...xtremo superior derecho para acceder a la interfaz de escaneo del código QR 2 Escanee el código QR que se encuentra en la tapa de este manual o en la parte inferior del dispositivo Siga al asistente de la aplicación EZVIZ para terminar la configuración del Wi Fi Asegúrese de que su teléfono esté conectado al Wi Fi de 2 4 GHz desde el router para la configuración Wi Fi Asegúrese de que el teléfono ...

Страница 18: ...IM RESET IPC ACCESS Cable de red Paso 3 Agregado de detectores 1 Activación del modo de Agregado de detectores Con un solo clic en el botón de configuración se iniciará el mensaje de voz del modo de agregado de detectores 2 Agregado de detectores Ubique el detector cerca del dispositivo dentro de los 50 cm y active la alarma manualmente Escuchará un mensaje de voz del tipo del detector que indica ...

Страница 19: ...eces el peso del dispositivo La superficie de instalación debe estar limpia y plana 1 Coloque la plantilla de perforación sobre la superficie que ha elegido para montar el dispositivo 2 Solo para paredes de cemento Realice perforaciones de acuerdo con la plantilla e inserte los tres pernos de expansión 3 Utilice tres pernos de metal para fijar la base del dispositivo siguiendo el diagrama de la pl...

Страница 20: ...ensaje de voz Compatible con mensaje de voz humana y alarma en tiempo real Interfaz externa Interfaz micro USB 1 Otros Alimentación 100 a 240 V CA 50 60 Hz Batería de respaldo Batería recargable incorporada Capacidad de alimentación 4600 mAh tiempo de espera 10 horas Consumo de energía 5 W Temperatura de trabajo 10 a 45 C Anexo Contenido de la caja 1 Dispositivo 1 Base 1 Cable USB 1 Plantilla de p...

Страница 21: ...ignotant Une alarme se déclenche Bleu fixe L appareil fonctionne correctement et le réseau est connecté Lent clignotement bleu La connexion Wi Fi a échoué Clignotement bleu rapide L appareil est prêt pour la connexion Wi Fi Interface d alimentation Mise sous tension de l appareil Bouton d alimentation Lorsque l appareil n est pas branché à la prise de courant appuyez sur cette touche pour le mettr...

Страница 22: ...tre plan de données fourni par l opérateur ne comprend que des données mobiles limitées la durée de communication limitée etc veuillez faire attention à la quantité de données et à la durée de communication lors de l utilisation de cet appareil afin d éviter une utilisation excessive Vous pouvez également suivre l étape 2 2 pour le connecter à Internet par le biais d un routeur 2 Mise en marche Br...

Страница 23: ...in supérieur droit pour accéder à l interface de numérisation du code QR 2 Scannez le code QR qui se trouve sur la couverture de ce manuel ou au bas de l appareil Suivre les directives de l assistant de l application EZVIZ pour compléter la configuration Wi Fi Vous assurer que votre téléphone est connecté au Wi Fi de 2 4 GHz du routeur pour la configuration Wi Fi Assurez vous que le téléphone mobi...

Страница 24: ... RESET IPC ACCESS Câble réseau Étape3 Ajout de détecteurs 1 Activation du mode d ajout de détecteurs Faites un seul clic sur le bouton de réglage l assistant vocal du mode d ajout de détecteurs démarrera 2 Ajout de détecteurs Approchez le détecteur de l appareil dans un rayon de 50 cm et déclenchez l alarme manuellement Un message d assistance vocale indiquant le type de détecteur s affiche afin d...

Страница 25: ...porter trois fois le poids de l appareil La surface d installation doit être propre et plane 1 Placez le gabarit de perçage sur la surface que vous avez choisie pour monter l appareil 2 Pour mur de béton seulement Percez les trous de vis selon le gabarit et insérez trois pointeaux 3 Utilisez trois vis à métal pour fixer la base de l appareil selon le gabarit 4 Installez l appareil sur la base et t...

Страница 26: ...ise en charge des messages vocaux humains et des alarmes en temps réel Interface externe Interface Micro USB 1 Autres Alimentation électrique 100 à 240 VCA 50 60 Hz Batterie de sauvegarde Batterie rechargeable intégrée Puissance maximale 4 600 mAh temps de disponibilité passive 10 heures Consommation d énergie 5 W Température de service Entre 10 et 45 C 14 à 113 F Appendix Contenu de la boite Appa...

Страница 27: ...lfunction is due to the normal aging of the product Cosmetic damage including but not limited to scratches dents and broken plastic on ports Any software even if packaged or sold with EZVIZ hardware For any other damages free from defects in material or workmanship Routine cleaning normal cosmetic and mechanical wear and tear DISCLAIMER OF WARRANTIES EXCEPT AS STATED ABOVE IN THIS LIMITED WARRANTY...

Страница 28: ...cionamientosedebaalenvejecimientonormaldelproducto Dañosestéticos incluidosrayones marcasyplásticorotoenlospuertos entreotros Softwarede tercerasmarcas aunqueestéincluidoosevendaconelhardwaredeEZVIZ Paraotrostiposdedañoslibrededefectosenlosmaterialesolamanodeobra Limpieza de rutina estéticanormalydesgastemecánico RENUNCIA DEGARANTÍAS SALVO LO DISPUESTO ANTERIORMENTE EN ESTA GARANTÍA LIMITADA Y HAS...

Страница 29: ...sé Pourtouslesconsommables commelespiles lorsqueledysfonctionnementestdûauvieillissementnormalduproduit Pourlesdommagesesthétiques notammentlesrayures lesbossesetleplastiquecassésurlesports Pourtoutlogiciel mêmes ilestemballéouvenduavecdumatérielEZVIZ Pourtoutdommagenerésultantpasd undéfautmatérielnid unvicedefabrication Pourlenettoyagederoutineainsiquel usureesthétiqueetmécaniquenormale EXCLUSION...

Страница 30: ...UD13023B ...

Отзывы: