background image

2

Step 2
Camera Setup

1

Create an user account

- Connect your mobile phone to Wi-Fi. 

- Download and install the EZVIZ app by searching “EZVIZ” in App Store and Google Play

TM

.  

- Launch the app and register for an EZVIZ user account following the start-up 

wizard.

2

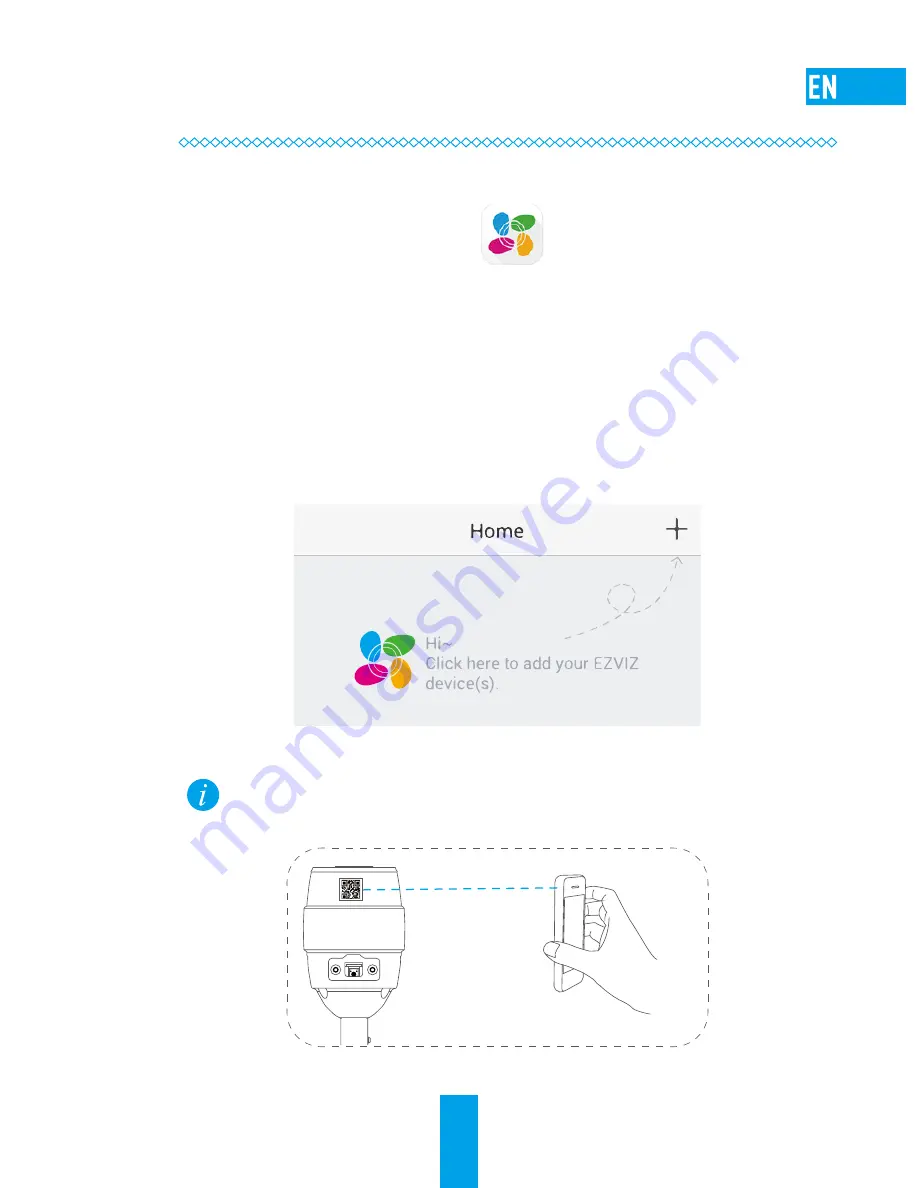
Add a camera to EZVIZ 

- Log in the EZVIZ app.

- From the Home screen, tap “+” on the upper-right corner to go to the scan QR 

code interface.

- Scan the QR Code on the bottom of the camera and then configure the Wi-Fi.

The wired network connection is supported as well, connect the camera to 

the router with a network cable.

- Enter the correct time zone and DST information and tap “Finish” to finish setup.

Содержание Bullet Cloud Camera

Страница 1: ......

Страница 2: ......

Страница 3: ...TO THE MAXIMUM EXTENT PERMITTED BY APPLICABLE LAW THE PRODUCT DESCRIBED WITH ITS HARDWARE SOFTWARE AND FIRMWARE IS PROVIDED AS IS WITH ALL FAULTS AND ERRORS AND HIKVISION MAKES NO WARRANTIES EXPRESS OR IMPLIED INCLUDING WITHOUT LIMITATION MERCHANTABILITY SATISFACTORY QUALITY FITNESS FOR A PARTICULAR PURPOSE AND NON INFRINGEMENT OF THIRD PARTY IN NO EVENT WILL HIKVISION ITS DIRECTORS OFFICERS EMPLO...

Страница 4: ...e may not cause harmful interference and 2 This device must accept any interference received including interference that may cause undesired operation Please take attention that changes or modification not expressly approved by the party responsible for compliance could void the user s authority to operate the equipment Note This product has been tested and found to comply with the limits for a Cl...

Страница 5: ...municipal waste in the European Union For proper recycling return this product to your local supplier upon the purchase of equivalent new equipment or dispose of it at designated collection points For more information see www recyclethis info 2006 66 EC battery directive This product contains a battery that cannot be disposed of as unsorted municipal waste in the European Union See the product doc...

Страница 6: ... camera by connecting to the power socket by a power cable Option 2 You can also power on the camera by PoE switch not included Only supported by some certain models Refer to page 6 for details Network Cable Power Cable Optional Power Socket PoE Switch ...

Страница 7: ...t following the start up wizard 2 Add a camera to EZVIZ Log in the EZVIZ app From the Home screen tap on the upper right corner to go to the scan QR code interface Scan the QR Code on the bottom of the camera and then configure the Wi Fi The wired network connection is supported as well connect the camera to the router with a network cable Enter the correct time zone and DST information and tap Fi...

Страница 8: ...re the camera The camera can be installed on the wall or ceiling Installing on the wall will be taken as the example in the following content 1 Sticking Mounting Template Stick the mounting template to the place to install the camera and drill the screw holes according to the mouting template 2 Installing the Camera Route the camera cables through the mounting base and wire the cables through the ...

Страница 9: ... before it will connect to the same Wi Fi automatically after connecting the power cable 4 Adjusting the Surveillance Angle Loosen the adjusting screw and adjusting knob Adjust the surveillance angle to your desired place Tighten the adjusting screw and adjusting knob after finishing Make sure the microSD card slot facing downward for water proof performance when you adjust the camera surveillance...

Страница 10: ... CVXXX 31XX Series 1080P HD Live Video CS CVXXX 32XX Series Wi Fi Connection Refer to page 6 to see whether the function is supported by your camera PoE Power Supply The PoE switch is required and not provided Refer to page 6 to see whether the function is supported by your camera microSD card Maximum space 128GB IP66 level for water proof and dust proof ...

Страница 11: ...ions of different models may vary check the label on your camera and refer to the figure below for details Camera Series Lens Focal Length IR Light Supported Memory Card Supported micro SD PoE Supported Wi Fi Supported Resolution 1 1 0MP 2 2 0MP ...

Страница 12: ...camera You need to initialize it on the EZVIZ app RESET Hold down the RESET button for 10 seconds when the camera is running the camera restarts and resets all parameters to default Network Interface 10M 100M Self adaptive Ethernet Interface Some models of device support the PoE Power over Ethernet addtionally Refer to page 6 for details Power Supply 1A 12V microSD Card Slot RESET Network Interfac...

Страница 13: ...ult Q The mobile phone cannot receive alarm prompts when the camera is online A 1 Make sure the EZVIZ app is running on your mobile phone and the Motion Detection Notification is enabled 2 For Android system make sure the app is running in background and for iOS enable the message push function in Settings Notification 3 If still no alarm prompts hold down the RESET button for 10 seconds restore t...

Страница 14: ...em Stromkabel an die Steckdose anschließen Option 2 Sie können die Kamera auch mit einem PoE Switch nicht enthalten hochfahren Diese Funktion wird nur von bestimmten Modellen unterstützt Ausführliche Hinweise hierzu finden Sie auf Seite 6 Netzwerkkabel Stromkabel optional Steckdose PoE Switch ...

Страница 15: ...e Kamera zu EZVIZ hinzufügen Melden Sie sich an der EZVIZ App an Tippen Sie auf dem Home Bildschirm oben rechts auf um die Oberfläche zum Scannen des QR Codes aufzurufen Scannen Sie den QR Code auf der Unterseite der Kamera und richten Sie dann die WLAN Verbindung ein Die Verwendung eines Kabelnetzwerkanschlusses wird ebenfalls unterstützt Schließen Sie dazu die Kamera mit dem Netzwerkkabel an den...

Страница 16: ...an der Wand oder an der Decke montiert werden Im Folgenden wird die Installation exemplarisch anhand einer Wandinstallation erläutert 1 Anbringen der Montageschablone Kleben Sie die Montageschablone an die Stelle an der die Kamera installiert werden soll und bohren Sie die Schrauben löcher an den entsprechenden Stellen der Schablone 2 Installation der Kamera Führen Sie die Kamerakabel durch die Gr...

Страница 17: ...erbindet sie sich nach dem Anschließen des Stromkabels automatisch mit diesem Wi Fi 4 Einstellen des Überwachungswinkels Lösen Sie die Einstellschraube und den Einstellknopf Stellen Sie den Überwachungswinkel auf die gewünschte Position ein Ziehen Sie die Einstellschraube und den Einstellknopf zum Schluss wieder fest 0 bis 360 microSD Kartensteckplatz Einstellschraube Einstellknopf 0 bis 180 Verge...

Страница 18: ...tación a la toma de corriente Opción 2 También puede suministrar alimentación a la cámara mediante un conmutador PoE no incluido Solo es compatible con algunos modelos Consulte la página 6 para obtener más información Cable de red Cable de alimentación Opcional Toma de corriente Interruptor PoE ...

Страница 19: ...ción 2 Agregue una cámara a EZVIZ Inicie sesión en la app EZVIZ Desde la pantalla de inicio toque el símbolo situado en la esquina superior derecha para ir a la interfaz de escaneo de código QR Escanee el código QR situado en la parte inferior de la cámara y después configure la red Wi Fi También se admite la conexión de red con cable conecte la cámara al router con un cable de red Introduzca la z...

Страница 20: ... fijar la cámara La cámara puede instalarse en la pared o el techo En el siguiente contenido la instalación en la pared se tomará como ejemplo 1 Plantilla de montaje adhesiva Pegue la plantilla de montaje en la ubicación en la que se instalará la cámara y perfore los agujeros de los tornillos según esta plantilla 2 Instalación de la cámara Pase los cables de la cámara a través de la base de montaj...

Страница 21: ...nectará automáticamente a la misma red Wi Fi tras conecta el cable de alimentación 4 Ajuste del ángulo de vigilancia Afloje el tornillo y el regulador de ajuste Ajuste el ángulo de vigilancia a la ubicación que desee Apriete el tornillo y el regulador de ajuste cuando haya terminado De 0 a 360º Ranura para tarjeta microSD Tornillo de ajuste Regulador de ajuste De 0 a 180º Asegúrese de que la ranur...

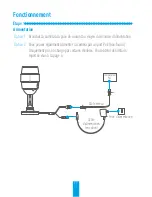
Страница 22: ...u moyen d un cordon d alimentation Option 2 Vous pouvez également alimenter la caméra par un port PoE non fourni Uniquement pris en charge par certains modèles Pour obtenir des détails reportez vous à la page 6 Câble réseau Câble d alimentation en option Prise d alimentation Commutateur PoE ...

Страница 23: ...Ajouter une caméra à EZVIZ Connectez vous dans l application EZVIZ Depuis l écran d accueil appuyez sur dans le coin supérieur droit pour accéder à l interface de lecture du code QR Scannez le code QR au bas de la caméra puis configurez le réseau Wi Fi La connexion réseau filaire est également prise en charge Il vous suffit de raccorder la caméra au routeur au moyen d un câble réseau Saisissez le ...

Страница 24: ...s vous pouvez utiliser des vis taraudeuses pour fixer la caméra La caméra peut être fixée au mur ou au plafond Dans la section suivante nous prenons l exemple d une installation murale 1 Pose du gabarit Fixez le gabarit à l emplacement où vous souhaitez installer la caméra puis percez les trous pour les vis 2 Installation de la caméra Faites passer les câbles de la caméra par le socle puis par l o...

Страница 25: ...un réseau Wi Fi elle s y reconnectera automatiquement après avoir branché le câble d alimentation 4 Réglage de l angle de surveillance Desserrez la vis et le bouton de réglage Réglez l angle de surveillance Serrez la vis et le bouton de réglage lorsque vous avez terminé 0 à 360 Logement de carte microSD Vis de réglage Bouton de réglage 0 à 180 Veillez à tourner l emplacement pour carte microSD ver...

Страница 26: ...o di alimentazione al connettore di alimentazione Opzione 2 La videocamera può anche essere alimentata tramite uno switch PoE non incluso Supportata solo da alcuni modelli Per i dettagli consultare pagina 6 Cavo di rete Cavo di alimentazione opzionale Connettore di alimentazione Switch PoE ...

Страница 27: ...mera a EZVIZ Effettuare l accesso nell app EZVIZ Dalla schermata iniziale toccare nell angolo superiore destro per passare all interfaccia di acquisizione del codice a matrice Acquisire il codice a matrice riportato sotto la videocamera e successivamente configurare il Wi Fi È anche possibile effettuare la connessione alla rete cablata collegando la videocamera al router con un cavo di rete Specif...

Страница 28: ...ilizzare viti autofilettanti La videocamera può essere installata sulla parete o sul soffitto L esempio sottostante si basa sull installazione a parete 1 Applicare la dima di montaggio Applicare la dima di montaggio in posizione e praticare i fori di montaggio indicati sulla dima 2 Installare la videocamera Far passare i cavi attraverso la base di montaggio e attraverso l apertura laterale Fissare...

Страница 29: ...i connetterà automaticamente alla stessa rete Wi Fi 4 Regolare l angolazione di sorveglianza Allentare la vite di regolazione e la ghiera di regolazione Regolare l angolazione della videocamera per inquadrare l area da sorvegliare Serrare la vite di regolazione e la ghiera di regolazione da 0 a 360 microSD Slot per scheda Vite di regolazione Ghiera di regolazione da 0 a 180 Durante la regolazione ...

Страница 30: ...ada de alimentação com um cabo de alimentação Opção 2 Pode também ligar a câmara através de um comutador PoE não incluído Apenas compatível com determinados modelos Consulte a página 6 para obter detalhes Cabo de rede Cabo de alimentação Opcional Tomada de alimentação Comutador PoE ...

Страница 31: ...iguração 2 Adicionar uma câmara ao EZVIZ Inicie sessão na app EZVIZ A partir do ecrã inicial toque no símbolo no canto superior direito para ir para a interface de leitura do código QR Leia o Código QR na parte inferior da câmara e de seguida configure a rede Wi Fi A ligação de rede com fios também é suportada ligue a câmara ao router através de um cabo de rede Insira o fuso horário correto e info...

Страница 32: ...so auto roscante para fixar a câmara A câmara pode ser instalada na parede ou no tecto Tomaremos como exemplo para o conteúdo a seguir a instalação na parede 1 Colocação do modelo de montagem Coloque o modelo de montagem no local de instalação da câmara e faça os furos para parafusos de acordo com o modelo de montagem 2 Instalação da câmara Faça passar os cabos da câmara através da base do suporte...

Страница 33: ...mesma rede Wi Fi após ligar o cabo de alimentação 4 Ajuste do ângulo de vigilância Desaperte o parafuso de ajustamento e o botão de ajustamento Ajuste o ângulo de vigilância para o local pretendido Aperte o parafuso de ajustamento e o botão de ajustamento após terminar 0 a 360 Entrada de cartões microSD Parafuso de ajustamento Botão de ajustamento 0 a 180 Verifique se a entrada de cartões microSD ...

Страница 34: ...тросети Вариант 2 Питание на камеру можно также подать от коммутатора с функцией PoE питание через Ethernet Коммутатор в комплект поставки не входит Эта функция поддерживается только некоторыми моделями Для получения подробной информации см стр 6 Сетевой кабель Кабель питания дополнительно Розетка электросети Коммутатор с функцией PoE ...

Страница 35: ...едуя инструкциям мастера запуска 2 Добавление камеры в EZVIZ Авторизуйтесь в приложении EZVIZ В верхнем правом углу главного экрана нажмите чтобы открыть интерфейс сканирования QR кода Отсканируйте QR код в нижней части камеры и задайте параметрыWi Fi Поддерживается также проводное подключение к сети камера может быть подключена к маршрутизатору с помощью сетевого кабеля Введите часовой пояс и инф...

Страница 36: ...езающие винты Камера может устанавливаться на стене или потолке В качестве примера далее будет рассматриваться установка на стене 1 Установка монтажного шаблона Приклейте монтажный шаблон в месте установки камеры и просверлите отверстия для винтов согласно меткам шаблона 2 Установка камеры Пропустите кабели камеры через монтажное основание и выведите их через боковое отверстие Прикрепите монтажное...

Страница 37: ...i она автоматически подключится к этой же сетиWi Fi после подсоединения сетевого кабеля и кабеля питания 4 Регулировка угла обзора Ослабьте регулировочный винт и регулировочную ручку Установите требуемый угол обзора По завершению затяните регулировочный винт и регулировочную ручку От 0 до 360 Гнездо для карты microSD Регулировочный винт Регулировочная ручка От 0 до 180 При регулировке угла обзора ...

Страница 38: ... võimalus Lülita kaamera vooluvõrku milleks ühenda toitejuhe pistikupessa 2 võimalus Kaamera toitena võib kasutada ka PoE lülitit ei sisaldu komplektis Ainult teatavatel mudelitel Vt lähemalt lk 6 Võrgujuhe Toitejuhe valikuline Pistikupesa PoE lüliti ...

Страница 39: ...jakonto järgides käivitusviisardit 2 Lisa kaamera EZVIZi kontole Logi sisse EZVIZi rakendusse Koputa avalehel üleval paremas nurgas olevale sümbolile et minna QR koodi skannimise liidesele Skanni kaamera põhjal olev QR kood ja konfigureeri traadita ühendus Toetatakse ka traadiga võrguühendust milleks tuleb kaamera võrgujuhtme abil ruuteriga ühendada Sisesta õige ajavöönd ja suveaja määrang ning va...

Страница 40: ...ib kaamera kinnitamiseks kasutada isekeermestavaid kruvisid Kaamera võib paigaldada seinale või lakke Selles tekstis on näitena kasutatud seinale kinnitamist 1 Kinnitusšablooni kleepimine Kleebi kinnitusšabloon kaamera paigaldamise kohale ja puuri vastavalt sellele kruviaugud 2 Kaamera installimine Vii kaamera juhtmed läbi kinnitusaluse ja juhi juhtmed läbi küljeava Kinnita alus komplektis olevate...

Страница 41: ...endatud siis ühendatakse see pärast toitejuhtmega ühendamist automaatselt samasse traadita võrku 4 Seirenurga reguleerimine Keera reguleerimiskruvi ja nupp lahti Reguleeri seirenurk soovitud asendisse Kui oled lõpetanud pingulda reguleerimiskruvi ja nuppu 0 360 mikro SD kaardi pesa Reguleerimiskruvi Reguleerimisnupp 0 180 Kaamera seirenurga reguleerimisel veendu et mikro SD kaardi pesa on suunaga ...

Страница 42: ...tās strāvas kabeli kontaktligzdai 2 variants Jūs arī varat ieslēgt kameru ar Ethernet barošanas PoE slēdzi nav iekļauts komplektācijā To atbalsta tikai daži modeļi Vairāk informācijas skatiet 6 lpp Tīkla kabelis Strāvas kabelis pēc izvēles Strāvas kontaktligzda PoE slēdzis ...

Страница 43: ...dņanorādījumus 2 Pievienojiet kameru lietotnē EZVIZ Piesakieties lietotnē EZVIZ Pieskarieties simbolam sākuma ekrāna augšējā labajā stūrī lai dotos uz QR kodu skenēšanas saskarni Noskenējiet QR kodu kameras apakšpusē un pēc tam konfigurējietWi Fi savienojumu Tiek atbalstīts arī tīkla savienojums Pievienojiet kameru maršrutētājam ar tīkla kabeli Ievadiet pareizu informāciju par laika joslu un ziema...

Страница 44: ...skrūvi lai nostiprinātu kameru Kameru var uzstādīt pie sienas vai griestiem Turpmākajos norādījumos ir pieņemts ka kamera ir uzstādīta pie sienas 1 Pielīmējams montāžas šablons Pielīmējiet montāžas šablonu vietā kur vēlaties uzstādīt kameru un izurbiet skrūvju caurumus atbilstoši montāžas šablonam 2 Kameras uzstādīšana Virziet kameras kabeļus cauri montāžas pamatnei un izvadiet tos pa sānu atveri ...

Страница 45: ... iepriekš tā automātiski savienosies ar to pašuWi Fi tīklu pēc strāvas kabeļa pievienošanas 4 Novērošanas leņķa pielāgošana Atskrūvējiet regulējošo skrūvi un pogu Pielāgojiet novērošanas leņķi vēlamajā pozīcijā Pēc tam pievelciet regulējošo skrūvi un pogu No 0 līdz 360 microSD kartes slots Regulējošā skrūve Regulējošā poga No 0 līdz 180 Pielāgojot kameras novērošanas leņķi pārliecinieties ka micro...

Страница 46: ...eliu prijungdami prie maitinimo lizdo 2 parinktis Kamerą galima maitinti ir naudojant PoE jungiklį komplekte nėra Ši galimybė yra tik tam tikruose modeliuose Žr p 6 kur pateikiama išsamios informacijos Tinklo kabeli Maitinimo kabelis pasirinktinis Maitinimo lizdas PoE jungiklis ...

Страница 47: ...esi paleisties vediklio nurodymais 2 Įtraukite kamerą į EZVIZ Prisijunkite prie programėlės EZVIZ Pradžios ekrane palieskite viršutiniame dešiniajame kampe kad atvertumėte QR kodo nuskaitymo sąsają Nuskaitykite kameros dugne esantį QR kodą ir sukonfigūruokite Wi Fi ryšį Įrenginį galima prijungti ir prie laidinio tinklo sujunkite kamerą ir kelvedį tinklo kabeliu Įveskite tinkamą laiko juostą ir vas...

Страница 48: ...ite naudoti savisriegius sraigtus Kamerą galima montuoti ant lubų arba ant sienos Tolesniam tekste daroma prielaida kad kamera sumontuota ant sienos 1 Montavimo šablono tvirtinimas Pridėkite montavimo šabloną prie vietos kurioje montuosite kamerą ir pagal šabloną išgręžkite angas sraigtams 2 Kameros įrengimas Prakiškite kameros kabelius pro montavimo pagrindą ir ištraukite pro šoninę angą Pateikta...

Страница 49: ...automatiškai prisijungs prie to paties Wi Fi tinklo kai tik prijungsite maitinimo kabelį 4 Stebėjimo kampo reguliavimas Atlaisvinkite reguliavimo sraigtą ir reguliavimo rankenėlę Pagal pageidavimą nustatykite stebėjimo kampą Baigę priveržkite reguliavimo sraigtą ir reguliavimo rankenėlę 0 360 microSD kortelės lizdas Reguliavimo sraigtas Reguliavimo rankenėlė 0 180 Reguliuodami stebėjimo kampą užti...

Страница 50: ... refurbished product or components This warranty does not cover the postal cost insurance and any other incidental charges incurred by you in returning the product Except where prohibited by applicable law this is your sole and exclusive remedy for breach of this limited warranty Any product that has either been repaired or replaced under this limited warranty will be covered by the terms of this ...

Страница 51: ...nten austauschen Diese Garantie deckt keine Versand Versicherungs oder sonstige Nebenkosten die Ihnen durch die Rücksendung des Produkts entstehen Soweit nicht durch geltendes Recht untersagt ist dies Ihr einziges und ausschließliches Rechtsmittel im Fall einer Verletzung dieser beschränkten Garantie Jedes Produkt das im Rahmen dieser beschränkten Garantie entweder repariert oder ausgetauscht wurd...

Страница 52: ...dos Esta garantía no cubre el coste postal de transporte el seguro ni ningún otro coste incidental en el que incurra durante la devolución del producto Excepto si lo prohíbe la legislación vigente esta es la solución única y exclusiva en caso de incumplimiento de esta garantía limitada Cualquier producto que se haya reparado o sustituido en virtud de esta garantía limitada estará cubierto por los ...

Страница 53: ... composants par un produit ou des composants neufs ou remis en état Cette garantie ne couvre pas les frais de port l assurance ni les éventuels frais annexes de renvoi du produit Sauf si la législation en vigueur l interdit cette garantie est votre seul et unique recours Tout produit réparé ou remplacé en vertu de la présente garantie limitée sera couvert pendant une durée de quatre vingt dix 90 j...

Страница 54: ... dei componenti nuovi o ricondizionati Questa garanzia non copre spese postali assicurazione ed eventuali altre spese accessorie sostenute dall acquirente per la restituzione del prodotto Salvo laddove proibito dalla legge applicabile ciò costituisce l unico ed esclusivo rimedio per la violazione della presente garanzia limitata Qualsiasi prodotto riparato o sostituito ai sensi della presente gara...

Страница 55: ...critério da Empresa Esta garantia não cobre as despesas postais o seguro e quaisquer outros encargos acessórios incorridos por si ao devolver o produto Salvo nos casos em que é proibido pela legislação aplicável este é o seu único e exclusivo recurso por incumprimento desta garantia limitada Qualquer produto que seja reparado ou substituído nos termos desta garantia limitada estará coberto pelos t...

Страница 56: ...я не распространяется на почтовые расходы страховку и любые другие непредвиденные расходы понесенные Вами в связи с возвратом продукта За исключением случаев запрещенных действующим законодательством этот документ является Вашим единственным и исключительным средством судебной защиты в случае нарушения Ваших прав закрепленных в ограниченной гарантии К любому продукту который уже был отремонтирован...

Страница 57: ... ei hüvitata postikulu kindlustust ja muid kulusid mis on teile toote saatmisel tekkinud Välja arvatud juhul kui see pole seadustega teisiti sätestatud on see teie ainus võimalus garantiiremondiks Kõigile toodetele mis on parandatud või asendatud piiratud tootjagarantii raames laienevad piiratud garantii tingimused üheksakümmend 90 päeva alates kohale toimetamisest või järele jäänud esialgne garan...

Страница 58: ...s apdrošināšanu vai jebkuras citas izmaksas kas var rasties atgriežot produktu Izņemot gadījumus kad tas ir aizliegts ar piemērojamiem tiesību aktiem šis ir Jūsu vienīgais garantijas dokuments Jebkuram produktam kurš tika salabots vai aizvietots ar citu šīs garantijas ietvaros garantijas tērmiņš ir ne ilgāks par deviņdesmit 90 dienām kopš piegādes dienas vai oriģinālo garantijas termiņu Garantijas...

Страница 59: ...ūra remontas arba įrenginio keitimas galimas naudojant naujus arba prieš tai sutaisytus ir veikiančius komponentus Į produkto garantiją neįskaičiuojamos pašto išlaidos draudimo ir kiti mokesčiai susiję su Jūsų patirtais nuostoliais dėl gaminio grąžinimo Visais atvejais išskyrus šalies teisės aktuose numatytose išimtyse tai vienintelė bei išskirtinė priemonė garantiniam aptarnavimui Kiekvienam sure...

Страница 60: ...UD01726B ...

Страница 61: ...nty claim is made outside the warranty period or if the proof of purchase is not provided For any malfunction defect or failure caused by or resulting from the evidence of impact mishandling tampering use contrary to the applicable instruction manual incorrect power line voltage accident loss theft fire flood or other Acts of God shipping damage or damage resulting from repairs performed by unauth...

Страница 62: ... ALL OTHER ITEMS AND PETS RESULTING FROM YOUR USE OF THE PRODUCT INFORMATION DATA OR PRODUCT PRODUCT INFORMATION AND DATA PROVIDED BY EZVIZ IS NOT INTENDED AS A SUBSTITUTE FOR DIRECT MEANS OF OBTAINING THE INFORMATION FOR EXAMPLE A NOTIFICATION PROVIDED THROUGH THE PRODUCT IS NOT INTENDED AS A SUBSTITUTE FOR AUDIBLE AND VISIBLE INDICATIONS IN THE HOME AND ON THE PRODUCT NOR FOR A THIRD PARTY MONIT...

Страница 63: ...TY FOR ALL DAMAGES EXCEED THE PURCHASE PRICE THE PRODUCT EZVIZ does not undertake any liability for personal injury or property damage as the result of product interruption or service termination cause by a improper installation or usage other than as requested b the protection of national or public interests c Force Majeure d yourself or the third party including not limitation using any third pa...

Страница 64: ...ice complies with Industry Canada licence exempt RSS standard s Operation is subject to the following two conditions 1 this device may not cause interference and 2 this device must accept any interference including interference that may cause undesired operation of the device Under Industry Canada regulations this radio transmitter may only operate using an antenna of a type and maximum or lesser ...

Страница 65: ... Si el reclamo de garantía se realiza fuera del período de garantía o si no se proporciona prueba de la compra Para cualquier disfuncionalidad defecto o falla causada o resultante de la evidencia del impacto maltrato manipulación uso contrario a lo dispuesto en el manual de instrucciones aplicable voltaje de cable incorrecto accidente pérdida robo incendio inundación u otros casos fortuitos daño d...

Страница 66: ...ÓVIL Y CUALQUIER OTRO ARTÍCULO O ANIMALES DOMÉSTICOS QUE RESULTEN DEL USO DE LA INFORMACIÓN O DATOS DEL PRODUCTO O DEL PRODUCTO LA INFORMACIÓN Y LOS DATOS DEL PRODUCTO QUE PROPORCIONA EZVIZ NO PRETENDEN REEMPLAZAR A LOS MEDIOS DE OBTENCIÓN DE INFORMACIÓN DIRECTOS POR EJEMPLO UNA NOTIFICACIÓN PROVISTA CON EL PRODUCTO NO PRETENDE REEMPLAZAR A LAS INDICACIONES AUDIBLES Y VISIBLES EN EL HOGAR Y EN EL ...

Страница 67: ...EL PRECIO DE COMPRA DEL PRODUCTO EZVIZ no asume ninguna responsabilidad por los daños a las personas o a la propiedad que resulten de la interrupción del producto o la finalización del servicio causada por a la instalación o el uso inadecuado diferente al estipulado b la protección de los intereses nacionales o públicos c Fuerza mayo d el uso por parte suya o de un tercero de productos de terceras...

Страница 68: ...anada La operación está sujeta a las siguientes dos condiciones 1 que el dispositivo no cause interferencias y 2 que el dispositivo acepte cualquier interferencia incluso la interferencia que pueda causar un funcionamiento no deseado del dispositivo De acuerdo con la normativa de Industry Canada este transmisor de radio solo puede funcionar con una antena de un tipo y ganancia máxima o menor a ell...

Страница 69: ... reste de la période de garantie d origine si elle s avère plus longue Cette garantie est nulle est non avenue Si la réclamation au titre de la garantie est formulée hors garantie ou si aucune preuve d achat n est fournie En cas de dysfonctionnement de défaut ou de panne résultant manifestement d un impact d une mauvaise manipulation d une altération d un usage contraire au mode d emploi applicabl...

Страница 70: ...MAGES NOTAMMENT RELATIFS À VOTRE CÂBLAGE VOTRE ÉCLAIRAGE VOTRE ÉLECTRIQUE VOTRE DOMICILE VOTRE PRODUIT LES PÉRIPHÉRIQUES DE VOTRE PRODUIT VOTRE ORDINATEUR VOTRE APPAREIL MOBILE ET TOUT AUTRE OBJET OU ANIMAL DE COMPAGNIE RÉSULTANT DE VOTRE USAGE DES RENSEIGNEMENTS DES DONNÉES OU DU PRODUIT LUI MÊME LES RENSEIGNEMENTS ET LES DONNÉES DU PRODUIT FOURNIS PAR EZVIZ NE SAURAIENT REMPLACER UN MOYEN DIRECT...

Страница 71: ...ODUIT EZVIZ n endossera aucune responsabilité en cas de dommages corporels ou de dégâts matériels résultant d une interruption du produit ou d une résiliation de service causée par a une installation ou un usage incorrect b la protection des intérêts nationaux ou publics c un cas de force majeure d vous même ou un tiers y compris l usage de produits logiciels ou applications d un tiers EN CE QUI C...

Страница 72: ...ce d Industrie Canada Son fonctionnement est soumis aux deux conditions suivantes 1 cet appareil ne doit pas causer d interférences et 2 cet appareil doit accepter toute interférence reçue notamment les interférences susceptibles d occasionner un fonctionnement indésirable de l appareil Conformément aux réglementations d Industrie Canada ce radio émetteur peut uniquement être utilisé avec une ante...

Отзывы: