background image


88 

O

O

p

p

e

e

r

r

a

a

t

t

i

i

o

o

n

n


M

M

a

a

n

n

u

u

a

a

l

l


10.16

10.16

10.16

10.16


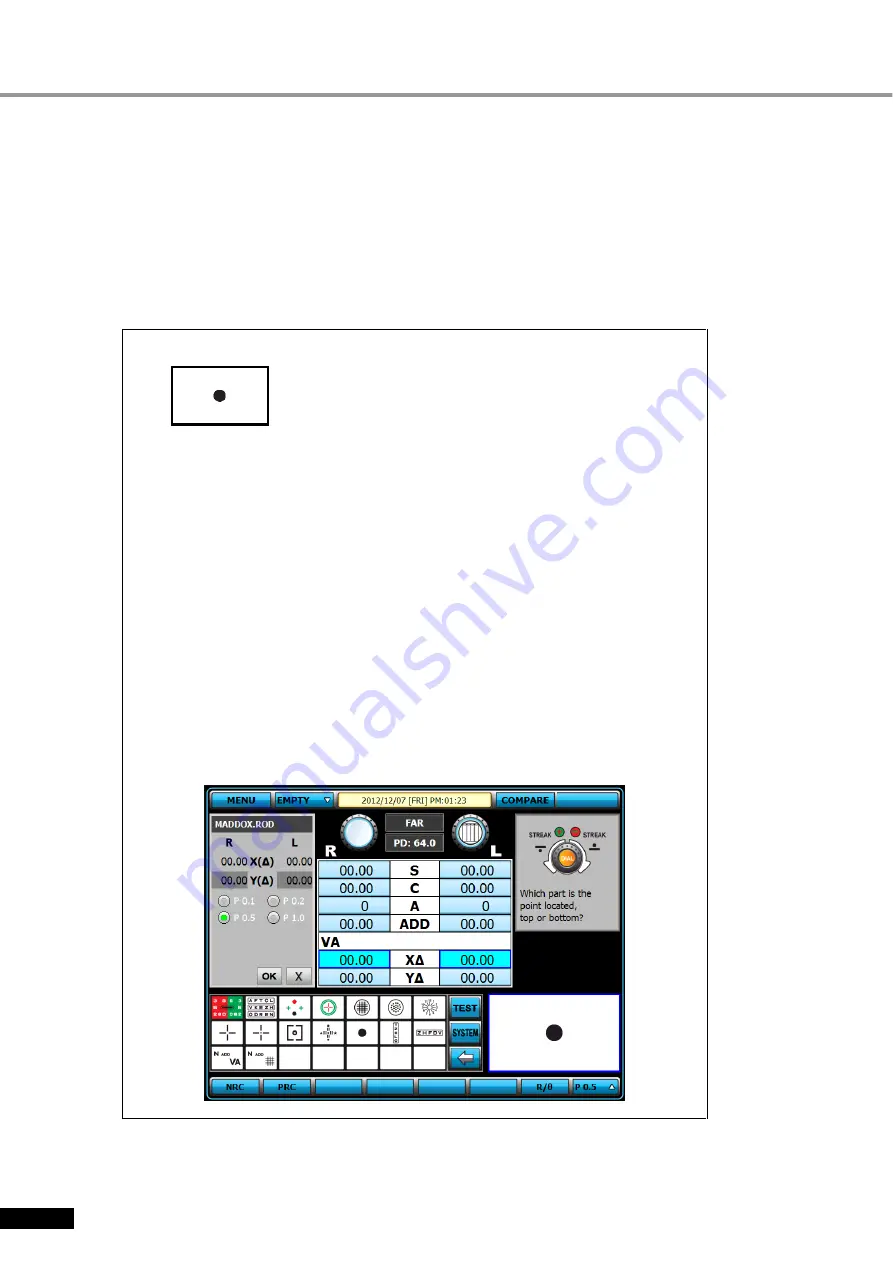
Vertical Maddox Rod Test 


Purpose: In subjective test, do the Vertical Heterophoria in the way of Maddox Rod. 


Chart: Maddox Chart 


Auxiliary Lens: Rotating Prism for right eye, Vertical Maddox for left eye. 


Target: The horizontal bar seen with the left eye and the Maddox Chart seen with the right eye 
must be united. 


Way of Test 


1. On Special Chart clause of touch screen, press Maddox Chart to choose the 

Horizontal Maddox Rod Test Mode At this time, a guide and prism change window 
appear on the upper left and upper right part of the screen, respectively.   


2. At this time, on upper left of touch screen, press Vertical Prism button, to change it 

into Vertical Maddox Rod Test Mode.   

 
3. Turn the dial until the line and the dot are united as one. 
 

  If the line locates over the dot, turn the dial clockwise (- direction.)   

(Hypophoria) 
 

  If the line locates under the dot, turn the dial counterclockwise (+ direction.)   

(Hyperphoria) 
 

  If the line and the dot are seen as united, that is an orthophoria.   


[Figure 10-16] Vertical Maddox Rod Test


Содержание EDR 7800

Страница 1: ......

Страница 2: ......

Страница 3: ...lectric shock Type B Applied Part The EDR 7800 is classified as a device with a Type B Applied Part Degree of protection against ingress of liquids IPX0 The EDR 7800 is classified as IPX0 Degree of protection against flammability The EDR 7800 is classified as a device not suitable to be used in a potentially flammable environment Do not use near flammable materials Method s of sterilization or dis...

Страница 4: ...ody who connects additional equipment to the signal input part or signal output part configures a medical system and is therefore responsible that the system complies with the requirements of the system standard EN 60601 1 1 2001 If in doubt consult the technical service department or your local representative For EU Countries The following mark the name address of the EU Representative shows comp...

Страница 5: ...isconnect to the mains On power connection to the mains Do not throw away the waste to inappropriate place Risk of electric shock Crushing hazard sign Hand hazard sign Instruction for user manual General mandatory action sign General prohibition sign General warning caution sign Keep dry symbol DO NOT Hand Hooks symbol Fragile symbol Recycling symbol Handle with care symbol ...

Страница 6: ...e o Shape o Shape o Shape of f f f P P P Plug lug lug lug Country Voltage frequency Shape of plug Mexico 110V 50Hz Type C E Argentina 220V 60Hz Type A Peru 220V 60Hz Type A Venezuela 110V 50Hz Type C E Bolivia Paraguay 220V 60Hz Type A Most common Type H Infrequently Chile 220V 60Hz Type A Colombia 110V 50Hz Type C Brazil 220V 60Hz 127V 60Hz Type A Type C Ecuador 110V 50Hz Type C E USA 120V 60Hz T...

Страница 7: ...his mamual it may cause injury or accident while operate it Please do use this unit after reading this well and understanding enough Keep at the place easy to find this Warning for safety CAUTION WARNING is to inform of the disaster which may cause a private severe injury or great loss of property in case of carelessness MANDATORY ACTION SIGN is to inform of the compulsory obligation which should ...

Страница 8: ...Junction Box 17 4 4 Accessaries 18 4 4 1 Ref Body 18 4 4 2 Operation Panel 19 4 4 3 JUNCTION BOX 19 4 4 4 Converter Box 20 4 5 How to install EDR 7800 21 4 5 1 Notice to install EDR 7800 22 5 Basic operation 5 Basic operation 5 Basic operation 5 Basic operation 23 23 23 23 5 1 How to conrtol Key pad button on OP PANEL 23 5 2 How to control touch screen monitor 25 6 Test Mode 6 Test Mode 6 Test Mod...

Страница 9: ...4 9 1 5 Check the Power of Glasses for Right Eye 64 9 1 6 Adjustment of the SPH CYL AXIS Value 65 9 1 7 Cross Cylinder Test using Dots Chart AXIS 66 9 1 8 Cross Cylinder Test using Dots Chart CYL 66 9 1 9 Red Green Balnace Test for single eye 67 9 1 10 Check the Power of Glasses for Left Eye 67 9 1 11 Binocular Balance Test at Polarized Light 68 9 1 12 Check the Power of Glasses for both eyes 68 9...

Страница 10: ... 10 23 Horizontal Von Graefe Test 99 10 24 Vertical Von Graefe Test 100 10 25 Minute Stereo Acuity Test 101 11 Etc Convenient Function 11 Etc Convenient Function 11 Etc Convenient Function 11 Etc Convenient Function 102 102 102 102 11 1 Field Selection Shortcut Key 102 11 2 SPH Large step value change 102 11 3 SOFT Rest compulsively 102 11 4 Test Mode Comparison COMPARE function 103 11 5 Menu Dial...

Страница 11: ... 109 109 13 1 Replacement of Printing Paper 109 13 2 Cleaning 109 13 3 Service Information 109 13 3 1 Repair 109 14 EMC ELECTROMAGNETIC COMPATIBILITY 14 EMC ELECTROMAGNETIC COMPATIBILITY 14 EMC ELECTROMAGNETIC COMPATIBILITY 14 EMC ELECTROMAGNETIC COMPATIBILITY 110 110 110 110 15 Disposal of waste products 15 Disposal of waste products 15 Disposal of waste products 15 Disposal of waste products 114...

Страница 12: ...and consecutive operation of jog shuttle does not skip any data allowing more accurate and prompt vision test possible To minimize interruption for control power an auto shielding function works when a lens more than 0 5D operates You can run complicated functions easily with SHIFT keys and it is convenient to execute various options for test It supports short distance PD 45 75mm and short distanc...

Страница 13: ...n use please unplug and then consult the maker Please contact the maker or the distributor in case exchange parts Battery Fuse and others 1 It could affect the precise measurement if the uint is exposed to a direct sunray or the bright indoor illumination It s recommended to use under the proper optometry room 2 It may gather dew on lens for a patient or optic parts if heat indoor suddenly in a co...

Страница 14: ... or many dust 6 Don t disassemble or modify at one pleases 7 Do let only a skilled one use the unit 8 Must connect or disconnect power cable only after switching off 9 Don t operate the unit with wet hands Otherwise may cause an electric shock 10 Do turn off the power when not in use for a long time 11 Electromagnetic waves discharged from mobile phones radiotelegraphs wireless toys may cause malf...

Страница 15: ...Do not let use the device besides a skilled people Make sure to turn off the unit if do not use for a long time Do not turn off the device before the device runs fully Prohibiting power off on loading 3 3 3 3 3 3 3 3 How to store and handle after use How to store and handle after use How to store and handle after use How to store and handle after use This device is designed to be used only indoors...

Страница 16: ...ollowings here 4 1 4 1 4 1 4 1 Body of EDR 7800 Ref Body EDR 7800 body is the most important part of the Digital Refractor and is installed in the unit table Figure 4 1 Digital Refractor Ref Body For Tester Figure 4 2 Digital Refractor Ref Body For Patient Leveler Forehead Fixing Dial VD Control Dial VD Test Window Near distance Vision Chart Near Distance Vision Chart Bar VD Test Window Forehead P...

Страница 17: ... to fix near distance vision chart Face Protector Treated softly for a human face It could be detachable Horizontal Controller Level out the equipment by rotating the dial Forehead Prop A plate to prop patient s forehead Test Window The patient can view the chart through the lens Table 4 1 Ref Body 4 2 4 2 4 2 4 2 Operation Panel It controls the products such as ECP 5400 ERK 7800 Figure 4 3 Operat...

Страница 18: ...ton Choose various tests and charts by pressing the button Jog Dial button Change the lenses value by turning it to Left and Right RS 232 PORT Used to communicate with PC USB PORT Used to upgrade the product General USB Type S W upgradd Mini USB Type used to connect to PC JUNCTION BOX PORT Connecting Terminal Connect it with 10pins of the Junction Box Table 4 2 Operation Panel Figure 4 4 Operation...

Страница 19: ... the ECP 5400 converter and 4 pins cables AC Power A terminal to connect outer power with this equipment Power Switch A switch to power on or off EDR 7800 Fuse T2AH 250V A device to protect this equipment from excessive currents Connecting Terminal for Others A terminal to conncet this product with other devices Converter Connecting Terminal for ERK 7800 A terminal to connect ERK 7800 converter an...

Страница 20: ...18 O Op pe er ra at ti io on n M Ma an nu ua al l 4 4 4 4 4 4 4 4 Accessaries Those are various accessories offered by EDR 7800 4 4 1 4 4 1 4 4 1 4 4 1 Ref Body Figure 4 7 Ref Body Accessaries ...

Страница 21: ...e leveler 2 A Cable to connect with the Junction Box A cable to connect the Junction Box and the Ref Body Cable is manufactured to 1M 2M 3 M Is offered to basis 3 M at product shipping 1 Table 4 4 Ref Body Accessaries 4 4 2 4 4 2 4 4 2 4 4 2 Operation Panel Figure 4 8 Operation Panel Accessaries Nomination Function Q ty Interface Cable A cable to connect Operation Panel and Junction Box 10 pins Ca...

Страница 22: ... Nomination Function Q ty ERK 7800 Converter Box A Converter Box for ERK 7800 1 ERK 7800 Serial Cable A cable to connect the Converter Box and ERK 7800 Serial Port 1 ERK 7800 Serial Cable A cable to connect the Converter Box and the Junction Box 4 pins 1 ECP 5400 Converter Box A converter Box for ECP 5400 1 ECP 5400 Serial Cable A cable to connect the Converter Box and ECP 5400 Serial Port 1 ECP 5...

Страница 23: ... 1 to see the process 5 Connect ERK 7800 Refer to the article 5 2 to see the process 6 Connect the power cable of the Junction Box and then check out whether all cables are connected properly 7 Power on ECP 5400 8 Power on ERK 7800 9 Power on the Junction Box 10 After power on the Ref Body gets initialized and the Logo comes out on the LCD screen of the Operation Panel And then the initializing sc...

Страница 24: ... Styrofoam to the bottom of JUNCTION BOX Stick a insulator for example insulation sheet or Styrofoam to the bottom of CONVERTER BOX Need to arrange the surrounding cable Do separate and arrange each cable such as A C cable and other communication cable so that they may be not mixed up Check out if there is a Leakage current in JUNCTION BOX and CONVERTER BOX Method to check a leakage current by mea...

Страница 25: ...program Custom definition unit test and editing message It could do color blindess test and supply various near chart images S W version Chart Projector device and homepage PRINT Button Print out the measurement value and it is valid to print out the measurement value along with the data to be loaded from the exterior devices It could set the measurement value to be saved into DATABASE and initial...

Страница 26: ... Left Binocular Select the eys to be measured With R L can choose Dominant Eye Dial button Alter the chosen field value according to the applied step unit by rotating dial or pressing Button It could be moved to S C A field with Dial button 1 2 Button Execute Cross Cylinder Test Cross Cylinder Test is executed as sams as the mode to be designated on System Configuration In case of JACKSON MODE whe...

Страница 27: ...nsmeter mode SUB button Subjective vision test mode FIN button Prescription mode FIELD selection button Can select the field R L BIN which want to amend a value on touch screen S button Select the field for Sphere power SPH C button Select the field for Cylinder power CYL A button Select the field for Axis AX ADD button Select the field for Addition VA button Select the field for Visual acuity X b...

Страница 28: ...A test when press button with SHIFT button List to use a special type of chart would alter when press button but list to use a normal type of chart would alter when press button If want to begin customized unit test press SYSTEM button to change list into CUSTOM chart list and then select the chart to be used among the registered items On the registered chart C Custom show but on the non registere...

Страница 29: ...es R L Polarized light 135 degrees R 10 BI L 6 BU R Vertical Maddox L Horizontal Maddox R L Pin Hole R L Jackson Cross Cylinder R Red Filter L Green Filter R L PD check R L Retinoscopy Lens Test distance 67cm R L Retinoscopy Lens Test distance 50cm Table 5 1 List of Auxiliary lens 10 BI lens is changeable from 0 to 5 according to the value designated on SYSTEM CONFIG page 2 10 BI COMPLEMENT In cas...

Страница 30: ...f 10 BI Prism Lens and Installation FUNCKEY button It is used to execute the function of FUNKEY or to select increase and decrease unit when change field value Different meaning and function are designated on a button per each mode and it d be used helpfully on each test process ...

Страница 31: ...other modes into UA mode RK Mode Auto Ref Keratometer Test Mode It is a mode to save the test results of the auto ref keratometer After receiving information from the auto ref keratometer press LOAD button to save the test results You can change others into RK mode by pressing RK button LM Mode Auto Lensmeter Mode It is a mode to save test results of auto lensmeter After receiving information from...

Страница 32: ...ive test result obtained from Ref Keratometer and Lensmeter and subjective test result obtained from EDR 7800 In other words the patient can compare directly objective test results with subjective test results through mode changes Beside it coduld compare and analyze the information of the patient from various aspects make complementary correction between them and allow the proper prescription for...

Страница 33: ...right part of the screen Set the fileld value by selecting the field and lift PRESET mode by pressing SHIFT and Masking button together Lenses are inserted at once according to the determined value of field Figure 6 3 PRESET Mode AUX OFF Mode AUX OFF Mode temporarily removes auxiliary lenses Polarized Light Red Green Fixed Cross Cylinder Lenses 6 BU Lenses and 10 BI Lenses which are put in during ...

Страница 34: ...R 7800 serves both Far vision and Near vision To do Near vision test change the mode by pressing FAR NEAR button on touch screen or adjust Addition only while maintaining Far vison mode by pressing ADD button If a patient has even presbyopia with nearsightedness myopia it s recommended to test on ADD mode by pressing ADD button On each method the Ref Body of EDR 7800 is tilted to the opposite side...

Страница 35: ...f Function key below of screen Set up patient s eye Can alter age by pressing AGE button and furthermore Add per age is automatically applied if ADD ESTIMATION on SYSTEM CONFIG page 3 is set into YES 그림 6 6 Applying addition per age On Near vison test mode hang up th near vision chart to test how far the patient can see the chart and put Addition if necessary Figure 6 7 Hang up the Near Vision Cha...

Страница 36: ...0 does not run To set up the above option enter the SYSTEM CONFIG mode through MENU mode and move on to page 7 by pressing 7 button Then press OK button to save it after setting all Figure 7 1 Chart projector setup on SYSTEM CONFIG page 7 7 2 7 2 7 2 7 2 Option setting for Auto Ref Keratometer ERK 7800 It s recommended to install ERK 7800 to make full use of the function of EDR 7800 Although there...

Страница 37: ... the database of EDR 7800 Transmit the test results of the Auto Ref Keratometer to EDR 7800 The data that is transmitted into the DATABASE is saved automatically When the vision test is finished by pressing PRINT button the data is saved automatically into DATABASE It s possible to save the measurement data only without printing out if press ALT and PRINT button together Figure 7 2 LOAD DATA List ...

Страница 38: ...the test results after printing out are saved automatically into the memory of EDR 7800 on a basis of first come first go To pull out the results of the built in database choose the necessary menu by pressing LOAD button and then check out the past results that are arranged according to the patients IDs The lenses also can be put in automatically Figure 7 4 List of RK data which is transmitted Fig...

Страница 39: ...t Custom Program EDIT TEST Edit Custom Test EDIT MESSAGE Edit Custom Program Name Custom Test Name Various messages and Print Footer GALLERY Serve color blindness test and supply various charts and images for near vision test ABOUT Serve S W version Chart Projector device type and homepage address Figure 8 1 MENU Selection 8 1 8 1 8 1 8 1 TEST RESULT On TEST RESULT can check 4 measurement result f...

Страница 40: ...a al l LIST1 SPH CYL AXIS ADD VA test result Figure 8 2 LIST1 LIST2 ADD VA X Y NPC NPA Fusion Minute Stereo Aniseikonia test result Figure 8 3 LIST2 LIST3 BLUR BREAK RECOVERY NPC NPA Fusion Minute Stereo Aniseikonia test result Figure 8 4 LIST3 ...

Страница 41: ...IXATION MADDOX NRC PRC Figure 8 5 PRISM Can print out the test result by pressing PRINT button or OK button on the screen Can enter TEST RUSULT without printing if PREVIEW LIST on PRINT OPTION 6page of SYS TEM CONFIG is set as YES If want to print out directly set PREVIET LIST as NO Figure 8 6 PREVIEW LIST on 6page of SYSTEM CONFIG ...

Страница 42: ...ere is the explanation how to handle the button to do SYSTEM CONFIG Changing pages There are 7 pages and you can move to the next page in order by touching 1 7 on the screen Changing value of each item Select the button on the screen for each item and can change each value RESET Can restore each value to the original state by pressing RESET on the screen but this function is valid only before savi...

Страница 43: ...ose one between and and is the initial one If press on the screen at CYL mode CYL mark change or temporarily CYL STEP Designate the increased or decreased value of CYL You can choose one among 0 25D but the initial value is 0 25D AXS STEP Designate the increased or decreased value of AXS You can choose one among 1 5 15 30 and 45 but the initial value is 5 STEP Desginate the increased or decreased ...

Страница 44: ...ES or NO and the initial value is YES CC TYPE Designate the type of Cross Cylinder You can choose one among Jackson Cross Cylinder 0 25 or 0 50 and DUAL Dual Cross Cylinder but the initial value is Jackson Cross Cylinder 0 25 S E Fix Determine whether to fix the SPH You can choose one among OFF SPH is fixed all the time CYL MODE SPH is fixed only on CYL mode CC ONLY SPH is fixed only on Cross Cyli...

Страница 45: ...OFF but the initial value ON ALLOW ADDITION Determine whether to allow the minus value of Addition You can choose YES or NO but the initial value NO ADD ESTIMATION Determine whether to designmate presumptuous Addition according to ages You can choose YES or NO but the initial value NO WORKING DISTANCE Designate the working distance on Short Distance Mode You can choose from 35cm to 70cm but the in...

Страница 46: ...00D INPUT FUSION Determine whether to put in the test value of Worth 4 Dots You can choose YES or NO but the initial value is YES INPUT STEREO Determine whether to put in the test value of Stereo Test You can choose YES or NO but the initial value is YES INPUT ANISEIKONIA Determine whether to put in the test value of Aniseikonia You can choose YES or NO but the initial value is YES STARTUP MODE De...

Страница 47: ... every 5 minutes But the initial value is 10 minutes TEST TIME Designate the beginning time of the test to calculate the whole time of the test You can shoose ENTERING SUBJ the time that SUBJ mode starts or BEGINNING TEST the time that the test starts but the initial values is ENTERING SUBJ DATE DISPLAY Designate the expression type for the date and time appear on the upper right part of the scree...

Страница 48: ...nt LM data only and OFF do not print any data but the initial value is OFF PRINT KERATO DATA Determine whether to print the value of KEAROMETRY Radius of corneal curvature You can choose YES or NO but the initial value is NO PRINT TEST DATA Determine whether to print the value of Prism for each Heterophoria Test You can choose YES or NO but the initial values is NO PREVIEW LIST Determine whether t...

Страница 49: ...ial value is YES LM COPY Determine whether to bring the Prism data from LM You can choose YES or NO but the initial value is NO LM COPY ADD Determine whether to bring the Addition data from LM You can choose YES or NO but the initial value is NO CP CONNECTION Designate how to connect Chart Projector You can choose one among SERIAL serial communication or NONE no connecting but the initial value is...

Страница 50: ...t up System test and Programs according to the individual s test purpose and preference in advance 8 3 1 8 3 1 8 3 1 8 3 1 Edit Custom program Enter program choice mode by pressing EDIT PROGRAM menu after pressing MENU button or touching MENU on the screen The program list would appear on the left side You can choose and edit one of 11 programs except STANDARD If the name of a selected program is ...

Страница 51: ...e chart buttons On the below side of the screen it shows the list of each step for Custom program On the bottom of the screen it shows function keys so that check the previous contents and the next contents for the perpared step by pressing PREV and NEXT ADD is to add new step on the last step in the process of editing and INS is to add new step on the right previous step against the current step ...

Страница 52: ...sing or button AUXILIARY LENS Select a necessary auxiliary lens Choose lens directly among auxiliary lenses on window by selecting lens on the touch screen PD Measure the Pupil Distance MESSAGE Select help or message to utilize at the current program step Select a message to need by pressing or button on the touch screen MOVE STEP PREV button Move to the previous step NEXT button Move to the next ...

Страница 53: ... Figure 8 18 STEP 01 Polarlized Binocular Balance Test STEP 02 Schober Test Add new step by pressing INS button After choosing select chart by rotating jog dial or select chart on the screen directly Select FAR mode at the right side of combo box of TEST MODE Figure 8 19 STEP 02 Schober Test ...

Страница 54: ...ly by touching And then select FAR MODE for T MODE SPH for DATA ELEMENT BIN for EYE on combo box And then choose open lens at lens selection window for R L Figure 8 20 STEP 03 Confirming binocular visual acuity Lastly press OK button to save and then exit After pressing SHIFT button and PROG button together select CUSTOM PROGRAM A to implement It would shows the saved step in order ...

Страница 55: ...Custom Test Select one among 35 Custom test and edit it too If the name of a selected test is written with dark black it means it s already to be set up so user can execute the test in the measurement process Figure 8 21 List of Custom Test Enter edit custom test mode by pressing CUSTOM TEST A1 and then The beginning component to edit cusom test consist of CHART Test name could not be changed on e...

Страница 56: ...stom Test To do Edit Custom Test press to alter into Custom chart list and select a necessary chart among the registered items Figure 8 23 Chart List for Custom Test It shows C Custom on the left top of the registered chart but on non registered chart it shows N Nothing ...

Страница 57: ... Select message group on running EDIT MESSAGE If touch the test name on the screen move to the message group In succession select a message to edit and then enter edit mode by pressing EDIT on function key area Figure 8 25 Select EDIT MESSAGE group In case of PRINTER FOOTER can enter edit mode directly without selecting a message per group Buttons on imaginary keyboard is arranged in order and can...

Страница 58: ...ng PASTE button PRINT FOOTER 3 lines 23 letters per line are editable How to use FAST EDITOR FAST EDITOR consist of two windows one is edit window on the upper side and the other is a imaginary keyboard on the below SAVE Save the edited contents by pressing CANCEL Exit without saving by pressing Switch Capital Small letter Switch the window for letter into Capital letter or Small letter each other...

Страница 59: ...ortable and comprehensible easily if change CUSTOM PROGRAM A into CHILDREN Enter edit mode through imaginary keyboard window if press EDIT on function key area after selecting CUSTOM PROGRAM A by pressing PROGRAM NAME tab button Figure 8 26 Edit the name of Custom Program 8 4 2 8 4 2 8 4 2 8 4 2 Edit the name of Custom test Enter edit mode through imaginary keyboard window if press EDIT on functio...

Страница 60: ...nction key area after selecting a blank area by pressing TEST GUIDE tab button Figure 8 28 Edit CUSTOM GUIDE MSG 8 4 4 8 4 4 8 4 4 8 4 4 Edit shop name Edit company name telephone number web and address to be used to print out properly for each user Enter edit mode directly through imaginary keyboard window if press PRINT FOOTER tab button Figure 8 29 Edit PRINT FOOTER ...

Страница 61: ...ion test with near vision chart And could expain various vision and ophthalmic diseases very easily to the patient If select the item to be used at the menu of touch screen the various images appear properly The image become big if press RUN button on function key area after selecting one among the right images Move to previous image or next image if press PREV or NEXT button Figure 8 30 Main Scre...

Страница 62: ...er ra at ti io on n M Ma an nu ua al l 8 6 8 6 8 6 8 6 ABOUT EDR 7800 serves Patient ID S W version Chart Projector device type Language and the information of the company with ABOUT mode Figure 8 31 ABOUT running ...

Страница 63: ...gram Press SHIFT and PROG keys at the same time to float program choice menu on the left side or you can choose STANDARD here and press OK key to operate as same When the System Defined Program starts you would see the name and step mark of the current program which is STANDARD and 1 17 at the moment on the lower part of the right screen Figure 9 1 Choice and Operation of the STANDARD Program 9 1 ...

Страница 64: ...62 O Op pe er ra at ti io on n M Ma an nu ua al l Figure 9 2 Adjustment of 1 st step S C A Value ...

Страница 65: ...ction clockwise Continue this until the patient answers that he sees both with similar clarity Figure 9 3 2 nd step Cross Cylinder Test Axis 9 1 3 9 1 3 9 1 3 9 1 3 Cross Cylinder Test using Dots Chart CYL The 3 rd step of the System Defined Program is to revise the value of CYL for the right eye more elaborately based on the result of 1st step SPH CYL AXIS test In case of Jackson Cross Cylinder T...

Страница 66: ...ckground respectively When he says the letter in green background is clearer turn the dial in direction countercloskwise while one in the red backgroung in direction clockwise because that is not revised Continue this until the patient says that he sees both letters with similar clarity Figure 9 5 4 th step Red Green Balance Test for Monocular 9 1 5 9 1 5 9 1 5 9 1 5 Check the Power of Glasses for...

Страница 67: ...ac ct to or r E ED DR R 7 78 80 00 0 9 1 6 9 1 6 9 1 6 9 1 6 Adjustment of the SPH CYL AXIS Value 6 th step of the System Defined Program is basically to adjust the value of SPH CYL AXIS for left eye Figure 9 7 Adjustment of the S C A Value ...

Страница 68: ...ail explanation please refer to the article 9 1 2 Cross Cylinder Test using Dots Chart AXIS Figure 9 8 Cross Cylinder Test AXIS 9 1 8 9 1 8 9 1 8 9 1 8 Cross Cylinder Test using Dots Chart CYL 8 th step of the System Defined Program is to revise the value of CYL for the left eye more elaborately based on the result of 6th step SPH CYL AXIS test For a detail explanation please refer to the article ...

Страница 69: ...tely based on the result of 6th step SPH CYL AXIS test For a detail explanation please refer to the article 9 1 4 Red Green Balance Test for single eye Figure 9 10 Red Green Balnace Test for single eye 9 1 10 9 1 10 9 1 10 9 1 10 Check the Power of Glasses for Left Eye After the test of left eye is over check the power of glasses for left eye again If necessary use a mask for the test Figure 9 11 ...

Страница 70: ...with 45 degrees and right with 135 degrees For more detailed information please refer to the article 10 17 Binocular Balance Test at Polarized Light Figure 9 12 Binocular Balance Test at Polarized Light 9 1 12 9 1 12 9 1 12 9 1 12 Check the Power of Glasses for both eyes After the test of both eyes is finished check the power of glasses for both eyes again If necessary use a mask for the test Figu...

Страница 71: ...g Vertiacl Unequal Coincidence Aniseikonia chart in the middle of binocular visual acuity test Test Heterophoria following the guidance and do Coincidence Aniseikonia Test if necessary and then record the result For more detailed explanation please refer to the article 10 20 Vertical Coincidence Aniseikonia Test Figure 9 14 Far Distance Vertiacl Coincidence Aniseikonia Test ...

Страница 72: ...ing the guidance For more detailed information please refer to the article 10 4 Near Distance Addition Test Using Cross Grid Near ADD Figure 9 15 Near Distance Cross Grid Test 9 1 15 9 1 15 9 1 15 9 1 15 Near Vision Test with Addition Near VA with ADD Test the Near Vision with Addition For more detailed information please refer to the article 10 1 Near VA with ADD Figure 9 16 Near Vision Test with...

Страница 73: ... the article 10 23 Horizontal Von Graefe Test and the article 10 24 Vertical Von Graefe Test Figure 9 17 Near Distance Horizontal Vertical Von Graefe Test By following all the above all standard tests are finished which are in order of Monocular Refraction right Monocular Refraction letf Binocular test Binocular Vision Near Distance Test Ref body may hurt a patient in the process of initialization...

Страница 74: ...est CYLINDER TEST POWER Test of Cylinder Power CYLINDER TEST AXIS Test of Cylinder Axis RED GREEN TEST Monocular Red Green Test CROSS CYL TEST POWER Cross Cylinder Test Power Test CROSS CYL TEST AXIS Cross Cylinder Test Axis Test CROSS GRID Cross Grid Test Ver2 00 and over MADDOX ROD HORZ Horizontal Maddox Rod Test MADDOX ROD VERT Vertical Maddox Rod Test BINOCULAR BALANCE Binocular Balance Test a...

Страница 75: ...y Lens None Target Test the Near Vision with Addition for left right and Binocular Way of Test 1 On Special Chart clause of touch screen press N ADD VA button to express the Near Vision Chart or you can establish the test mode by pressing TEST and choosing NEAR VA WITH ADD 2 Press R BIN L to choose the field for test 3 Record the estimated value of left right and both eyes Figure 10 1 Test of Near...

Страница 76: ...er the Near Point Convergence Test Mode or You can establish the test mode by pressing TEST and choosing NEAR POINT OF CONVERGENCE 2 Hang up the Near Vision Chart as much as the patient can check 3 While bringing the Near Point Chart or a ballpen near the patient find out the point where the end of the ballpen or the Chart is divided Record this distance in BREAK item 4 on the contrary while pulli...

Страница 77: ...n press N ADD VA and NPA buttons to enter Near Vision of Accommodation Test Mode or you can setup the Near Point of Accommodation Test Mode by pressing TEST button and choosing NEAR POINT OF ACCO 2 Hang up the Near Vision Chart as much as the patient can check 3 On the touch screen press BIN RIGHT LEFT and choose the field for test 4 While drawing Near Vision Chart or a ballpen near the patient fi...

Страница 78: ... of Test 1 On Special Chart clause of touch screen press N ADD button to drop the Near Vision Cross Grid Chart at a place of about 40cm or press TEST button to choose NEAR ADD 2 Press R BIN L to choose the field for test 3 Change the ADD value until the thickness or clarity of horizontal or vertical line becomes equal 4 Record the estimated value of left right and both eyes When the vertical line ...

Страница 79: ...uch screen press NADD and NRA buttons to enter the Negative Relative Accommodation Test Mode or you can setup the Negative Relative Accommodation Test Mode by pressing TEST button and choosing NEGATIVE RELATIVE ACCOM 2 Press R BIN L to choose the field for test 3 Turn the dial counterclockwise When the chart is beginning to be blurred press RECOVERY on the left dialog box of touch screen 4 If reco...

Страница 80: ... NADD and PRA buttons to enter the Positive Relative Accommodation Test Mode or you can setup the Positive Relative Accommodation Test Mode by pressing TEST button and choosing POSITIVE RELATIVE ACCOM 2 Press R BIN L to choose the field for test 3 Turn the dial clockwise When the chart is beginning to be blurred press RECOVERY on the left dialog box of touch screen 4 If recovered point is found tu...

Страница 81: ...d NRC to process test 3 In case of Far Vision Mode Horizontal Von Graefe Chart is spead out on the screen automatically In case of Near Vision Mode drop the Near Vision Van Graefe Chart at a place of about 40cm so that the patient would see it 4 Turn the dial counterclockwise When the chart is beginning to be blurred choose BREAK on the touch screen 5 Turn the dial counterclockwise When the chart ...

Страница 82: ... test 3 In case of Far Vision Mode Horizontal Von Graefe Chart is spead out on the screen automatically In case of Near Vision Mode drop the Near Vision Van Graefe Chart at a place of about 40cm so that the patient would see it 4 Turn the dial counterclockwise When the chart is beginning to be blurred choose BREAK on the touch screen 5 Turn the dial counterclockwise When the chart is beginning to ...

Страница 83: ...s 2 On Special Chart clause of touch screen press Clock Dial button to change it into distorted vision test mode 3 Press R or L button to choose the field for test 4 On touch screen press C or left right button to change it into Cylinder Power mode 5 Turn the dial in direction until all the lines are seen eqully When the location of the line which is seen the thickest is changed the axis must be a...

Страница 84: ...storted vision test mode 2 Press R or L to choose the field for test 3 On the touch screen Press S or left right button to change it to Spherical Power mode and add Fogging until tll the line of Clock Dial is seen equally 4 Question the patient like In which hour direction line is seen the thickest and the darkest 5 When the patient says all the lines are seen equally he is determined not to have ...

Страница 85: ...ch of green and red is seen more clearly or more thickly and check whether both of them are seen equally 4 If red one is seen more clearly or both of them are seen clearly try to add 0 25D and If green one is seen more clearly try to add 0 25D 6 Adjust until both are seen equally Attention In case of distorted vision this test is not available for the normal visual acuity above 1 0 or an accurate ...

Страница 86: ...screen press Dot Group Chart to move on to Cross Cylinder Test Mode 2 Press R or L to choose the field for test 3 On the touch screen press CC 0 25 CC 0 50 button to change it into Jackson Cross Cylinder Mode 4 While pressing number and number ask the patient which side letter is seen more clearly If number 1 is seen clearly turn the dial counterclockwise direction If number 2 is seen clearly turn...

Страница 87: ...p Chart to move on to Cross Cylinder Mode 2 Press R or L to choose the field for test 3 On the touch screen press CCdual to change it into Dual Cross Cylinder Mode 4 From the patient s view the Dot Group Chart is separately shown divided as two If the left one is seen clearly turn the dial counterclockwise direction If the right one is seen clearly turn the dial clockwise direction If the patient ...

Страница 88: ...ng CROSS GRID button 2 Press R BIN L to choose the field for test 3 Adjust the SPH value until thickness or clarity of horizontal or vertical line becomes equal When the vertical line is seen clearly turn the dial clockwise direction When the horizontal line is seen clearly turn the dial counterclockwise direction Figure 10 14 Cross Grid Test Before the test should be set up the Vision Axis the Cy...

Страница 89: ...t be united Way of Test 1 On Special Chart clause of touch screen press Maddox Chart to choose Horizontal Maddox Rod Test Mode At this time a guide and prism change window appear on the upper left and upper right part of the screen respectively 2 Turn the dial until the line and the dot unite as one If the line locates on the right side of the dot turn the dial clockwise direction Esophoria If the...

Страница 90: ...n press Maddox Chart to choose the Horizontal Maddox Rod Test Mode At this time a guide and prism change window appear on the upper left and upper right part of the screen respectively 2 At this time on upper left of touch screen press Vertical Prism button to change it into Vertical Maddox Rod Test Mode 3 Turn the dial until the line and the dot are united as one If the line locates over the dot ...

Страница 91: ...ld and add Fogging to about 0 5D and then loosen the interrupted accommodation 3 Ask the patient which of the upper and lower one is clearer If the upper line is seen clearly press R button and turn the dial counterclockwise to increase the right side SPH value If the lower line is seen clearly press L button and turn the dial clockwise to increase the left side SPH value When both of upper and lo...

Страница 92: ...Question the patient how many lights he sees If he says 4 dots the patient s fusio is normal If he says 2 red dots the patient is using right eye only and the Respression is occurring in his left eye If he says 3 green dots the patient is using left eye only and the Respression is occurring in his right eye If he sees 5 dots it is Diplophia If the red dot is right side of the green dot the patient...

Страница 93: ...ots in light red these cases are normal Right Eye Suppression Seen 3 green dots only it is Right Eye Suppression Left Eye Suppression Seen 2 red dots only it is Left Eye Suppression Heterophoria Seen 2 red dots and 3 green dots it is Heterophoria Alternative Suppression What the patient sees is unstable and 2 red dots and 3 green dots appear alternatively it is Alternative Repression Table 10 1 In...

Страница 94: ...f the circle On left side External Heterophoria Turn the dial counterclockwise direction to increase the value of BI prism until the cross locates in the middle of the circle On right side Internal Heterophoria Turn the dial clockwise dirction to increase the value of BO prism until the cross locates in the middle of the circle 4 Question the patient like this Is the cross upside or downside the c...

Страница 95: ...of the circle Exophoria Turn the dial counterclockwise direction to increase the value of BI prism until the cross locates in the middle of the circle Left Hyperphoria Press Vertical Prism button and turn the dial clockwise direction until the cross locates in the middle of the circle Right Hyperphoria Press Vertical Prism button and turn the dial counterclockwise direction until the cross locates...

Страница 96: ...ng Coincidence Aniseikonia Chart 2 Ask the patient if he sees the square chart well if yes ask if that square chart is tilted toward up and down or is arranged straight When the left square chart is tilted upside Upside Heterophoria of right eye Turn the dial counterclockwise to increase BD prism until the square is arranged straight When the right square chart is tilted toward upside Upside Heter...

Страница 97: ... Yes there is no Heterophoria Test done If the answer is No it is Heterophoria Process the next test 3 To start with Horizontal Heterophoria test ask the patient as following 4 Does the letter locate on the left side of the letter or the right side of it Located on left Exophoria Turn the dial counterclockwise to increase BI prism until the cross is seen well Located on right Esophoria Turn the di...

Страница 98: ...t Hyperphoria Right Hypophoria 3 Press BDBU Turn the dial clockwise until the Horizontal Cross Chart becomes a cross shage Right Hyperphoria Left hypophoria 4 Press BDBU Turn the dial counterclockwise until the Horizontal Cross Chart becomes a cross shage Exophoria Right Hyperphoria 5 Correct the Horizontal Heterophoria like 2 and correct the Vertical Heterophoria like 4 Esophoria Left Hyperphoria...

Страница 99: ...nswer is Yes there is no Heterophoria Test done If the answer is No it is Heterophoria Process the next test 3 First of all to start with Horizontal Heterophoria ask the patient as following 4 Does the letter ㄴ ㄴ ㄴ ㄴ locate on the left side of the letter ㄱ ㄱ ㄱ ㄱ or the right side of it Located on left Exophoria Turn the dial counterclockwise to increase BI prism until the cross is seen well Locate...

Страница 100: ...s shage Right Hyperphoria 4 Press BDBU Turn the dial clockwise until the Horizontal Cross Chart becomes a cross shage Esophoria Right Hyperphoria 5 Correct the Horizontal Heterophoria like 1 and correct the Vertical Heterophoria like 4 Esophoria Left Hyperphoria 6 Correct the Horizontal Heterophoria like 1 and correct the Vertical Heterophoria like 4 Exophoria Right Hyperphoria 7 Correct the Horiz...

Страница 101: ... to process this test 2 Ask the patient if the vertical bars are located on one straight line Yes no Heterophoria Test done No it s Heterophoria Process the next test 3 Of 2 of vertical bar which bar is the left side In case of upside vertical bar on left side Turn the Esophoria dial clockwise to add BO prism until the vertical bars are arranged on one straight line In case of downside vertical ba...

Страница 102: ...AFE VERT to process this test 2 Ask the patient if the vertical bars are located on one straight line Yes no Heterophoria Test done No it s Heterophoria Process the next test 3 Of 2 of vertical bar which bar is the upside In case of right bar on downside Turn the R Hyperphoria dial counter clockwise to add BD prism until the 2 horizontal bars are arranged on one straight line In case of left bar o...

Страница 103: ...ute Stereo Vision Test Mode 2 Ask the patient How do you see the bars with the standard of Fixation from at 12 3 6 to 9 o clock clockwise All the bars including central Fixation look like flat The patient does not have the capability of stereo vision Choose NG The bars at 12 and 3 o clock look like cubic The patient can perceive to 1 arc minute Choose 1 The bars at 3 and 6 o clock look like cubic ...

Страница 104: ...eld mode in order of S C A with Dial button pressing 11 2 11 2 11 2 11 2 SPH Large step value change You can alter the SPH value with SPH large step value with SHIFT button and Dial rotation together In case of SPH field Figure 11 1 SPH SHIFT step change 11 3 11 3 11 3 11 3 SOFT Rest compulsively It could be initialized as SOFT booting if press SHIFT and RESET button together It is initialized fas...

Страница 105: ...hen press the mode Figure 11 2 COMPARE mode 11 5 11 5 11 5 11 5 Menu DialogBox Shortcut Key Key pad button Operation Dial or Menu movement Dial button Menu selection MENU DialogBox close 11 6 11 6 11 6 11 6 AUX LENSES DialogBox Shortcut Key Key pad button Operation Dial or Lens movement Dial button Lens selection RESET Cancel Close R L BIN Right Light Binocular Selection change 11 7 11 7 11 7 11 7...

Страница 106: ...or Selected Field value change Dial button Save DialogBox Close RESET Cancel Close R L BIN Right Light Binocular Selection change Field Selection Change 11 12 11 12 11 12 11 12 NRC PRC Shortcut Key Key pad button Operation Dial or Selected Field value change Dial button Save DialogBox Close RESET Cancel Close Field Selection Change 11 13 11 13 11 13 11 13 NPC NPA Shortcut Key Key pad button Operat...

Страница 107: ...t movement LIST1 PRISM RESET Close 11 17 11 17 11 17 11 17 SYSTEM CONFIG Shortcut Key Key pad button Operation PROGRAM OK function Close after save PREV NEXT List movement LIST1 PRISM RESET Value Initialization SHIFT RESET Close 11 18 11 18 11 18 11 18 EDIT PROGRAM EDIT TEST Shortcut Key Key pad button Operation Dial or SYSTEM TEST item selection SYSTEM TEST change in case of EDIT PROGRAM Chart it...

Страница 108: ...ESULT would be operated To print the result press PRINT or OK button If it is supposed to be printed on papers only after all tests are done it takes so long time and much paper to complete printing Because it offers various options related with SYSTEM CONFIG PAGE 6 print time and paper saving is possible if it is setup to print only designated results ID P20120222 0001 Name M F Date 2012 02 22 16...

Страница 109: ... 00 9 00 PRC Convergence 11 00 12 00 9 00 NEAR BLR BRK RCV NRC Divergence 9 00 10 00 7 00 PRC Convergence 7 00 9 00 6 00 FAR SCHOBER BI00 50 X BO00 50 00 00 Y 00 00 COINCIDENCE BI00 50 X BO00 50 00 00 Y 00 00 MADDOX ROD BI00 50 X BO00 50 00 00 Y 00 00 PHORIA BI00 50 X BO00 50 00 00 Y 00 00 PHORIA WITH FIXATION Final Result for Prescripton Visual Acuity Test Result for Binocular NPC NPA NRA PRA Far...

Страница 110: ...0 50 X BO00 50 00 00 Y 00 00 PHORIA WITH FIXATION BI00 50 X BO00 50 00 00 Y 00 00 VON GRAEFE BI00 50 X BO00 50 00 00 Y 00 00 FAR FUSION Wroth 5 Dots STEREO NG ANISEIKONIA X Y OK OK NEAR FUSION Wroth 5 Dots STEREO NG ANISEIKONIA X Y OK OK Von Graefe Test Schober Test Coincidence Aniseikonia Test Maddox Rod Test Phoria Test without Fixation Phoria Test Fixation Von Graefe Test Fusion Minute Stereo V...

Страница 111: ...eep this instrument clean Don t use volatile object thinner or benzene etc Polish each part with a dry cloth containing detergent solution Model of the instrument EDR 7800 Serial Number 7 digit characters indicated on the name plate Symptom In detail 1 To move alone holding a fall or be dropped 2 Holding the rope packing to move your fingers can get hurt 3 The product is damaged packaging may be d...

Страница 112: ...in the electromagnetic environment specified below The customer or the user of the EDR 7800 should assure that it is used in such an environment Emissions test Compliance Electromagnetic environment guidance RF emissions CISPR 11 Group 1 The EDR 7800 uses RF energy only for its internal function Therefore its RF emissions are very low and are not likely to cause any interference in nearby electron...

Страница 113: ...ge IEC 61000 4 5 1kV differential mode 2kV common mode 1kV differential mode 2kV common mode Mains power quality should be that of a typical commercial or hospital environment Voltage dips short Interruptions and voltage variations on power supply input lines IEC 61000 4 11 5 UT 95 dip in UT for 0 5 cycle 40 UT 60 dip in UT for 5 cycles 70 UT 30 dip in UT for 25 cycles 5 UT 95 dip in UT for 5 sec ...

Страница 114: ... Field strengths from fixed RF transmitters as determined by an electromagnetic site survey a should be less than the compliance level in each frequency range b Interference may occur in the vicinity of equipment marked with the following symbol NOTE 1 At 80MHz and 800MHz the higher frequency range applies NOTE 2 These guidelines may not apply in all situations Electromagnetic propagation is affec...

Страница 115: ...t power of transmitter W Separation distance according to frequency of transmitter m 150kHz to 80MHz d 1 2 root P 80MHz to 800MHz d 1 2 root P 800MHz to 2 5GHz d 2 3 root P 0 01 0 12 0 12 0 23 0 1 0 38 0 38 0 79 1 1 2 1 2 2 3 10 3 8 3 8 7 3 100 12 12 23 For transmitters rated at a maximum output power not listed above the recommended separation distance d in metres m can be estimated using the equ...

Страница 116: ...90 NW 14 Street Suite 105 Doral FL 33172 USA eet Suite 105 Doral FL 33172 USA eet Suite 105 Doral FL 33172 USA eet Suite 105 Doral FL 33172 USA Tel 888 802 2466 This instrument incorporates a lithium battery which may pollute the environment if the instrument is disposed Please ask a professional waste disposal company to handle disposal or your distributor before disposing of the instrument ...

Страница 117: ...oss Cylinder 0 50D Dual Cross Cylinder Retinoscopy Lens 1 5D 2 0D Test Distance 67cm 50cm Specifications Body 362 width 83 depth 299 height mm 3 5 kg Controller 215 width 230 depth 226 height mm 1 5 kg Junction Box 266 width 60 depth 239 height mm 1 0 kg Power Supply AC 100 240V 50 60Hz Power Consumption 90VA Auxiliar Lens Open Close Lens Open Close Select Pin Hole Lens Ф 1mm Moddox Rod Right eye ...

Страница 118: ...116 O Op pe er ra at ti io on n M Ma an nu ua al l ...

Отзывы: