background image

MICRO-BLASTER  Assembly  &  Parts

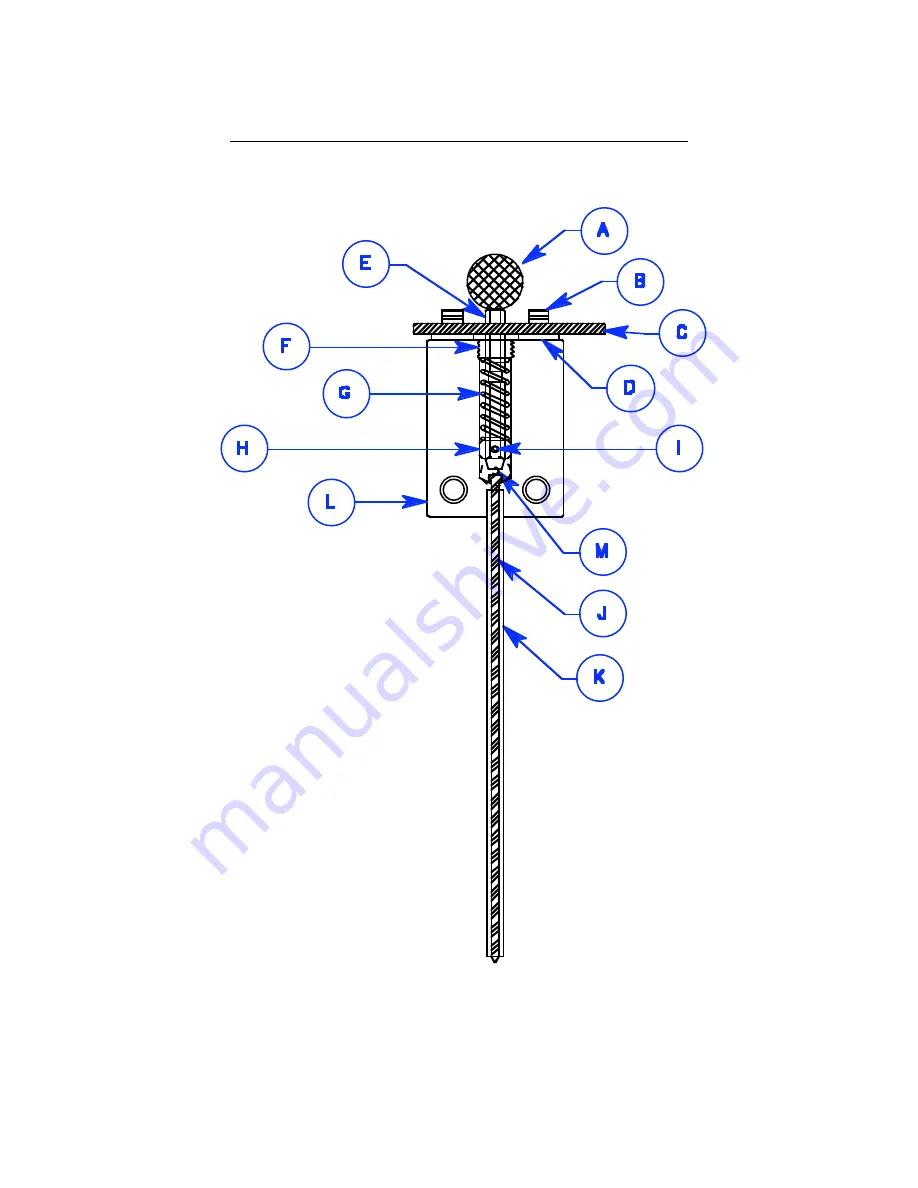
MICRO-BLASTER PARTS:
A . Cocking Knob
B . Release Plate Screw (2)
C . Release Plate
D. Nylon Washers (2)
E . Hammer
F . Hammer Guide
G . Spring
H . Bushing
I. Roll Pin
J . Firing Pin
K . Firing Pin Tube
L . Body
M . Sight Hole

Shown without Lanyard and Safety Clip Assembly

Содержание MICRO-BLASTER 1

Страница 1: ...MICRO BLASTER 1 INSTRUCTIONS ...

Страница 2: ... items 1 MICRO BLASTER I UNIT 1 RUBBER BULB HOLE BLOWER 25 FT RELEASE CORD W CLIP WINDER 2 TAPERED DRIFT PINS 1 HEX KEY 1 8 INCH 1 5 16 BORE BRUSH 1 CORD REDIRECT KIT 1 INSTRUCTION CARD 1 INSTRUCTION MANUAL MICRO BLASTER CARTRIDGES ARE SUPPLIED SEPARATELY CONTACT YOUR DEALER OR EZEBREAK FOR DETAILS Ezebreak LLC 1 Clay St PO Box 29 Frankford WV 24938 V 304 497 9970 F 304 497 9971 www ezebreak com 2...

Страница 3: ...n activation of the Micro Blaster Cartridge If these gasses are allowed to escape too easily through cracks etc sufficient force to crack the rock will not be generated In situations where one has encountered flawed material or the material has cracked from the use of MICRO BLASTING frost or whatever an alternative technique such as plugs and feathers or more simply the use of suitably sized drift...

Страница 4: ...the hole is not able to accommodate the entire length of the MICRO BLASTER in turn allowing the tip to make contact with the primer end of the cartridge no initiation of the cartridge will occur Depending on the hardness and type of material this hole should be 4 to 12 inches from the edge of the material you intend to crack Experience will dictate placement of the hole Drilling in the center of a...

Страница 5: ...he end of the cartridge with the metal primer is positioned correctly out so that it will make contact with the tip of the MICRO BLASTER when it is inserted into the hole in the next step 5 Using the Hole Blower tube gently push the cartridge to the bottom of the hole USE ONLY THE HOLE BLOWER TUBE TO PUSH THE CARTRIDGE INTO THE HOLE If step 3 was properly completed this will require very little or...

Страница 6: ...t you can now see the green head of the Firing Pin through the countersunk hole in the side of your MICRO BLASTER BODY If you cannot see the green it is very likely that the tip of the MICRO BLASTER is not in contact with the end of the cartridge The MICRO BLASTER will not initiate the cartridge if the tip is not in contact with the cartridge When you can see green through the hole the tip of the ...

Страница 7: ... happens the Firing pin will not be able to make proper contact with the metal primer in the end of the cartridge and will not initiate To solve this problem redirect the release cord so that the pulling action does not lift the MICRO BLASTER out of the hole when the Release Cord is pulled A weight with a small pulley positioned below the level of the Release Plate with the Release Cord passed thr...

Страница 8: ...ES maintain Micro Blaster in top condition ACTUATOR PIN PROBLEMS As has been stated earlier it is extremely important to maintain free movement of the actuator pin Disassemble clean and re lubricate often Pins dry fired against hard materials have been known to crack due to the high hardness of the pin If it is noticed that the end of the pin is not in the form of a smooth half round ball the firi...

Страница 9: ... and lubricate with light oil and reassemble in reverse order of disassembly 5 Test for free movement of hammer release plate and actuator pin INFORMATION SPARE PARTS ACCESSORIES Go to the website below or for further information on your MICRO BLASTER Spare parts can be obtained from your MICRO BLASTER dealer Units needing repair will only be accepted after proper return authorizationhas been give...

Страница 10: ...I Breaking Large Rocks with the Micro Blaster To break large rocks or to break off larger pieces of rock with the Micro Blaster a technique known as pre splits has allowed us to break up rocks weighing up to 10 tons The technique involves drilling a series of holes along a line defining where the rock should split This is similar to the technique used since Roman times using tools known as plugs a...

Страница 11: ...veloped by the Micro Blaster cartridge Concrete partly because of its relative softness and the presence of the aggregate within which breaks up the fracture lines may require hole spacing as close as six inches Very hard fine grained rock such as granite or limestone may be effectively cracked with hole spacing as much as eighteen to twenty four inches When breaking rock with distinct layers hole...

Страница 12: ...ve thinness should be drilled in the center of an exposed edge This will allow holes to be drilled to their proper depth 9 to 10 inches for single cartridge shots and 12 inches for 2 cartridge shots If no edge is exposed very shallow angled holes can be drilled and shot in the face of the concrete floors or walls Care should be taken to drill the holes so that the bottom of the hole is in the cent...

Страница 13: ...LASTER PARTS A Cocking Knob B Release Plate Screw 2 C Release Plate D Nylon Washers 2 E Hammer F Hammer Guide G Spring H Bushing I Roll Pin J Firing Pin K Firing Pin Tube L Body M Sight Hole Shown without Lanyard and Safety Clip Assembly ...

Отзывы: