


13
“
Basic
(default)
” mode displays a progress bar, along with the amount of total
data in MB on the master DVD (or in time for the master CD).
“
Expert
” mode displayed the percentage of the process completed, the
amount of data transferred and the total amount of data on the master disc.
“
Show Timer
” mode shows progress time bar in the process.
“
Show speed
” mode shows the transfer speed in the process.
11.4 Beep
Turn the audio signal (a beeping sound) ON or OFF for pressing of the buttons.
Button
&
Warning
(default)
: The device will produce audio signal when press
button or error occurred.
Warning Only
: The device will produce audio signal only when error occurred.
OFF
: The device won’t produce audio signal.
11.5 Power on Eject
Allows the drive(s) with disc(s) present inside to eject the disc trays when the
duplicator is done initializing after power on.
Eject All Discs
(default)
: Device will ejects all trays with disc inside.
Eject All Trays
: Device will ejects all trays no matter even if no disc inside.
Do Not Eject
: Device won’t ejects any trays.
Eject Targets Only
: Device will only eject target’s trays.
Eject Source Only
: Device will only eject source’s trays.
11.6 Reader Speed
Set the reader speed for the duplicator to read the master disc(s).
Selectable Reader speeds
:
CD
: 1, 2, 4, 8, 10, 12, 16, 20, 24, 32, 36, 40, 44, 48, 50, 52,
56 (default)
, MAX.
DVD
: 1, 2, 2.4, 4, 6, 8, 12, 16, 18, 20,
24(default)
, MAX.
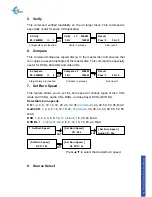
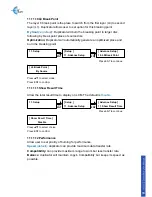
Press ▲▼ to select function
Press ENT to confirm
Display Mode
menu
ENT
ENT
11. Setup
[ Setup ]
3. Display Mode
[ Display Mode ]
Basic
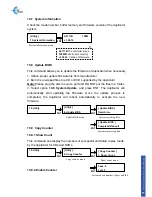
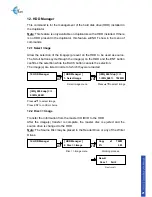
Press ▲▼ to select function
Press ENT to confirm
Beep
menu
ENT
ENT
11. Setup
[ Setup ]
4. Beep
[ Beep ]
OFF
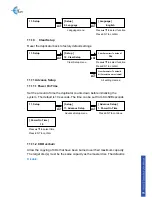
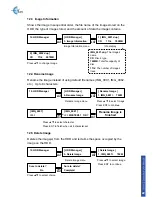
Press ▲▼ to select function
Press ENT to confirm
Power on Eject
menu
ENT
ENT
11. Setup
[ Setup ]
5. Power on Eject
[ Power on Eject ]
Eject All Discs
Содержание Gold Premier
Страница 1: ...Copyright 2015 All right reserved...


