EYEZONE B1080PX-4 Скачать руководство пользователя страница 22


43

11. OPTIONAL AUXILIARY EQUIPMENT          

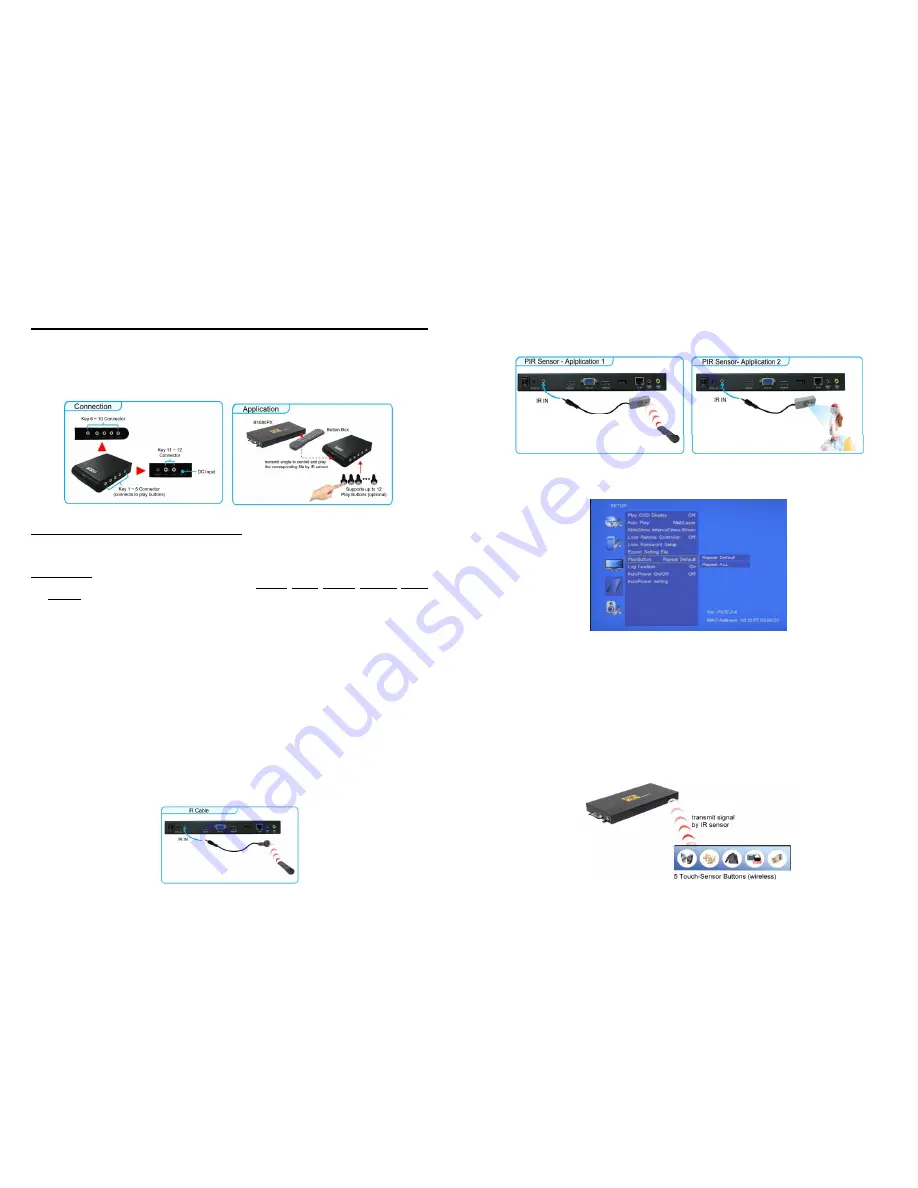
11.1 PLAY-BUTTON BOX (Eyezone BB) 

„

  The Play Button Box (Eyezone BB) supports up to 12 play-button inputs. 

„

  Press one of the play buttons to play the corresponding file. 

„


Hardware Connection


„


Play the Media File By the Play-Button


ex. 5 Play-Buttons (supports up to 12 play buttons) 
Step 1: 

Put 6 demo files on CF card. (1 default file and 5 demo files) 

NOTE: 

The files are sorted by filename in ascending order alphanumerically (numbers < upper case 

letters < lowercase letter). Each button is mapped to a file by this order. 

For Example


There are 6 demo files on the CF card. The file names are 

a01.xxx

33.xxx

b55.xxx

1abc.xxx

07.xxx


and 

A01.xxx

. (xxx is extension of the file) 

Default File

07.xxx  

Demo File 1

1abc.xxx 

Demo File 2

33.xxx 

Demo File 3

A01.xxx 

Demo File 4

a01.xxx 

Demo File 5

b55.xxx 

Step 2: 

Insert the CF card to the Eyezone B1080PX-4, and the Eyezone B1080PX-4 will play the 

default file automatically while powered on. 

Step 3: 

Press one of the buttons 1-5 to play the corresponding demo file. 

Step 4: 

The Eyezone B1080PX-4 supports two options (Repeat Default / Repeat All) when the demo 

file finishes playing. The functions can be set in the setup menu. (Other Setup 

 Play Button) 

- Repeat Default: 

Eyezone B1080PX-4 will automatically play the default file when the demo file 

finishes playing. 

- Repeat All: 

Eyezone B1080PX-4 will automatically play all the demo files when the demo file 

finishes playing. 

NOTE:

 If you are in 

Video In Display

 mode, the B1080PX-4 will automatically play the live video from 

video source when the demo file finishes playing. 


11.2 IR Cable 

The IR cable is an external remote control receiver. Connect the IR Cable to the IR input. 


44

11.3 PIR SENSOR 

(Eyezone PIR) 

„


Application 1:

 The Eyezone PIR is an external remote control receiver. 

„


Application 2: 

The Eyezone PIR is a motion detector.


11.3.1 Using the PIR Sensor


Step 1: 

Set the repeat mode to the “

Repeat Default

”. 


Step 2: 

Insert the CF card to the B1080PX-4, and the B1080PX-4 will play the default file automatically 

while powered on. 

Step 3: 

After sensing approaching subjects, the B1080PX-4 will play all the demo files once. 


11.4 TOUCH-SENSOR BUTTONS 

11.4.1 Features of the Touch-Sensor Buttons 

„

  The number of touch-sensor buttons can be customized to 12, 24 or 36 for OEM project. 

„

  Used with various operating environment (glass, plastics and acrylic material, except metal 

material), the thickness supports 3mm -5mm, and it can be customized to 5cm for OEM project. 


Содержание B1080PX-4

Страница 1: ...harmful interference to radio communications However there is no guarantee that interference will not occur in a particular installation If this equipment does cause harmful interference to radio of...

Страница 2: ...ideo Audio Cable 5 RS 232 Cable optional 6 VGA to Y Pb Pr Cable optional 7 Power Adapter 8 Quick Guide 9 CD Driver Schedule Software IP Detect Tool User Manual 2 INTRODUCTION The Eyezone B1080PX Serie...

Страница 3: ...pports CF memory cards Suggest using the high speed 150X CF card Supports HTTP Control Function Supports Auto Key Lock Function Exports the Configuration Value You can export the configuration value t...

Страница 4: ...r a You would press the button 2 twice Enter The IP Address For Example To enter the IP address 192 168 100 100 Step 1 Press 1 once then 1 is displayed and the color of 1 is orange Step 2 When the col...

Страница 5: ...ill automatically assigns an IP address to the Eyezone B1080PX 4 If you don t have a DHCP enabled router select Off and type the network information in Assign IP Address 10 7 1 NETWORK SETUP continued...

Страница 6: ...ue Select the installation folder and click Next to continue Create a desktop icon and click Next to continue Click Install to start the installation Installing Click Finish to complete the installati...

Страница 7: ...able the FTP auto download function Remote FTP Download Setup Server IP Enter the domain name or IP address of the FTP as was given to you by your Web hosting provider Port The default port for FTP is...

Страница 8: ...Zagreb GMT 10 00 Brisbane GMT 01 00 Midwest Africa GMT 10 00 Vladivostok GMT 01 00 Amsterdam Berlin Bern Rome Stockholm Vienna GMT 10 00 Canberra Melbourne Sydney GMT 02 00 Bucharest GMT 10 00 Hobart...

Страница 9: ...123 18 7 4 OTHER SETUP continued Export Setting File Press the Enter button to export the configuration value to the CF card Step1 Copy the file HDPlayerSetting txt on CF card to your PC Use the Wordp...

Страница 10: ...rn on or off the background of the scrolling text Scrolling text speed Adjust the speed of the scrolling text RS232 Control Enable or disable the RS232 control function 20 8 USING THE B1080PX 4 8 1 PL...

Страница 11: ...e volume while the video or music is playing SHUFFLE Turn on off the shuffle function PREV NEXT Play the previous next file REPEAT Select the repeat mode REV FWD Rewind forward movie or music file STO...

Страница 12: ...tem to display the movies and pictures with scrolling text immediately 24 8 3 HDMI IN Mode 1 Play HD Videos from HDMI sources only Step 1 Connects the HDMI source DVD Player TV Game or camcorder to HD...

Страница 13: ...connecting to the FTP server and checking whether the commands file in the FTP The first value is the Initial Time unit minutes The second value is Interval Time unit minutes Example 1 the current ti...

Страница 14: ...del2 Play videos pictures and scrolling text simultaneously and the pictures are on the right Slide ByTime Set the picture slideshow mode ByTime Change the pictures with the internal time MatchVideo C...

Страница 15: ...u UP TV MODE p PLAY d DOWN AutoPlay P PAUSE STEP l LEFT i INFO x STOP r RIGHT m NTSC PAL f FFW s ENTER SEARCH b REW C CLEAR XXXXX XXX Play The File xxxxx xxx is the file name NOTE Must include the rou...

Страница 16: ...K to log on Default User Name root Default Password admin There are five items Control Network Server Time and Features 32 9 1 CONTROL Control Select one of the control command s and press the Send to...

Страница 17: ...umber If the FTP site uses a port other than 21 you should enter the correct port IP address Enter the domain name or IP address of the remote FTP server Path Enter the folder path that you want to sh...

Страница 18: ...ble the HTTP command function Port Enter the port of the B1080PX 4 default port 80 User ID Enter the user name of the B1080PX 4 default ID root Password Enter the password of the B1080PX 4 default pas...

Страница 19: ...aker for starting the program There are two parts of program Basic Schedule and Advance Schedule in the window 10 2 1 Basic Schedule In the Basic Schedule mode you could arrange a basic schedule that...

Страница 20: ...p window will appear Select the path then click the SAVE button to save your setup NOTE Do not rename the file schedule ini otherwise the B1080PX 4 will not be able to read the file 10 2 2 Advance Sch...

Страница 21: ...ave NOTE Do not rename the file schedule ini otherwise the B1080PX 4 will not be able to read the file 42 10 2 3 Explanation of the Warning Message No any schedule Can t Save There is no schedule file...

Страница 22: ...s playing The functions can be set in the setup menu Other Setup Play Button Repeat Default Eyezone B1080PX 4 will automatically play the default file when the demo file finishes playing Repeat All Ey...

Страница 23: ...n the demo file finishes playing Repeat All Eyezone B1080PX 4 will automatically play all the demo files when the demo file finishes playing NOTE If you are in Video In Display mode the B1080PX 4 will...

Отзывы: