Installation Instructions
Aphos
™
CM Luminaires
EQS3423 REV: D
INSTALLATION INSTRUCTIONS:
Read the instructions completely before starting
installation.
Installation shall be done in compliance with the
National Electric and Building Codes, as well as with
State and Local Code requirements in effect at the
time of installation. The local inspector has final
jurisdiction on any installation.
Ensure that supply power is off
Luminaire installation and service shall be executed
by qualified personnel only.
Unpack the luminaire and inspect for damage in
shipment. If it is damaged in any way, do not install.
Locate the manufacturer’s labels. Note all
specifications and warnings on the labels. Enter serial
number and installation date in area provided. Retain
this information and Instructions for future reference.
Ensure that junction box is appropriately sized and
sufficient to mount and support this luminaire. Refer
to Specifications given above for weight and
approximate dimensions.
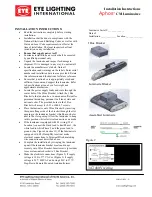
Locate the power supply leads and route through the
center hole of the J Box Bracket. Attach the J Box
Bracket to the junction box, in a manner sufficient for
permanent mounting, pursuant to all local, state and
national codes. The provided holes in the J Box
Bracket will accept (4) 8-32 or M4-0.7 screws.
Place the luminaire onto J Box Bracket by inserting
the square flange side of the bracket through the slot
opening in the luminaire bracket which has no holes
next to the slot opening. Allow the luminaire to hang
in this position while electrical connections are made.
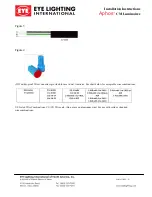
If the luminaire is equipped with E1 wiring (Wet
Location) connect the black
lead to line/Phase 1, the
white lead to white/Phase 2, and the green lead to
ground. (See Figure 4 on sheet 3). If the luminaire is
equipped with E2 (Damp-Dry location) make
electrical connections to Terminal Block, matching
wire connections as described above.
Complete the installation by swinging the luminaire
up until the luminaire bracket meets and snaps
securely onto J Box Bracket. Insert screws (provided)
to secure luminaire bracket to J Box Bracket.
Make the electrical connections (Figure 2) if supply
voltage is 120 to 277 VAC or (Figure 3) if supply
voltage is 347 / 480VAC and using 480V to 277V
Step-Down Remote Mounted Autotransformer.
Luminaire Serial #:_____________
Date of
Installation:_____________Location:_____________
J Box Bracket
Luminaire Bracket
Assembled Luminaire
Figure 2
347-480V wiring


