background image

Installation and Operation, cont’d

USP 405 • Installation and Operation

2-10

8

.

View the horizontal phases again.  If the phase difference is not zero,
repeat steps 6 and 7 until the settings do not change.

9

.

Once the settings are stable, disconnect the oscilloscope, and reconnect
the genlock cables.

10

. Check the display(s) for proper colors and for undesirable artifacts in

the image(s).  Make adjustments as necessary.

11

. If other USP 405s are part of this genlock daisy chain, connect the

oscilloscope to each device, and repeat this procedure.

Oscilloscope displays

What you see on the oscilloscope while adjusting the USP 405 to match the
genlock signal depends on the type of signal used, the type of oscilloscope, and
the procedure the scope requires.  This section shows some examples of
oscilloscope displays.

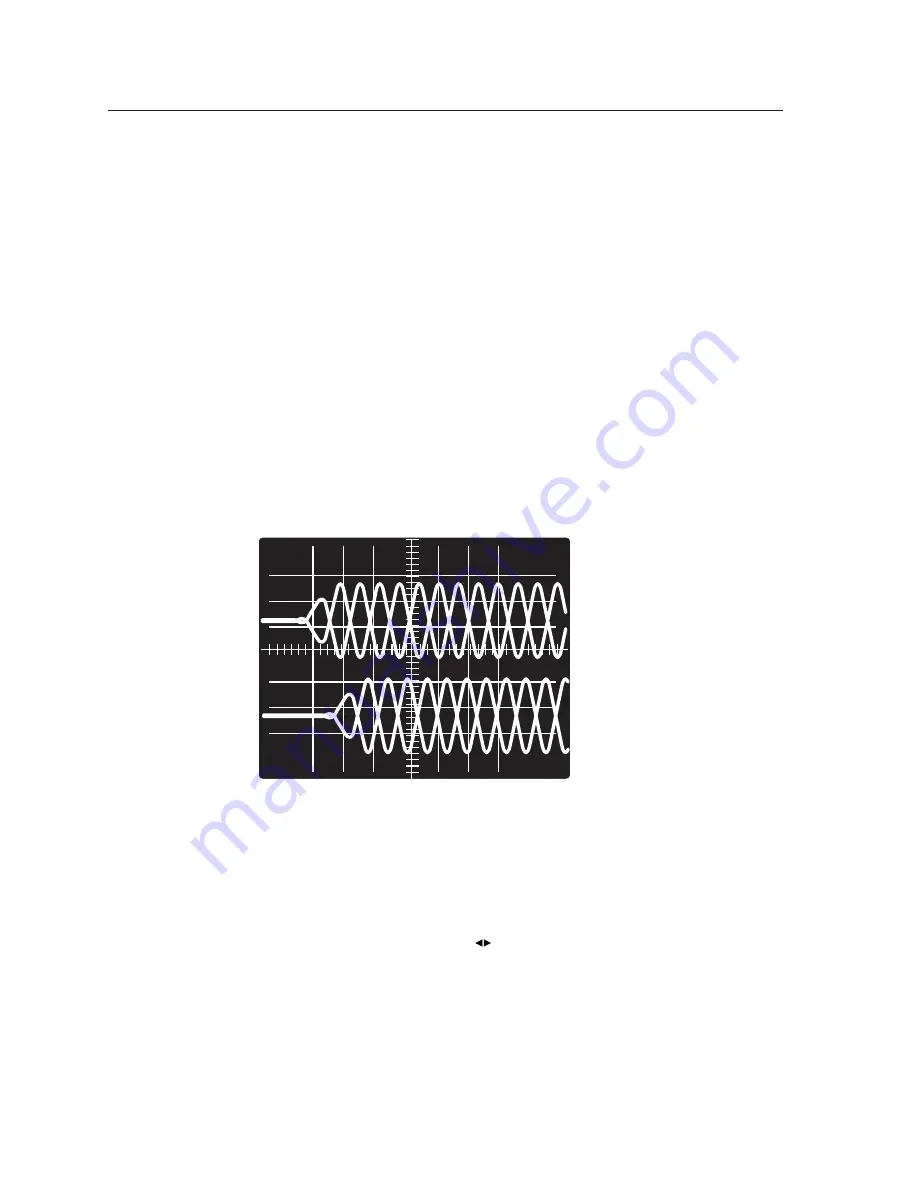
The following diagram shows the genlock input signal (top) and an out-of-
alignment NTSC composite sync output signal (bottom) displayed on a
waveform monitor to check for alignment.  When the phases are aligned, the
wave peaks on the bottom waveform should line up with those in the reference
signal above it.

Superimposed waveforms

With this method there is no way to know if the signals are 180º out of phase.  A
delayed sweep on a time-based scope would allow a more accurate display of the
input and output signal phase relationships.

A vectorscope is more accurate than a waveform monitor.  The following diagram
shows an example of a vectorscope display when the horizontal phase is
adjusted to align it with the burst (genlock) vector.  Adjust the horizontal phase
by rotating the horizontal Adjust (

)

 knob until the difference between the two

vectors is 0º.  This example shows black burst only (with no color).  The burst
vector is pointing to the left from the center.

im Vertrieb von

            CAMBOARD Electronics

www.camboard.de

Tel. 07131 911201
Fax 07131 911203

[email protected]

Содержание USP 405

Страница 1: ...USP 405 Universal Signal Processor 68 541 01 Rev C 01 05 im Vertrieb von CAMBOARD Electronics www camboard de Tel 07131 911201 Fax 07131 911203 ce info camboard de ...

Страница 2: ... al usuario sobre la presencia de elementos con voltaje peligroso sin protección aislante que puedan encontrarse dentro de la caja o alojamiento del producto y que puedan representar riesgo de electrocución Precaucion Leer las instrucciones Leer y analizar todas las instrucciones de operación y seguridad antes de usar el equipo Conservar las instrucciones Conservar las instrucciones de seguridad p...

Страница 3: ...displays The sync format is the same for both outputs Step 5 Plug the USP 405 and the input and output devices into a grounded AC source and turn on the input and output devices Step 6 Use the LCD menu screens see the next page or RS 232 programming to configure the USP 405 See chapter two for installation and operation procedures and see chapter three for programming information RGB 1 I N P U T S...

Страница 4: ...fault Cycle NEXT Input Configuration MENU Output Configuration Advanced Configuration Genlock Exit Menu MENU MENU MENU 10 sec 10 sec 10 sec 10 sec 10 sec MENU 1 2 Memory Presets MENU 10 sec 3 5 6 60 369 0x Version x xx 4 Input Configuration Input 2 Betacam 50 MENU Input video type RGB Betacam 60 RGBcvS HDTV YUVi S video YUVp Composite Betacam 50 Input phase adjustment Inputs 1 and 2 only 0 thru 31...

Страница 5: ...sync only On Off default NEXT Press and Hold FREEZE to Reset NEXT Test Pattern Off NEXT Set test pattern type Off default Alt pixel Color Bars Film aspect 1 78 Crosshatch Film aspect 1 85 4 x 4 crosshatch Film aspect 2 35 Grayscale Ramp Crop Top and Bottom Blanking Top blanking ranges from 000 default to 237 Bottom blanking ranges 000 default to 237 Enhanced Mode OFF ON Enhanced mode gain control ...

Страница 6: ... Configuration menu has been set to any pattern other than Off Crop or a Film aspect crop pattern the picture control adjustments will be disabled Not Available NOTE With an input signal present the following picture adjustment s are Not Available for the respective inputs with exceptions in Input 1 color and tint not available anytime Input 2 tint but available only if S video or composite is sel...

Страница 7: ... Use the USP s sizing and centering functions to fill the pattern To set the sizing or centering Default Cycle Input MENU NEXT For RGB input sources Inputs 1 and 2 HDTV and YUVp input 2 use phase adjustments to eliminate noise To adjust pixel phase NOTE If the source is a DVD set the DVD player to output a 16 9 aspect ratio prior to performing step 4 See Image Adjustments page 2 19 NOTE Once the s...

Страница 8: ...e and achieve a clear and sharp image To adjust pixel phase b Use the horizontal filter adjustment to maximize the amount of detail and the vertical filter adjustment to reduce the amount of flicker on the screen To adjust the horizontal and vertical filtering See Image Adjustments page 2 19 c Next use the encoder filter to adjust the sharpness of the image to the desired level To adjust the sharp...

Страница 9: ...ols 2 8 Genlock and Vertical Interval Switching 2 8 Genlock setup 2 8 Oscilloscope displays 2 10 Optimizing the System 2 11 Setting up a DVD source 2 11 Menus Configuration and Adjustments 2 12 Moving through menus by using front panel controls 2 12 Menu overview 2 12 Input Configuration 2 13 Input 2 submenu 2 14 Input Phase submenu 2 14 Output Configuration 2 14 Resolution and refresh rates subme...

Страница 10: ...Serial Communication 3 1 RS 232 Programmer s Guide 3 2 Host to signal processor communications 3 2 Signal processor initiated messages 3 2 Error responses 3 2 Symbol definitions 3 3 Using the command response tables 3 3 Command response table for SIS commands 3 4 Command response table for special function SIS commands 3 7 Control Software for Windows 3 8 Installing the software 3 8 Using the cont...

Страница 11: ...anual are the properties of their respective owners 68 541 01 Rev C 01 05 Firmware Upgrade Installation A 5 Serial Digital Interface SDI Card Installation A 7 im Vertrieb von CAMBOARD Electronics www camboard de Tel 07131 911201 Fax 07131 911203 ce info camboard de ...

Страница 12: ...iv USP 405 Table of Contents Table of Contents cont d im Vertrieb von CAMBOARD Electronics www camboard de Tel 07131 911201 Fax 07131 911203 ce info camboard de ...

Страница 13: ...USP 405 1 Chapter One Introduction About this Manual About the USP 405 Features and Options im Vertrieb von CAMBOARD Electronics www camboard de Tel 07131 911201 Fax 07131 911203 ce info camboard de ...

Страница 14: ...nable superior scaling performance the USP 405 features several of Extron s patent pending technologies including Dynamic Motion Interpolation DMI and 3 2 and 2 2 pulldown detection DMI is an advanced motion detection and compensation method that enables image enhancement with no loss of image fidelity Controlling the USP 405 universal signal processor The USP 405 can be controlled using one or mo...

Страница 15: ...Extron Accu RATE Frame Lock eliminates artifacts from scaled motion video by eliminating frame rate conversion It locks the output frame rate to the input frame rate of the active input The result is a switching system that eliminates image tears and other artifacts from motion video Dynamic Motion Interpolation DMI This video processing technique is an advanced motion prediction and compensation ...

Страница 16: ...l controls of the USP 405 except the Menu and Next buttons SDI input card Serial digital interface SDI input can be added to the USP 405 by the installation of an SDI input card part 70 168 01 SDI output card Serial digital interface SDI output can be added to the USP 405 by the installation of an SDI output card part 70 065 01 im Vertrieb von CAMBOARD Electronics www camboard de Tel 07131 911201 ...

Страница 17: ...enlock and Vertical Interval Switching Optimizing the System Menus Configuration and Adjustments Image Adjustments Front Panel Security Lockout Executive mode IR 801 Infrared Remote Control Troubleshooting im Vertrieb von CAMBOARD Electronics www camboard de Tel 07131 911201 Fax 07131 911203 ce info camboard de ...

Страница 18: ...ine screws as shown below then fasten the USP to the rack using the supplied machine screws Rack mounting the USP 405 Application diagrams The diagrams on the next page show examples of typical USP 405 applications and cable connections The two examples show the USP 405 being used as a scan converter and as a scaler USP 405 UNIVERSAL SIG NAL PROCESSOR ADJU ST MENU NEXT PICTURE ADJU STMENTS CENTE R...

Страница 19: ... E N L O C K O U T P U T S I N T P U T S SGI Computer Betacam Tape Deck PC Computer Extron RGB 112xi Non linear Edit Station Sync Timing Source RS 232 Control VCR Extron USP 405 B Y SD I Y 5 4 2 1 H V OU T Camera PC Computer Non linear Edit Station RS 232 Control Projector Monitor VCR DVD Monitor Plasma Display 2A MAX 100 240 V 50 6 0Hz RS 23 2 RG B H D R Y B Y Y RG B R Y B Y Y R Y B Y Y RG B B Y ...

Страница 20: ...ent video composite video and S video signals The input can be scan converted for YUV YC composite video or SDI output The output can be scaled to 35 different output resolutions Connect cables for the appropriate signal type as shown in the following diagram For 24 kHz to 100 kHz RGB signals Input 2 can accept RGBHV RGBS or RGsB formats when RGB is the selected input type see Input Configuration ...

Страница 21: ... The output can be scaled to 35 different output resolutions Output of the SDI signal requires the SDI output card option 9 Video input 5 SDI serial digital interface Connect an SDI signal to this female BNC input connector The input can be scan converted for YUV YC composite video or SDI output The output can be scaled to 35 different output resolutions Input and output of the SDI signal requires...

Страница 22: ...nc critical applications RS 232 connection 18 RS 232 port This connector provides for two way RS 232 communication See the chapter 3 Serial Communication for information on how to install and use the control software and SIS commands The default protocol is 9600 baud 1 stop bit no parity no flow control The rear panel RS 232 9 pin D connector has the following pin assignments DB9 Pin Locations Fem...

Страница 23: ...cts the SDI input from video input 5 Actual input of the SDI signal requires the SDI input card option Picture adjustment buttons The picture adjustment buttons select image adjustment controls that are adjusted using the horizontal Adjust 17 and vertical Adjust 18 adjustment knobs When pressed these buttons light green 8 Center control button This button selects the centering adjustment for the o...

Страница 24: ... for details 15 Menu button Use this button to enter and move through the main menu system in the USP 405 See the Menus Configuration and Adjustments section in this chapter for details This button is always lit yellow 16 Next button Use this button to step through the submenus in the USP 405 menu system See the Menus Configuration and Adjustments section in this chapter for details This button is...

Страница 25: ...k signal use the cabling configuration that will be used in the installation Either connect the genlock signal cable from the scope to the next device in the system to be timed or provide 75 ohm termination at the scope s genlock output REMOTE RGB HD R Y B Y Y R Y B Y Y B Y R Y VID SDI Y RGB R Y B Y Y S VIDEO IN R R Y G Y B B Y H V S OUT G E N L O C K O U T P U T S Timing Source OUT To Scope Probe...

Страница 26: ...e genlock input signal top and an out of alignment NTSC composite sync output signal bottom displayed on a waveform monitor to check for alignment When the phases are aligned the wave peaks on the bottom waveform should line up with those in the reference signal above it Superimposed waveforms With this method there is no way to know if the signals are 180º out of phase A delayed sweep on a time b...

Страница 27: ... Optimizing the System For optimal performance follow the steps in this section in order when setting up the USP 405 and its input and output devices Setting up a DVD source To get the best results when using a DVD as a video source Extron recommends that the DVD player itself be set up to output an aspect ratio of 16 9 and not 4 3 Because all DVDs are mastered as 16 9 having them set up for anyth...

Страница 28: ... corresponding image adjustment menu appears on the LCD screen Adjustments can then be made by rotating the horizontal Adjust knob or the vertical Adjust knob Settings and adjustments are stored in nonvolatile memory Menu overview The default screens appear on the LCD when no adjustments are actively being made When the USP 405 is powered up the LCD displays a screen showing the USP model USP 405 ...

Страница 29: ... main menu becomes active For example the menu changes from the Input Configuration menu or submenus to the Output Configuration main menu To return to the default screens let the UPS 405 remain idle for 10 seconds until the selected screen times out or repeatedly press the Menu button until the Exit Menu appears then press the Next button Power on Extron USP 405 Input Configuration 2 sec MENU MEN...

Страница 30: ...8 Refresh 60 Output Signal RGB Sync Polarity H Neg V Neg NEXT NEXT NEXT Input Configuration MENU Scaler output rates See the table below for available combinations of resolutions and refresh rates Default 640x480 60 Hz NOTE Lock Accu RATE Frame Lock Video types RGB default Y R Y B Y Polarity combinations H V default H V H V H V Resolution and refresh rates submenu The output resolution is defined ...

Страница 31: ...and vertical V sync signal polarities Select the appropriate combination of positive or negative H and V sync by rotating either the horizontal Adjust or the vertical Adjust knob Memory Presets The following flowchart provides an overview of the Memory Presets submenus and the options for each setting The presets save only the Sizing and Centering adjustments for the selected output rate If you ch...

Страница 32: ...or vertical Adjust knob select either N A 1 2 or 3 to select a preset The default is N A To erase the preset press the Next button Recalling a preset To recalling an input s saved preset select the input then press the input button successively to recall any saved preset up to three saved presets The available presets are sequentially selected in a loop preset 1 preset 2 preset 3 preset 1 preset 2...

Страница 33: ... submenu features edge smoothing Edge smoothing smooths the edges of a picture by minimizing the differences between pixels Using either the horizontal Adjust or vertical Adjust knob select either On or Off The default is On Encoder Filter submenu This submenu adjusts the sharpness of the displayed image The sharpness can be set from 0 to 12 maximum The default is 6 Using either the horizontal Adj...

Страница 34: ...Enhanced mode is set On automatic gain control of the video input signal is enabled If the input signal is too weak the signal gain will be increased and if the input signal level is excessive the signal gain will be decreased Enhanced mode is effective only for S video and composite video input From this submenu use either the horizontal Adjust knob or vertical Adjust knob to specify this mode as...

Страница 35: ...justment and the value of the current setting 3 Rotate the horizontal Adjust knob or vertical Adjust knob to select a level from the following adjustment ranges Color Tint 101 114 Input selection button Input 3 Composite 10 sec timeout NOTE The horizontal Adjust knob and the vertical Adjust knob are used to adjust the image settings on the left and right sides of the LCD screen respectively Defaul...

Страница 36: ...lor and no tint anytime Input 2 RGB RGBcvS no color or tint anytime YUVi YUVp Betacam 50 Betacam 60 composite PAL S video PAL and HDTV no tint but there is color Input 3 composite PAL no tint but there is color Input 4 S video PAL no tint but there is color Input 5 SDI no color no tint no detail Front Panel Security Lockout Executive mode To prevent accidental changes to settings press the Size an...

Страница 37: ...l filtering apply only to the following input formats Input 1 RGB Input 2 RGB YUVp HDTV The middle portion of the IR 801 features five input selection buttons the size buttons for sizing an image and the shift buttons for centering an image The bottom portion of the IR 801 contains the adjustment controls for color tint brightness contrast detail and zoom adjustments Selecting an input To use the ...

Страница 38: ... the picture adjustment settings Troubleshooting This section gives recommendations on what to do if you have problems operating the USP 405 and it provides examples and descriptions for some image problems you might encounter The following are some tips to help you in troubleshooting Some symptoms may resemble others so you may want to look through all of the examples before attempting to solve t...

Страница 39: ... sync on green The RGB Y R Y Set the output signal for RGB B Y ouput is set for Y R Y B Y The image is too soft The detail sharp Change the detail sharpness ness level needs to be changed No color tint Color tint affects Verify the video format picture adjustment only composite video and S video The USP randomly An RS 232 cable Verify that the RS 232 cable is switches to an input with all pins bei...

Страница 40: ...Installation and Operation cont d USP 405 Installation and Operation 2 24 im Vertrieb von CAMBOARD Electronics www camboard de Tel 07131 911201 Fax 07131 911203 ce info camboard de ...

Страница 41: ... RS 232 Programmer s Guide Control Software for Windows Labeling Buttons on the USP 405 Setting the Output Rate Using the Per Input Feature im Vertrieb von CAMBOARD Electronics www camboard de Tel 07131 911201 Fax 07131 911203 ce info camboard de ...

Страница 42: ...end of the response character string A string is one or more characters It is also possible to send several SIS commands back to back in sequence Signal processor initiated messages When a local event such as a front panel selection or adjustment takes place the USP 405 signal processor responds by sending a message to the host No response is required from the host The signal processor initiated m...

Страница 43: ...024x768 14 1080i 6 1280x768 15 NTSC 7 1280x1024 16 PAL 8 1360x765 17 custom per input X8 Video type 0 RGB 5 Betacam 60 1 RGBcvS 6 HDTV 2 YUVi 7 S video 3 YUVp 8 Composite 4 Betacam 50 X9 0 off 1 on X10 Horizontal vertical filter setting 0 through 7 X12 Test pattern type 0 through 10 0 off 9 ramp 1 color bars 10 alternating pixels 2 crosshatch 3 4x4 crosshatch 4 grey 5 crop 6 film aspect ratio 1 78...

Страница 44: ...nt level View the color value C X3 Show the color adjustment Tint Set a specific tint value X4 T Tin X4 Specify a tint adjustment level Example 176T Tin176 Set the tint to 176 Increment T Tin X4 Increase tint adjustment level Decrement T Tin X4 Decrease tint adjustment level View the tint value T X4 Show the tint adjustment Contrast Set a specific contrast value X4 Con X4 Specify the contrast adju...

Страница 45: ...the detail Decrement D Dhz X10 Decrease the detail View the detail filter value D X10 Show the detail level Top blanking Specify a top blanking value X18 Blt X18 Set the number of lines to blank at the top of the picture Increase the top blanking value Blt X18 Increase the of top lines blanked Decrease the top blanking value Blt X18 Decrease the of top lines blanked View the top blanking value X18...

Страница 46: ...ect a test pattern Select test pattern X12 j Tst X12 Select a test pattern View test pattern J j X12 Show the test pattern Example J 0 Test pattern off Scaler output rate Set the output rate X7 X20 Rte X7 X20 Select a global scaler output scan rate View the output rate X7 X20 Show the global scaler output rate Set the output rate per input X7 X20 X5 Rte X7 X20 Select a scaler output scan rate for ...

Страница 47: ...ffect 10 X Enc X Encoder values 0 through 12 Example 10 3 Enc03 Encoder set to 3 Scaler settings Output signal 6 X Tpo X 0 RGB default 1 R Y Y B Y Example 6 1 Tpo1 RGB output signal Output polarity 7 X Pol X 0 H V default 1 H V 2 H V 3 H V Example 7 1 Pol1 Example H V output polarity Blue screen Blue screen blue sync output only 8 X Blu X 0 off default RGB sync output 1 on blue video sync output o...

Страница 48: ...the instructions that appear on the screen By default the installation creates a C USPDDS directory and it places two icons USPDDS Control Pgm and USPDDS Help into a group or folder named Extron Electronics Using the control program Many items found in the USPDDS Control Program are also accessible via front panel controls and the LCD menus described in chapter 2 Refer to chapter 2 for details on ...

Страница 49: ...manual However you can easily create customize and print labels for the USP s button label windows by using the Button Label Generator software Button Label Generator software The Extron Button Label Generator program Buttons exe is included with the USP 405 and it can also be downloaded from the Extron Web site http www extron com This program is used to create and print labels that can be insert...

Страница 50: ...n screen choosing Show Help and clicking the Load Demo button The following picture shows the Button Label Generator screen Button label screen Installing labels in the USP 405 s buttons Use the following procedure to install new labels in the USP 405 s front panel buttons 1 Make new labels by using the Button Label Generator software see the previous page Print them and cut them out 2 Remove a bu...

Страница 51: ...lows the USP to automatically upscale trans scale scan convert the input signal without additional programming Only one process scaling trans scaling or scan conversion can occur at one time For example you cannot scale and scan convert an input at the same time DVD Player VCR Video Camera USP 405 UNIVERSAL SIGNAL PROCESSOR ADJUST MENU NEXT FREEZE 1 2 3 4 5 PICTURE ADJUSTMENTS CENTER SIZE BRT CONT...

Страница 52: ...Serial Communication cont d USP 405 Serial Communication 3 12 im Vertrieb von CAMBOARD Electronics www camboard de Tel 07131 911201 Fax 07131 911203 ce info camboard de ...

Страница 53: ... Specifications Part Numbers and Accessories Firmware Upgrade Installation Serial Digital Interface SDI Card Installation im Vertrieb von CAMBOARD Electronics www camboard de Tel 07131 911201 Fax 07131 911203 ce info camboard de ...

Страница 54: ... video 0 3 Vp p for C of S video Minimum maximum levels Analog 0 3 V to 2 Vp p with no offset Impedance 75 ohms Horizontal frequency Input 1 24 kHz to 100 kHz Input 2 RGB HD component video 24 kHz to 100 kHz Input 2 RGBS RGBcvS component video S video composite video 15 kHz Inputs 3 4 15 kHz Input 5 CCIR 601 ITU R BT 601 270 Mbps Vertical frequency 30 Hz to 120 Hz Resolution range Autoscan 640 x 4...

Страница 55: ...g type Triple Action Sync Input type Autodetect RGBHV RGBS RGsB Output type RGBHV RGBS Standards NTSC 3 58 NTSC 4 43 PAL and SECAM Input level 0 V to 5 Vp p Outputlevel 0 V to 5 Vp p unterminated Input impedance 510 ohms Outputimpedance 75 ohms Max input voltage 5 Vp p Polarity Positive or negative selectable Control remote switcher scaler Serial control port RS 232 9 pin female D connector Baud r...

Страница 56: ... Numbers and Accessories Included parts These items are included in each order for a USP 405 Included parts Part number USP 405 60 369 01 USP 405 with SDI Input 60 369 02 USP 405 with SDI Output 60 369 03 USP 405 with SDI Input and Output 60 369 04 Rubber feet self adhesive 4 25 020 02 Rack and through desk mounting kit 70 077 03 IEC power cord Tweeker small screwdriver USP 405 User s Manual USP 4...

Страница 57: ...ure 2 Remove the USP 405 from the rack or furniture 3 Remove the cover of the USP the top half of the enclosure by removing the screws then lifting the cover straight up Removing the USP 405 cover CAUTION Do not touch any switches or other electronic components inside the USP 405 Doing so could damage the unit Electrostatic discharge ESD can damage IC chips even though you cannot feel it You must ...

Страница 58: ... squeeze the tool gently to grasp the chip 7 Pull the chip straight out of the socket and set it aside 8 For U67 and U68 align the slots of the new firmware chip with the notches of the socket in the same orientation as the old chip Gently but firmly press the chip into place in the socket 9 For U60 and U24 note the key angled corner of the new firmware IC and the dot on the underside that indicat...

Страница 59: ... AC power cord from the USP 405 to remove power To prevent electric shock always unplug the USP from the AC power source before opening the enclosure 2 Remove the USP from the rack or furniture 3 Remove the cover of the USP 405 the top half of the enclosure by removing the screws then lifting the cover straight up See the top cover removal diagram in the previous Firmware Upgrade Installation sect...

Страница 60: ...stalling the SDI output card locate the SDI output card connector opening situated near the middle rear portion of the main circuit board looking from above with the front panel nearest to you See the following picture SDI output card circuit board connector SDI input connector opening SDI input card standoff SDI output connector opening 20 pin connector for SDI output card im Vertrieb von CAMBOAR...

Страница 61: ...off The mounting hole on the SDI card should now be directly over the standoff See the picture below Input SDI board installation The SDI output card has a 20 pin socket on the underside which should align with the 20 pins on the main circuit board Be sure to align the pins properly in order to prevent bending the pins before pressing the SDI card firmly in place See the picture below Output SDI b...

Страница 62: ...I output card 8 Install the SDI connector s hex nut and keep the SDI card from twisting as the nut is tightened 9 For the SDI input card installation move the jumper on J23 see the illustration on page A 7 from pins 1 and 2 no SDI input card present to pins 2 and 3 SDI input card present 10 Replace the top cover on the USP and fasten it with the screws that were removed in step 3 11 Rack or furnit...

Страница 63: ...s Europe ExtronElectronics Beeldschermweg6C 1230 South Lewis Street 3821AHAmersfoort Anaheim CA 92805 USA The Netherlands Asia Japan Extron Electronics Japan Extron Electronics Asia KyodoBuilding 135 Joo Seng Road 04 01 16 Ichibancho PM Industrial Bldg Chiyoda ku Tokyo 102 0082 Singapore 368363 Japan This Limited Warranty does not apply if the fault has been caused by misuse improper handling care...

Страница 64: ...he Netherlands 31 33 453 4040 Fax 31 33 453 4050 Extron Electronics Asia 135 Joo Seng Road 04 01 PM Industrial Building Singapore 368363 65 6383 4400 Fax 65 6383 4664 Extron Electronics Japan Kyodo Building 16 Ichibancho Chiyoda ku Tokyo 102 0082 Japan 81 3 3511 7655 Fax 81 3 3511 7656 www extron com im Vertrieb von CAMBOARD Electronics www camboard de Tel 07131 911201 Fax 07131 911203 ce info cam...

Отзывы: