background image

Product  
Configuration 
Software

The Extron Product Configuration Software (PCS), available on the Extron 

website

, offers 

another way to control the DSC 301 HD via USB connection. This section describes the 
software installation and communication (see the 

DSC 301 HD Product Configuration 

Software

 help file for detailed control information). Topics include:

• 

Downloading and Installing PCS

• 

Starting the Software

• 

Using the Software

The graphical interface includes the same functions as those on the device front panel 
with additional features that are available only through the software. The control software 
is compatible with Microsoft Windows operating systems. 

Downloading and Installing PCS

To download PCS from the 

Extron website

, locate it on the 

Download


Center

 page or 

go to the 

PCS

 product page.

1. 

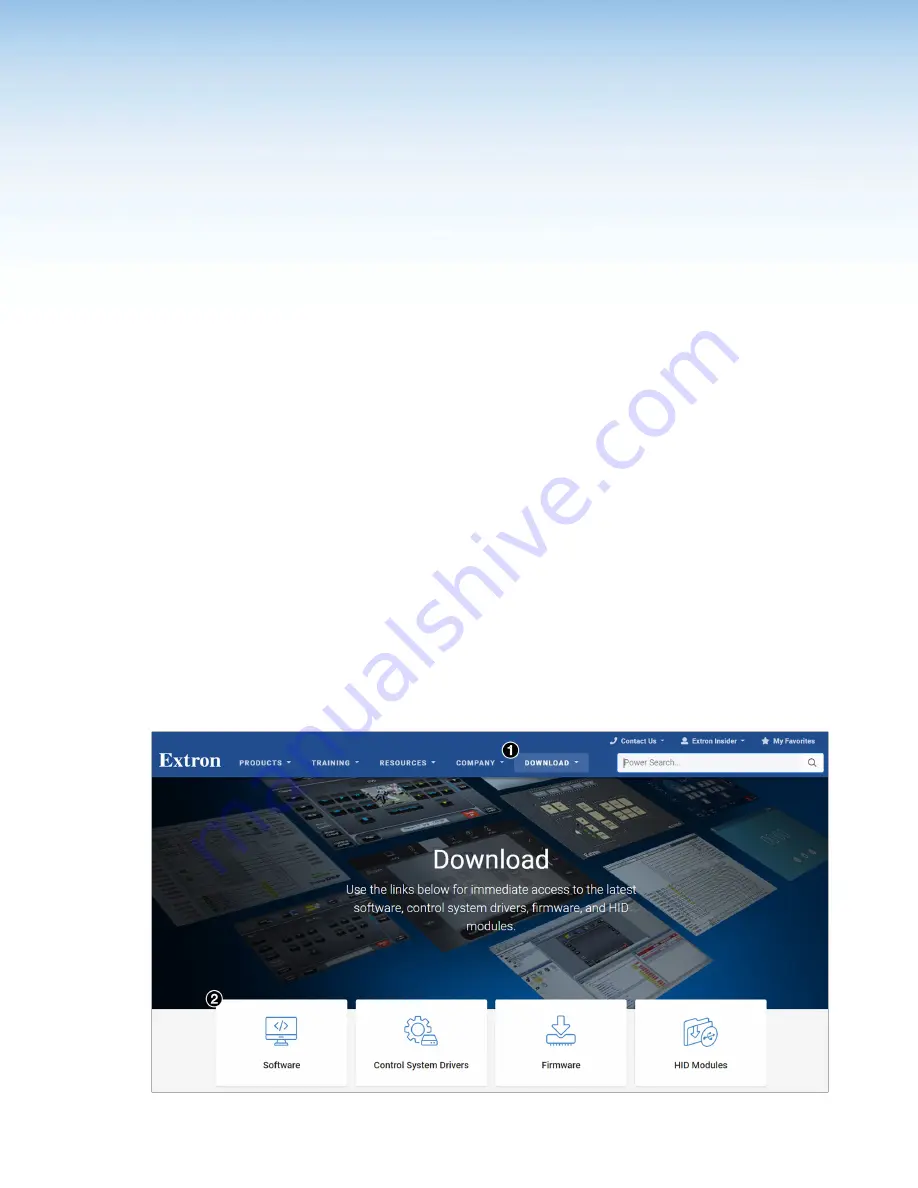
On the Extron website, select the 

Download

 tab (see figure 17, 

1

), then click the 

Software

 button (

2

). Alternatively, hover the mouse pointer over the 

Download

 tab, 

then move the pointer to the 

Software

 link in the 

Downloads

 column and click it.

Figure 17. 

Download Tab and Software Button on the Download Screen

DSC 301 HD • Product Configuration Software

39

Содержание DSC 301 HD

Страница 1: ...User Guide DSC 301 HD Digital Scaling Converter 68 2338 01 Rev D 01 22 Scalers and Signal Processors...

Страница 2: ...electric shock ATTENTION This symbol when used on the product is intended to alert the user of important operating and maintenance servicing instructions in the literature provided with the equipment...

Страница 3: ...oleVault PowerCage PURE3 Quantum ShareLink Show Me SoundField SpeedMount SpeedSwitch StudioStation System INTEGRATOR TeamWork TouchLink V Lock VN Matrix VoiceLift WallVault WindoWall XPA XTP XTP Syste...

Страница 4: ...can radiate radio frequency energy and if not installed and used in accordance with the instruction manual may cause harmful interference to radio communications Operation of this equipment in a resi...

Страница 5: ...ero and O is the capital letter o Computer responses and directory paths that do not have variables are written in the font shown here Reply from 208 132 180 48 bytes 32 times 2ms TTL 32 C Program Fil...

Страница 6: ......

Страница 7: ...es 22 Copyright Information 22 Error Responses 23 Commands and Responses 23 Using the Command and Response Table 23 Symbol Definitions 24 SIS Command and Response Table 28 Product Configuration Softwa...

Страница 8: ...DSC 301 HD Contents iii...

Страница 9: ...flexible control and monitoring The unit can be rack mounted or installed under a desk using the optional MBU 125 rack mounting brackets The DSC 301 HD features advanced video processing with the abi...

Страница 10: ...nals can be embedded onto the HDMI output signal Audio input gain and attenuation Gain or attenuation can be adjusted for each analog audio input to eliminate noticeable differences when switching bet...

Страница 11: ...d HD lossless audio formats Key Minder Key Minder authenticates and maintains continuous HDCP encryption between input and output devices to ensure quick and reliable switching in professional AV envi...

Страница 12: ...bles easy configuration without having to access the rear panel 1 inch 2 5 cm high half rack width metal enclosure Includes LockIt HDMI cable lacing brackets Energy efficient external universal power...

Страница 13: ...G 2 3 INPUTS OUTPUT REMOTE DSC 301 HD G A B C D E F Figure 1 DSC 301 HD Rear Panel Features Inputs and Outputs Control and Power A Input 1 BNC connector E HDMI output B Input 2 15 pin HD connector F R...

Страница 14: ...lug the HDMI cable into the panel connection 2 Loosen the HDMI connection mounting screw from the panel enough to allow the LockIt lacing bracket to be placed over it 3 Place the LockIt lacing bracket...

Страница 15: ...MOTE Transmit Receive Receive Transmit Ground Ground DB9 Pin Locations Female 5 1 9 6 Pin 2 Rx Pin 3 Tx Pin 5 G Computer Figure 2 Wiring the RS 232 Port NOTE The default protocol is 9600 baud 1 stop b...

Страница 16: ...tton is pressed Input 1 composite video input button Input 1 selects the composite video input Input 2 configurable input button Input 2 selects the RGB RGBHV RGBS or YUV YUV HD YUVp YUVi input Input...

Страница 17: ...display when there are no active input signals Use the remote control port configuration to view the read only Communication submenu Use the read only Device Info screen to view device status elements...

Страница 18: ...tions and Refresh Rates table on page 20 on page 20 for EDID data IN3 EDID Select this option 4 to match the output rate or to set a discrete EDID see the Resolutions and Refresh Rates table for EDID...

Страница 19: ...ed on 480p and later recalled onto another resolution for example recalled onto 1080p NOTE If an unsaved user preset is recalled INVALID PRESET is displayed An additional 128 global input presets are...

Страница 20: ...the horizontal and vertical size of the image The range is limited by the output resolution the maximum size is two times the output resolution Brightness and Contrast Select this option 3 to independ...

Страница 21: ...e pixels Select this 5 to adjust the horizontal and vertical active pixels range is dependant on input Total Pixels and Phase Select this 6 to set the number of active pixels and the phase value for R...

Страница 22: ...HDMI RGB 444 Limited HDMI YUV 422 Limited HDCP Notification Select this option 3 to turn HDCP notification on default or off The HDCP Notification provides a means of determining if HDCP content rest...

Страница 23: ...e a single TRS audio input see the example of an audio setup on the next page HDMI input 3 can be set to use any analog TRS input or to embedded digital or to automatically use embedded digital audio...

Страница 24: ...cted to the analog TRS 3 input on the DSC 301 HD Configure input 1 and input 2 to use audio from the analog TRS 3 input Configure input 3 to LPCM 2Ch Auto to use digital audio when present or when not...

Страница 25: ...ll fills the entire output raster or to Follow follows the native aspect ratio of the input When in Fill mode if an Aspect Ratio adjustment for a single input rate is desired the correct size and cent...

Страница 26: ...nal shipped firmware press and hold the Enter button for 20 seconds while applying power The message FIRMWARE RESET is displayed on the OSD to indicate the reset is completed When a firmware reset is...

Страница 27: ...status information is Device internal temperature in degrees F and C The current active input details resolution signal format and total lines Output resolution and refresh rate and output format AFL...

Страница 28: ...X X 1360 x 765 X X X 1360 x 768 X X X 1365 x 768 X X X 1366 x 768 X X X 1365 x 1024 X X X 1440 x 900 X X X 1400 x 1050 X X 1600 x 900 X X 1680 x 1050 X X 1600 x 1200 X X 1920 x 1200 X X 480p X X 576p...

Страница 29: ...1024x768 60 Hz or 720p 60 Hz To set the rate or toggle between 1024x768 60 Hz and 720p 60 Hz Press and hold inputs 1 and 3 simultaneously for approximately 3 seconds The output rate becomes 1024x768 6...

Страница 30: ...ired to begin or end a command sequence When the DSC 301 HD determines that a command is valid it executes the command and sends a response to the host device All responses from the scaler to the host...

Страница 31: ...alid command for this configuration error if sent to a product whose current configuration does not support the command Commands and Responses Using the Command and Response Table The command and resp...

Страница 32: ...requencies format is three digit with single decimal and leading zeros for example 075 3 X1 Text label or preset name up to 16 alphanumeric characters and minus sign hyphen No blank or space character...

Страница 33: ...6 576p 67 720p 68 69 70 71 72 73 1080i 74 75 76 1080p 77 78 79 80 81 82 83 84 2048x1080 2k 85 86 87 88 89 90 91 92 Default output resolution X1 Test patterns 0 Off default 1 Crop 2 Alternating pixels...

Страница 34: ...nt X2 Video switching effect 0 Cut audio ramps down and ramps up between inputs 1 Fade thought black default audio ramps down and ramps up between inputs X3 HDMI output format 0 Auto default based on...

Страница 35: ...I outputs 2 Follow the input with continuous DVI trials 3 Always encrypt the HDMI outputs with continuous DVI trials NOTE When enabled the HDCP mode can be set as follows Follow Input Encrypts the out...

Страница 36: ...Image setting X for X Execute A Img Execute an Auto Image to the selected input follows current aspect setting Execute and Fill 1 A Img1 Execute an Auto Image and fill entire output Execute and Follo...

Страница 37: ...rrent input Increment value E PHAS PhasX X Increase the pixel phase Decrement value E PHAS PhasX X Decrease the pixel phase View EPHAS X Show pixel phase for current input Total Pixels Available only...

Страница 38: ...lrX X1 Set color level to X1 for current input Increment value E COLR ColrX X1 Increment color level Decrement value E COLR ColrX X1 Decrement color level View ECOLR X1 View current setting for curren...

Страница 39: ...cal Position Image Specific value EX1 VCTR VctrX1 Set vertical position to X1 Increment value E VCTR VctrX1 Shift image down Decrement value E VCTR VctrX1 Shift image up View EVCTR X1 View the vertica...

Страница 40: ...ave preset 2 X2 2SprX2 Save input preset X2 for selected input Delete clear preset EX2 X2 PRST PrstX2 X2 Clears input preset X2 and sets input preset X2 name to unassigned Input Preset Name Write name...

Страница 41: ...av0 DSC runs in full power mode default Power save on E1PSAV Psav1 DSC enters low power mode Can only be exited using E0PSAV command or front panel button press View setting EPSAV X3 View power save s...

Страница 42: ...ts 1 and 2 X3 can be set only to 0 1 2 or 3 Attempting to set these inputs to a digital format yields an E14 error response Digital auto modes 6 or 7 detect and use embedded audio when present or use...

Страница 43: ...always fill the entire raster default Enable Follow mode EX 2ASPR AsprX 2 Sets input X to preserve its native aspect View aspect ratio EX ASPR X2 View aspect ratio for input X Auto Switch Mode Disabl...

Страница 44: ...put Query notification ENHDCP X Query the HDCP notification HDCP Status valid for HDMI input and HDMI output only Query input EIX HDCP X2 HdcpIX X2 Query the HDCP status of the current input X verbose...

Страница 45: ...GLOK X3 View the current input lock AFL setting View AFL status E41STAT X3 41Stat X3 View the current input lock AFL status verbose mode response Video Signal Presence View signal presence E0LS X3 X3...

Страница 46: ...nt firmware version Query part number N n 60 1253 01 View part number View internal temperature E 20STAT Stat20 X1 Temperature in degrees Celsius KEY X Input selection 1 composite 2 RGB or YUV 3 HDMI...

Страница 47: ...s as those on the device front panel with additional features that are available only through the software The control software is compatible with Microsoft Windows operating systems Downloading and I...

Страница 48: ...n to log into the https www extron com website if you need an ID number see your Extron representative 5 Follow the instructions on the subsequent screens to complete the software program installation...

Страница 49: ...re through a LAN or WAN or via a USB connection Devices can be identified and sorted by model IP address device name or connection method To sort the list of available devices click the desired column...

Страница 50: ...on File see figure 20 1 1 Figure 20 Start up Drop down list The New Configuration File dialog box opens 1 Figure 21 New Configuration File Dialog Box 1 Select the DSC 301 HD device model from the Devi...

Страница 51: ...pages can be accessed These pages are Input Output Config EDID Minder Image Settings Size and Position Audio Config Preset Management General Settings On the left side of the tab is the AV Controls p...

Страница 52: ...Device drop down list select Disconnect 1 Settings Hardware Settings dialog box This dialog box see figure 24 allows users to view unit information such as part number model name model description cur...

Страница 53: ...s saved as a backup which can later be restored to a single connected device if desired To backup a configuration 1 Select Backup from the Device drop down list see figure 23 4 A Backup window opens s...

Страница 54: ...the Restore This Device dialog box click Restore to upload the file to the connected DSC 301 HD The window closes after restoring and a confirmation pop up is shown briefly to indicate the process is...

Страница 55: ...option contains the device module part number version and build number From the Device drop down list select About This Module see figure 23 8 The About This Module dialog box opens see figure 28 1 Fi...

Страница 56: ...ork 1 From the Software menu select Tutorial see figure 29 4 The Tutorial dialog box opens 2 Click the I Get It or the OK button to close the dialog box Extron PCS Help This options opens the PCS Help...

Страница 57: ...el see figure 34 can be used to switch inputs view active input and output status initiate an Auto image freeze the displayed image and mute or unmute video and audio signals Included in the panel is...

Страница 58: ...and Sync Mute buttons Click the Audio Mute button 4 to globally mute only the audio The button turns red Click the Video Mute button 5 to mute only the video signal The button turns red Click the AV M...

Страница 59: ...tire video output Follow Follows the signal aspect ratio with respect to the current output resolution setting Black letter box or pillar box bars may be applied for aspect ratio compensation Auto Ima...

Страница 60: ...compliant display Disable HDCP Authorized to allow the output of the scaler to remain unencrypted Film Detect Select the Film Detect checkbox 6 of the desired input to enable automatic 3 2 2 2 and 24...

Страница 61: ...to the newly selected input Accu RATE frame lock AFL From the Accu RATE Frame Lock section 5 select one of the following radio buttons Off Frame lock is disabled Input AFL Frame lock is enabled NOTE...

Страница 62: ...s on the input NOTE If an analog custom EDID file is assigned to a digital input or a digital custom EDID file assigned to an analog input the display may not appear correctly 1 2 3 4 5 6 7 8 Figure 3...

Страница 63: ...all inputs To match the selected inputs to the current output resolution Matching the output resolution is the default value for all inputs 1 In the Inputs panel 4 on the previous page select the che...

Страница 64: ...n HDMI LPCM 2Ch EDID to the PC The file is saved as a bin file Image Settings Page From this page signal sampling and picture control settings can be adjusted user and input presets can be saved and r...

Страница 65: ...to perform a one time Auto Image and to maintain the aspect ratio of the input signal ignores aspect ratio setting Picture Controls panel The Picture Controls panel shows adjustable image settings for...

Страница 66: ...User Preset Auto Memory Horizontal and Vertical Start Yes Yes Active Pixels Yes Yes Active Lines Yes Yes Total Pixels Yes Yes Phase Yes Yes Brightness and Contrast Yes Yes Yes Color and Tint Yes Yes...

Страница 67: ...red 3 Press the Enter key to save the new name To recall an input preset 1 From the Input Presets list select the desired preset 2 Click the Recall Preset button 3 The Presets dialog box opens 3 Click...

Страница 68: ...ically with Auto Image Click the Size and Position icon on the global navigation bar to open the Size and Position page see figure 35 4 on page 50 1 2 3 4 5 Figure 46 Size and Position Page To adjust...

Страница 69: ...page see figure 35 5 on page 50 1 2 Figure 47 Audio Configuration Page Audio input configuration Audio Format From the Audio Configuration panel select the input Audio Format from the drop down lists...

Страница 70: ...n adjustment applies only to analog signals The Input Gain fader is available for analog gain only when the audio format is set to Analog LPCM 2Ch Auto or Multi Ch Auto Preset Management On the Preset...

Страница 71: ...formation including Part Number Model Name Model Description Firmware Version Temperature and Device Name Figure 50 Hardware Settings Page To set the Screen Saver click the desired radio button black...

Страница 72: ...red by the selected input source Always Encrypt Output Always encrypts the output regardless of the HDCP status of the selected input source Follow Input with continuous DVI trials Encrypts the output...

Страница 73: ...e greater than room ambient temperature Therefore install the equipment in an environment compatible with the maximum ambient temperature TMA 122 F 50 C specified by Extron Reduced air flow Install th...

Страница 74: ...que Surcharge lectrique Lorsque vous connectez l quipement au circuit d alimentation observez la connexion de l quipement et tudiez les effets possibles d une surcharge du circuit sur les protections...

Страница 75: ...h Tower 160 Jan Smuts Avenue Rosebank 2196 South Africa This Limited Warranty does not apply if the fault has been caused by misuse improper handling care electrical or mechanical abuse abnormal opera...

Отзывы: