background image


Remote Control

This


section


describes


using


the


remote


control


features


of


the


DMS


matrix


switchers


to


control


the


devices.


Topics


that


are


covered


include:

• 

Selected SIS Commands

• 

Installing and Starting the Control Program

• 

Accessing the HTML Pages

Selected SIS Commands

You


can


use


Simple


Instruction


Set


(SIS

commands


for


operation


and


configuration 

of


the


switchers.


You


can


run


these


commands


from


a


PC


connected


to


a


serial


port


(

item 

c

)

,


Ethernet


port


(

item 

d

)

,


or


USB


port


(

item 

i

on


the


switcher.

Establishing a Network (Ethernet) Connection

NOTE:


If

 y

ou


connect


to


the


switcher


via


the


LAN


port,


and


it


is


the

 first 

time

 y

ou


have


done


so,

 y

ou


ma

change


the


default


settings


(IP


address,


subnet


mask,


and


[optional]


administrator


name


and


password

of


the


controller.


See


Configuring for Network Communication


for


details.

Establish


a


network


connection


as


follows:

1. 

Open


a


TCP


socket


to


port


23


using


the


IP


address


of


the


switcher.

NOTE:


The


factor

default


IP


address


is


192.168.254.254.

The


switcher


responds


with


a


cop

y

right


message


including


the


date,


the


name


of


the


product,

 firmware 

version,


part


number,


and


the


current


date


and


time.

NOTES:

  • 

If


the


switcher


is


not


password-protected,


the


device


is


now


read

to


accept


SIS


commands.


• 

If


the


switcher


is


password-protected,


a


password


prompt


appears.

2. 

If


necessar

y

,


enter


the


appropriate


password.

If


the


password


is


accepted,


the


switcher


responds


with


Login 

User


or


Login Administrator

.

If


the


password


is


not


accepted,


the


Password


prompt


reappears.

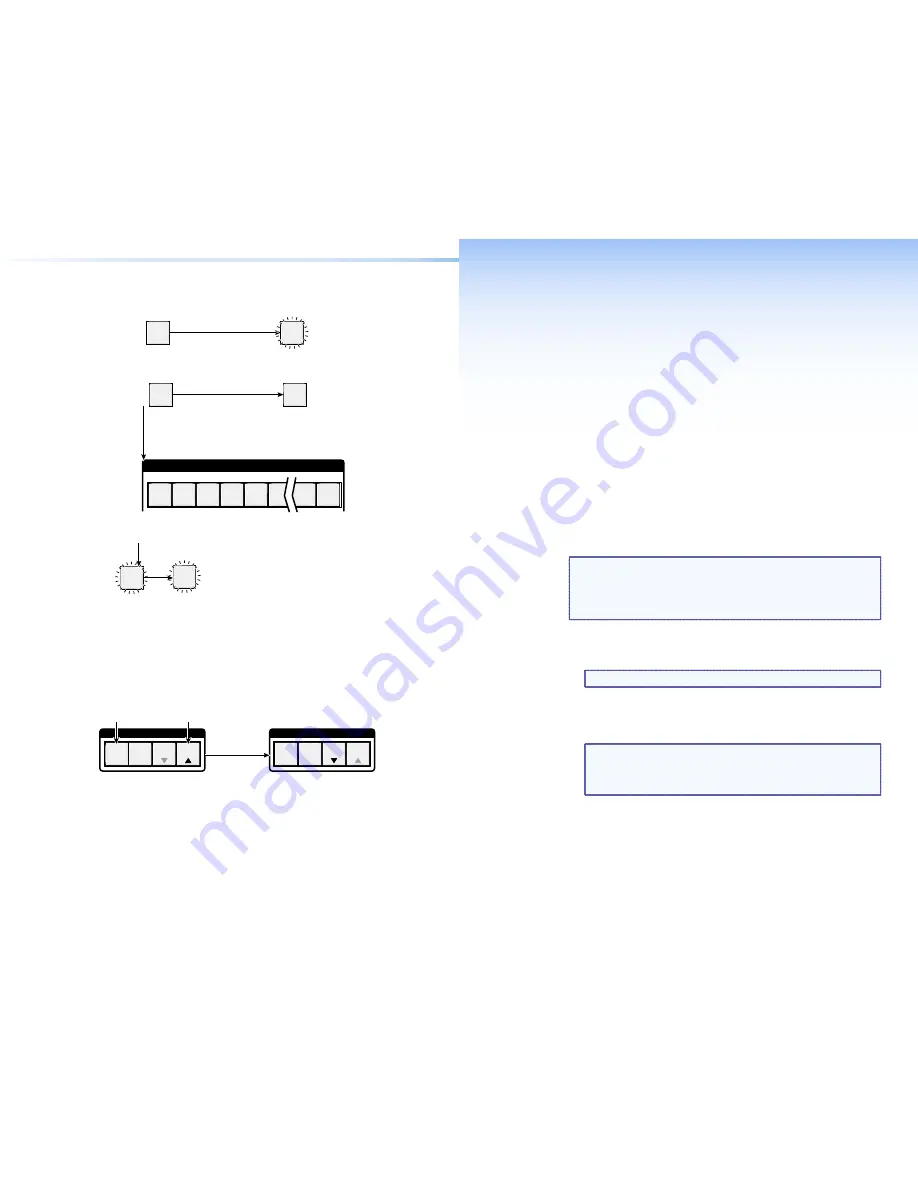
Saving or Recalling a Preset

1. 

Save


a


preset


Press


and


hold


the


Preset


button


until


it

 flashes.


PRESET 


PRESET 

The Preset button blinks.

Press and 

hold

2 seconds 

Save a 

preset 

Recall


a


preset


Press


and


release


the


Preset


button.


PRESET 


PRESET 

1 2 3 4 5 6

16

15

Recall a 

preset 

The Preset button lights.

Press and release.

All input and output buttons with assigned presets light 

red

.

When a preset is 

saved

, the configuration data at 

assigned preset locations will be overwritten

.

INPUTS

2. 

Press


and


release


the


desired


input


or


output


button.

ENTER 

The button blinks 

red

 to indicate that 

this 

preset

 is selected to save or recall. 

The Enter button blinks 

red

 to indicate the need to 

activate the save or recall.

3. 

Press


and


release


the


Enter


button.

Locking Out the Front Panel (Executive Mode)

To


toggle


the


lock


on


and


off,


simultaneousl

press


and


hold


the


Enter


button


and


the


Esc


button


until


the


Preset


and


View


buttons


blink


twice


(approximatel

2


seconds

)

.

C O N T R O L

PRESET

ENTER

ESC

VIEW

C O N T R O L

PRESET

ENTER

ESC

VIEW

Press and 

hold

 the Enter and 

Esc buttons simultaneously to 
toggle executive mode on or off.

2 seconds 

The Preset and View buttons 
blink twice to indicate the 
mode change.
Release the buttons.

10

DMS 1600 and DMS 3600 • Front Panel Operations

DMS 1600 and DMS 3600 • Remote Control

11

Содержание DMS 1600

Страница 1: ...side USA and Canada Only 1 919 863 1794 1 919 863 1797 FAX Extron Europe 800 3987 6673 Inside Europe Only 31 33 453 4040 31 33 453 4050 FAX Extron Asia 800 7339 8766 Inside Asia Only 65 6383 4400 65 6383 4664 FAX Extron Japan 81 3 3511 7655 81 3 3511 7656 FAX Extron China 400 883 1568 Inside China Only 86 21 3760 1568 86 21 3760 1566 FAX Extron Middle East 971 4 2991800 971 4 2991880 FAX 2010 Extr...

Страница 2: ...léctrica indicada en el mismo La alimentación eléctrica de este equipo debe provenir de un sistema de distribución general con conductor neutro a tierra La tercera pata puesta a tierra es una medida de seguridad no puentearia ni eliminaria Desconexión de alimentación eléctrica Para desconectar con seguridad la acometida de alimentación eléctrica al equipo desenchufar todos los cables de alimentaci...

Страница 3: ...anel Operation is subject to the following two conditions 1 this device may not cause harmful interference and 2 this device must accept any interference received including interference that may cause undesired operation The Class A limits are designed to provide reasonable protection against harmful interference when the equipment is operated in a commercial environment This equipment generates u...

Страница 4: ...ing a Network Ethernet Connection 11 Establishing a USB Port Connection 12 Host to Switcher instructions 13 Command Response Table for SIS Commands 14 Installing and Starting the Control Program 18 Installing the Program 18 First time Connection Considerations 19 Starting the Program 20 Accessing the HTML Pages 22 Configuring for Network Communication 22 Loading the Start up Page 23 Maintenance an...

Страница 5: ...chers unless a significant difference is noted in their features or operation This setup guide helps you to easily and quickly set up and configure your Extron DMS 1600 and DMS 3600 switcher Step by step instructions show you how to Connect the hardware Perform basic operations Use both the front panel controls and selected Simple Instruction Set SIS commands Load and start the Windows based Matri...

Страница 6: ...atrix Switcher Digital Monitors DVI Projectors HDTV Monitors Analog Monitor DVI Equipped PCs Compact HDTV Camera Systems Figure 1 Typical DMS 1600 Application The matrix switcher can be remotely controlled via its Ethernet LAN port a serial port or a USB port using either the Windows based Extron Matrix Switchers Control Program or the SIS The switcher has two internal hot swappable 100 VAC to 240...

Страница 7: ...NPUTS A B DVI D INPUTS DV C D A B Slot 1 1 4 Input 1 Slot 2 5 8 Slot 3 No board installed Slot 4 No board installed Output 1 Input 3 Input 4 Input 2 Output 2 Input 5 Input 6 Input 7 Input 8 Location A Input Location A Output Figure 2 Arrangement of Inputs and Outputs on the I O boards The board position designators correspond to the input and output numbers served by that position 1 through 4 5 th...

Страница 8: ...ction Wire as a patch straight through cable Computer or control system connection Wire the interface cable as a crossover cable NOTE The factory default IP address is 192 168 254 254 e Reset button Initiates four levels of reset of the matrix switcher For different reset levels press and hold the button while the switcher is running or while you power up the switcher Refer to the DMS 1600 and DMS...

Страница 9: ...he Esc button to clear any input button output button or control button indicators that may be lit 2 Press and release the desired input button 5 The button lights to indicate the selection 3 Press and release the desired output buttons 3 4 ENTER 8 The output buttons blink to indicate the potential ties The Enter button blinks to indicate the need to confirm the change 4 Press and release the Ente...

Страница 10: ...cessary enter the appropriate password If the password is accepted the switcher responds with Login User or Login Administrator If the password is not accepted the Password prompt reappears Saving or Recalling a Preset 1 Save a preset Press and hold the Preset button until it flashes PRESET PRESET The Preset button blinks Press and hold 2 seconds Save a preset Recall a preset Press and release the...

Страница 11: ...verbose mode SIS command In verbose mode 3 the Telnet socket reports changes using messages that resemble SIS command responses Establishing a USB Port Connection A standard USB cable and the Extron DataViewer utility version 2 0 or newer can be used for connection to the DMS switcher Configuration port The USB cable available at any local electronics store should be terminated on one end with a m...

Страница 12: ... configuration 00 untied X Output number 01 maximum number of outputs for your configuration Command ASCII Command host to unit Response unit to host Additional description Channel mute commands Channel mute X 1B VmtX 1 Mute output X no signal is output Channel unmute X 0B VmtX 0 Unmute output X signal is output Read channel mute X B X 1 mute on 0 mute off Global channel mute 1 B Vmt1 Mute all out...

Страница 13: ...0 outputs C1 4 inputs by 4 outputs C3 0 inputs by 4 outputs X Part number 60 nnnn nn X Firmware version number to second decimal place x xx NOTE X1 IP address nnn nnn nnn nnn X1 DHCP 0 1 off 1 on X1 Verbose mode 0 clear or none default for Telnet connection 1 verbose mode default for RS 232 RS 422 connection 2 tagged responses for queries 3 verbose mode and tagged for queries X1 Port timeout inter...

Страница 14: ... program creates a C Program Files Extron Matrix_Switchers directory and an Extron Electronics Matrix Switchers group folder It installs the following four programs MATRIX Switcher Control Program MATRIX Switcher Help Uninstall MATRIX Switcher Check for Matrix Updates First time Connection Considerations LAN port connection If you connect your PC to the switcher via the LAN port and it is the firs...

Страница 15: ...E For a comm port check the baud rate displayed in the Comm Port Selection window If you need to change the baud rate click the Baud button and double click the desired baud rate Click OK If you selected a serial port or the USB port in step 2 the Matrix Switchers Control Program is ready for operation 3 If you selected IP LAN in step 2 the IP Connection window appears a Examine the Matrix IP Addr...

Страница 16: ...new IP address for the unit obtained in step 1 and the MAC address of the unit from the rear panel of the unit For example arp s 10 13 197 7 00 05 A6 03 69 B0 and then press Enter After receiving the arp s command the controller changes to the new address and starts responding to the ping requests as described in step 5 NOTE You must ping the DMS matrix switcher as shown in step 5 for the IP addre...

Страница 17: ...ng a Power Supply Module Removing and Installing a Fan Removing and Installing an I O Board or Blank Panel Circuit boards can be added or removed to increase or decrease the I O configuration size of the switcher NOTES For proper cooling and air flow boards or blank panels should be installed in all locations during normal switcher operations See A Note on I O Boards to understand the different ar...

Страница 18: ...emoving and Installing a Power Supply Module The two power supply modules primary power supply and redundant power supply are identical and hot swappable Each power supply module has a 2 color LED visible on the rear panel that indicates the status of the power supply outputs If the LED is lit green the power supply is operating normally If the LED is lit red the supply has failed and should be re...

Страница 19: ...EVEL ACT LINK 100 24 0V 50 60H z 1 2 A MA X 100 24 0V 50 60H z 1 2 A MA X REDUNDANT PRIMARY DISCONNECT BOTH POWER CORDS BEFORE SERVICING SW ITC H RE FER EN CE PR IM AR Y PO WE R SU PP LY RE DU ND AN T PO WE R SU PP LY AN AH EIM CA 1 8 9 16 17 24 25 32 Knurled Knobs A B DV I D INP UT S DV I D OU TP UT S DM S 44 DV I C D A B C D A B DV I D INP UT S DV I D OU TP UT S DM S 44 DV I C D A B C D A B DV I...

Страница 20: ...30 DMS 1600 and DMS 3600 Maintenance and Modifications ...

Страница 21: ......

Отзывы: