


3-35
CrossPoint 300 Matrix Switchers • Operation
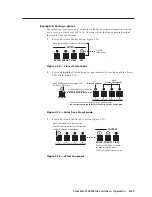
Basic features consist of:
Making ties
Saving and recalling presets
Setting input audio gain and attenuation
Changing Lock modes
Advanced features consist of:
Setting video and audio output mutes
Setting audio output volume
Setting the rear panel remote port protocol and baud rate
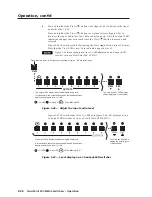
The switcher ships from the factory in Lock mode 2.
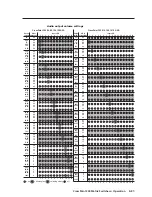
Selecting
Lock
mode 2 or toggling between mode 2 and mode 0
If the switcher is in Lock mode 0 or mode 1, this procedure selects mode 2.
If the switcher in in Lock mode 2, this procedure selects mode 0 (unlocks the
switcher).
To toggle the lock on and off, press and hold the Enter button, the RGBHV button,
and the Audio button for approximately two seconds (figure 3-56).
RGBHV AUDIO
ENTER
RGBHV AUDIO
ENTER
I/O
Press and hold the Enter, RGBHV, and Audio
buttons simultaneously to turn on Lock mode 2
or to toggle between mode 2 and mode 0.
2 seconds
The Enter, RGBHV, and
Audio LEDs blink twice to
indicate the mode change.
Release the buttons.
I/O
Figure 3-56 — Toggle front panel lock on or off
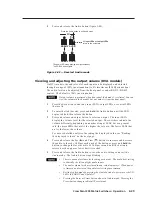
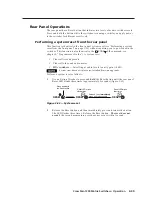
Selecting
Lock
mode 2 or toggling between mode 2 and mode 1
If the switcher is in Lock mode 0 or mode 1, this procedure selects mode 2.
If the switcher in in Lock mode 2, this procedure selects mode 1.
To toggle the lock on and off, press and hold the RGBHV button and the Audio
button for approximately two seconds (figure 3-57).
Press and hold the RGBHV and Audio
buttons simultaneously to turn on Lock mode
2 or to toggle between mode 1 and mode 2.
2 seconds
The RGBHV and Audio
LEDs blink twice to
indicate the mode change.
Release the buttons.
RGBHV AUDIO
I/O
RGBHV AUDIO
I/O
Figure 3-57 — Toggle front panel lock between mode 2 and mode 1
Содержание CrossPoint 300 1212
Страница 1: ...CrossPoint 300 Series Matrix Switchers 68 521 10 Rev B 03 07 ...
Страница 14: ...Introduction cont d CrossPoint 300 Matrix Switchers Introduction 1 6 This page was intentionally left blank ...
Страница 24: ...Installation cont d CrossPoint 300 Matrix Switchers Installation 2 10 ...
Страница 70: ...Operation cont d CrossPoint 300 Matrix Switchers Operation 3 46 This page was intentionally left blank ...
Страница 95: ...CrossPoint 300 Matrix Switchers A Appendix A Reference Information Specifications Part Numbers Button Labels ...
Страница 101: ...A 7 CrossPoint 300 Matrix Switchers Reference Information Figure A 1 Button label blanks 16 button strips ...
Страница 102: ...Reference Information cont d CrossPoint 300 Matrix Switchers Reference Information A 8 ...