background image

Installation and Connection, cont’d

AVT 100 • Installation and Connection

AVT 100 • Installation and Connection

2-8

5

.

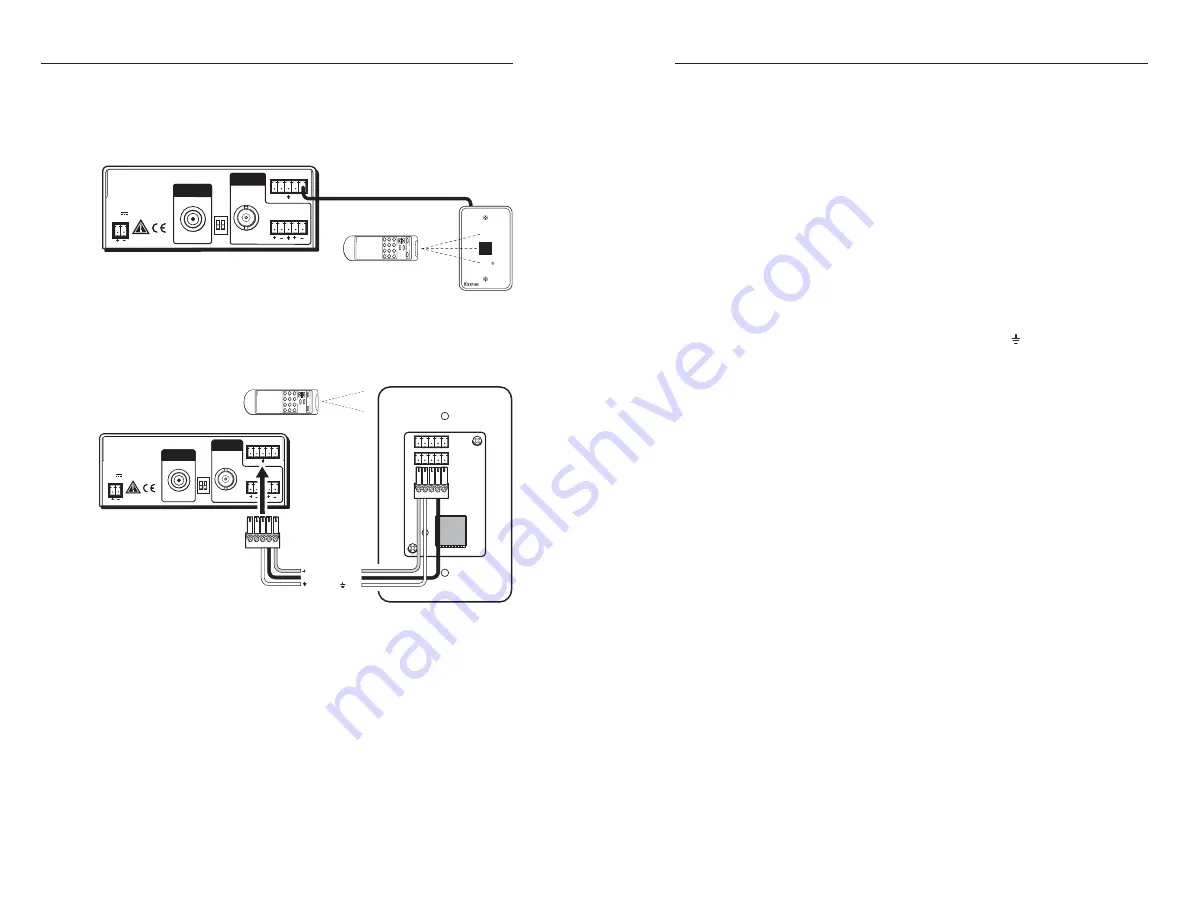
Plug the other end of the cable into the RS-232/IR port on
the rear panel  of the AVT 100.


C

Do not connect more than one IR Link (either in
parallel or in series) to a demodulator.


POWER 

12V          
0.5A MAX 

L R 

R

S

-2

3

2 / IR 

Tx Rx 

IR +12 

VID 

RF 

CABLE 

RE

S

ER

VED 

ANT 

ANT IN 

OUTPUT 

AUDIO 

AVT 100 

Re

a

r P

a

nel 

IR Link 

AVT 100 

Remote 

S

IGNAL 

IR LINK 

Channel 

TV TUNE 

A

VT 100 REMO

TE 

PRESET 

Video Audio 

0 1 

4 5 

8 9 

ENTER 

SA
VE 

150' (45 m) m

a

xim

u

m

MUTE

Using the AVT 100 IR Remote with the IR Link

The following diagram shows how to wire the AVT 100 to use
the infrared remote control with the optional IR Link.


POWER 

12V          
0.5A MAX 

L R 

R

S

-2

3

2 / IR 

Tx Rx 

IR +12 

VID 

RF 

CABLE 

RE

S

ER

VED 

ANT 

ANT IN 

OUTPUT 

Mod

u

l

a

ted IR 

+12 VDC 

Gro

u

nd (   ) 


IR 

12 

AVT 100 

Re

a

r P

a

nel 

IR Link 

Re

a

r P

a

nel 

AVT 100 

Remote

Channel

TV

TUNE

A

VT 100 REMO

TE

PRESET

Video

Audio

01

2

3

45

6

7

89

E

N
T

E

R

S

A

V

E

MUTE

Wiring the IR Link to the AVT 100

N

The ground pin is shared between RS-232 control and
the IR Link connection.

2-9

Connecting the AVT 100 to a MediaLink

Controller

You can hard wire an MLC MediaLink

 Controller’s modulated

IR output connector directly to the AVT 100 to provide remote
control of the AVT.

Follow these steps to connect the AVT 100 to an MLC.  See the
diagrams on the next page for examples.

1

.

Cut a length of 150' (45 m) or less of Extron Comm-Link
(CTL or CTLP) cable, which will go between the AVT 100
and the MediaLink controller.

2

.

Attach the provided 3.5 mm, 5-pole connector to the end of
the cable that will attach to the AVT 100, connecting one
wire to the center pin (which will plug into the AVT’s
ground connector pin, marked with  ), and another wire
to the pin to the right of the center ground pin.  (This pin
will plug into the AVT’s IR connector.)  Plug this end of the
cable into the RS-232/IR connector on the AVT’s rear
panel.

3

.

On the other (MediaLink controller) end of the cable, do
either of the following:

Attach the cable’s corresponding wires to the ground
and IR output pins of the captive screw connector
that will plug into the MLC.  Plug this end of the
cable into the IR connector on the MLC’s rear panel.

Attach the cable’s wires directly to the ground and IR
output pins on the MLC’s rear panel.

4

.

Using Global Configurator software, program the MLC
with the proper IR drivers for the AVT 100.  Refer to your
MediaLink controller user’s manual for more information.

N

If the AVT 100 does not respond to commands from the
MediaLink controller, a 1k ohm resistor may be required
between the ground and IR pins on the AVT 100.

This resistor 

is 

required when you are using an MLC 52

to control the AVT.

Содержание AVT 100

Страница 1: ...6C 3821 AH Amersfoort The Netherlands 800 3987 6673 31 33 453 4040 FAX 31 33 453 4050 Extron Electronics Asia 135 Joo Seng Rd 04 01 PM Industrial Bldg Singapore 368363 800 7339 8766 65 6383 4400 FAX 65 6383 4664 Extron Electronics Japan Kyodo Building 16 Ichibancho Chiyoda ku Tokyo 102 0082 Japan 81 3 3511 7655 FAX 81 3 3511 7656 www extron com Analog TV and Cable Demodulator 68 905 01 Rev G 01 08...

Страница 2: ...etrieb gesetzt werden Stromunterbrechung Um das Gerät auf sichere Weise vom Netz zu trennen sollten Sie alle Netzkabel aus der Rückseite des Gerätes aus der externen Stomversorgung falls dies möglich ist oder aus der Wandsteckdose ziehen Schutz des Netzkabels Netzkabel sollten stets so verlegt werden daß sie nicht im Weg liegen und niemand darauf treten kann oder Objekte darauf oder unmittelbar da...

Страница 3: ...nditions 1 this device may not cause harmful interference and 2 this device must accept any interference received including interference that may cause undesired operation The Class A limits are designed to provide reasonable protection against harmful interference when the equipment is operated in a commercial environment This equipment generates uses and can radiate radio frequency energy and if...

Страница 4: ...Link Controller 2 9 Chapter 3 Operation 3 1 Front Panel Features 3 2 Using the Control Buttons 3 2 Changing the channel 3 2 Initiating Auto Scan 3 3 Adding and deleting channels 3 3 Special Functions 3 3 Locking front panel controls executive mode 3 3 Selecting tune or preset mode 3 4 Presets 3 4 Muting the audio and video outputs 3 5 Selecting the audio output mode 3 5 Selecting the PAL broadcast...

Страница 5: ... the software program 4 16 Using the Windows based control configuration software Help 4 17 Appendix A Specifications Parts and Accessories A 1 Specifications A 2 Models A 5 Included Parts A 5 Optional Accessories A 5 Appendix B Channel Frequencies B 1 PAL Format Channels B 2 PAL channels B 3 NTSC Format Channels B 9 NTSC TV channels B 10 NTSC cable channels Standard frequency B 11 NTSC cable chan...

Страница 6: ...ception A full range of antenna and cable channels are available AVT 100N NTSC Antenna 2 69 Cable 2 125 1 2 AVT 100N NTSC Japan frequencies Antenna 1 62 Cable 1 63 AVT 100P PAL Antenna and cable 48 855 RS 232 interface Enables you to enter Simple Instruction Set SIS commands and interact with the Windows based control software The optional IR Link is also connected to this port IR Remote Control E...

Страница 7: ...ws based control software Rack mountability The AVT 100 can be mounted on a rack shelf using the optional mounting accessories It can also be placed on a tabletop for which four self adhesive feet are provided PAL standard selection Lets you select the appropriate PAL broadcasting standard for your area CATV frequency selection NTSC only Lets you select the NTSC cable frequency used by your cable ...

Страница 8: ...stall the equipment in a rack so that the amount of air flow required for safe operation of the equipment is not compromised 3 Mechanical loading Mount the equipment in the rack so that a hazardous condition is not achieved due to uneven mechanical loading 4 Circuit overloading Connect the equipment to the supply circuit and consider the effect that circuit overloading might have on overcurrent pr...

Страница 9: ...ed Stereo Output 3 16 5 mm max Do not tin the wires Wiring the audio output connector 2 5 2 4 Rear Panel Features The following figure shows the switches and connectors on the rear panel of the AVT 100 C US POWER 12V 0 5A MAX L R RS 232 IR Tx Rx IR 12 VID RF CABLE RESERVED ANT ANT IN OUTPUT NTSC AUDIO 7 8 6 2 3 4 5 1 AVT 100 rear panel 1 Power connector Plug the external 12 VDC power supply into t...

Страница 10: ...ins on the connector starting at the left a Connect the red wire to the first pin on the left which plugs into the Tx Transmit port b Connect the orange wire to the second pin which plugs into the Rx Receive port c Connect the green wire to the third pin which plugs into the ground port marked with this symbol 2 Plug the five pole connector into the RS 232 IR receptacle on the AVT 100 rear panel T...

Страница 11: ...ovide remote control of the AVT Follow these steps to connect the AVT 100 to an MLC See the diagrams on the next page for examples 1 Cut a length of 150 45 m or less of Extron Comm Link CTL or CTLP cable which will go between the AVT 100 and the MediaLink controller 2 Attach the provided 3 5 mm 5 pole connector to the end of the cable that will attach to the AVT 100 connecting one wire to the cent...

Страница 12: ...MAX L R RS 232 IR Tx Rx IR 12 VID RF CABLE RESERVED ANT ANT IN OUTPUT Modulated IR Ground D B IR AVT 100 Rear Panel Here or here MLC 226 IP Bottom Panel A B C D E DISPLAY RS 232 IR RS 232 12V CM IR SCP A B C D E MLS PWR A B Tx IR Rx GROUND P W R SNS GROUND 12V OUT Rx Tx GROUND GROUND 12V IN 12V OUT GROUND CONT MOD IR IN SCP COM NORMALLY OPEN 1 2 COMMON COMMON COMMON GROUND Tx IR Tx IR Tx IR GROUND...

Страница 13: ...SIS command the Windows based control software or the IR remote control you can change only to a preset channel To change the preset press the Channel buttons to display the numbers of the programmed presets in incremental or decremental order Initiating Auto Scan When Auto Scan is enabled the AVT 100 scans all channels and saves to memory those with an active signal To initiate automatic scanning...

Страница 14: ...na Antenna and Cable 2 to 69 2 to 125 1 to 62 1 to 63 48 to 885 Channels available for presetting When the AVT 100 is in tune mode and a preset is recalled via the appropriate SIS command the AVT 100 Remote or the Windows based control software a stored preset recalls the cable or antenna TV channel that was programmed for it When you select a preset in either tune or preset mode its preset number...

Страница 15: ... control software The AVT responds to commands from the AVT 100 Remote as if the corresponding button were pressed on the front panel or the corresponding SIS command or Windows based control software selection were entered From a distance of no more than 30 feet the remote control sends infrared IR signals to the AVT 100 through the tuner s front panel The IR receiver is located to the right of t...

Страница 16: ...y shows P00 then the channel number to which the AVT 100 was set before entering preset mode N The Channel up down button applies to antenna TV and cable modes Use the DIP switch on the rear panel to switch between these modes 3 Video Mute Press this button to toggle video muting on and off When muting is on video output is mute 4 Audio Mute Press this button to toggle audio muting on and off When...

Страница 17: ... 198 available presets 1 Switch to the channel that you want to assign See Selecting a channel tuning using the IR remote on the previous page 2 Enter the preset number to which you want to assign the current channel 3 Press Save The AVT 100 saves the preset and displays P and the preset number as confirmation After 3 seconds the display returns to the channel number that you just saved N If an in...

Страница 18: ...for information on connections The control device host can use the Extron Simple Instruction Set SIS commands or the Windows based control software Using Simple Instruction Set SIS Commands Host to AVT communications SIS commands consist of one or more characters per field No special characters are required to begin or end a command sequence You can enter these commands from your PC using a commun...

Страница 19: ...tatus Audio mute Mute on 1Z z Amt X2 Mutes audio output Mute off 0Z z Amt X2 Unmutes audio output View the audio mute status Z z Amt X2 Shows muting status 4 4 Symbol definitions CR LF carriage return line feed hex 0D 0A Soft carriage return no line feed Space Esc Escape key X1 Channel number NTSC antenna 002 069 NTSC cable 002 125 NTSC Japan antenna 001 062 NTSC Japan cable 001 063 PAL antenna an...

Страница 20: ... The default settings are Tune mode All presets removed Auto Scan channels cleared 4 6 Command response table for SIS commands continued Command ASCII Response Additional host to AVT AVT to host information PAL standard selection PAL version only Select standard X5 S s Sys X5 Select PAL standard X5 values are 0 B G default 1 D K 2 I View status S s Sys X5 Show the current PAL standard Request info...

Страница 21: ... X values for NTSC Japan 001 062 antenna TV channel 001 063 CATV channel X values for PAL 048 855 antenna and CATV channel 1 2 or 3 digits may be entered Example 011 3 Del 011 Delete channel 11 Add Auto Scan Channel X 4 Add X X values for NTSC 002 069 TV channel 001 062 Japan 002 125 CATV channel 001 063 Japan X values for PAL 048 855 antenna and CATV channel Example 011 4 Add 011 Add channel 11 4...

Страница 22: ...configuration via SIS command or the Window s based control software and the user s setting is saved Example 1 7 Mon 1 Mono output View audio mode 7 Mon X IR remote control access on off IR receiver on off X 9 Rmt X 0 IR enabled default 1 IR disabled Example 1 9 Rmt l Turn IR control off View IR receiver status 9 Rmt X 4 10 Command response table for special function SIS commands continued Command...

Страница 23: ... checksum Uploads all channels saved active channel presets mode selection and audio settings Write all memory contents 90 92 xxxx bytes of data 1 byte checksum Dn1 Downloads all channels saved the active channel presets mode selection and audio settings 4 12 Command response table for special function SIS commands continued Command ASCII command Response X values host to AVT 100 AVT 100 to host a...

Страница 24: ...mands the AVT 100 Windows based control configuration software provides you with another means of configuring and controlling the AVT 100 via RS 232 This program includes the functions found on the AVT s front panel and the IR remote control and some additional features that are available only through the Windows based software or the SIS commands Compatibility The software is compatible with Micr...

Страница 25: ...puter keyboard 4 16 Starting the software program Some items found in the software program correspond directly to the front panel or remote controls See chapter 3 Operation for front panel and IR remote control features and settings Other features are accessible only through the software or SIS commands discussed earlier in this chapter The AVT 100 Help program provides complete information on set...

Страница 26: ...ftware Configuration and Control cont d AVT 100 Software Configuration and Control AVT 100 A Appendix A Specifications Parts and Accessories Specifications Models Included Parts Optional Accessories 4 18 ...

Страница 27: ...oswitchable to 12 VDC 1 A max regulated Power input requirements 12 VDC 0 5 A Temperature humidity Storage 40 to 158 F 40 to 70 C 10 to 90 noncondensing Operating 32 to 122 F 0 to 50 C 10 to 90 noncondensing Cooling Convection unvented Rack mount Yes with optional 1U 9 5 deep rack shelf RSU 129 part 60 190 01 or RSB 129 60 604 01 Enclosure type Metal Specifications RF video input Number signal typ...

Страница 28: ...red separately Accessory Part number 1U 9 5 Deep RSU 129 Universal Rack 60 190 01 Shelf Kit 1U 9 5 Deep RSB 129 Basic Rack Shelf 60 604 01 AVT 100 IR Remote kit 70 366 01 IR Link black white RAL9010 white 60 404 02 03 05 CTL Series Comm Link cable 22 148 02 03 CTLP Series Comm Link cable 22 119 xx 22 461 xx A 4 Enclosure dimensions 1 7 H x 4 3 W x 6 7 D 1U high quarter rack wide 4 3 cm H x 10 9 cm...

Страница 29: ...AVT 100 Specifications Parts and Accessories Specifications Parts and Accessories cont d AVT 100 B Appendix B Channel Frequencies PAL Format Channels NTSC Format Channels A 6 ...

Страница 30: ...101 25 102 25 103 25 104 25 105 25 106 25 107 25 108 25 109 25 110 25 111 25 112 25 113 25 114 25 115 25 116 25 117 25 118 25 119 25 120 25 121 25 122 25 123 25 124 25 125 25 126 25 127 25 128 25 129 25 130 25 131 25 132 25 133 25 134 25 135 25 136 25 137 25 138 25 139 25 140 25 141 25 142 25 143 25 144 25 145 25 146 25 147 25 148 25 149 25 150 25 151 25 152 25 153 25 154 25 155 25 156 25 157 25 1...

Страница 31: ...25 388 25 389 25 390 25 391 25 392 25 393 25 394 25 395 25 396 25 397 25 398 25 399 25 400 25 401 25 402 25 403 25 404 25 405 25 406 25 407 25 B 4 PAL channels continued Channel Freq MHz Channel Freq MHz Channel Freq MHz 183 184 185 186 187 188 189 190 191 192 193 194 195 196 197 198 199 200 201 202 203 204 205 206 207 208 209 210 211 212 213 214 215 216 217 218 219 220 221 222 223 224 225 226 227...

Страница 32: ...25 703 25 704 25 705 25 706 25 707 25 708 25 709 25 710 25 711 25 712 25 713 25 714 25 715 25 716 25 717 25 718 25 719 25 720 25 721 25 722 25 B 6 PAL channels continued Channel Freq MHz Channel Freq MHz Channel Freq MHz 453 454 455 456 457 458 459 460 461 462 463 464 465 466 467 468 469 470 471 472 473 474 475 476 477 478 479 480 481 482 483 484 485 486 487 488 489 490 491 492 493 494 495 496 497...

Страница 33: ... 797 798 799 800 801 802 803 804 805 806 807 808 809 810 811 812 813 814 815 816 817 818 819 820 821 822 823 824 825 826 827 828 829 830 831 832 833 834 835 836 837 838 839 840 841 842 843 844 845 846 847 848 849 850 851 852 853 854 855 723 25 724 25 725 25 726 25 727 25 728 25 729 25 730 25 731 25 732 25 733 25 734 25 735 25 736 25 737 25 738 25 739 25 740 25 741 25 742 25 743 75 744 25 745 25 74...

Страница 34: ... 84 85 86 87 88 89 90 91 92 93 94 95 96 97 98 99 100 101 102 103 104 105 106 107 108 109 110 111 112 113 114 115 116 117 118 119 120 121 122 123 124 125 619 25 625 25 631 25 637 25 643 25 91 25 97 25 103 25 109 25 115 25 649 25 655 25 661 25 667 25 673 25 679 25 685 25 691 25 697 25 703 25 709 25 715 25 721 25 727 25 733 25 739 25 745 25 751 25 757 25 763 25 769 25 775 25 781 25 787 25 793 25 799 ...

Страница 35: ...00 684 00 690 00 696 00 702 00 708 00 714 00 720 00 726 00 732 00 738 00 744 00 750 00 756 00 762 00 768 00 774 00 780 00 786 00 792 00 798 00 B 12 NTSC cable channels IRC frequency Channel Freq MHz Channel Freq MHz Channel Freq MHz 2 3 4 5 6 7 8 9 10 11 12 13 14 15 16 17 18 19 20 21 22 23 24 25 26 27 28 29 30 31 32 33 34 35 36 37 38 39 40 41 42 43 44 45 46 47 48 49 50 51 52 53 54 55 56 57 58 59 6...

Страница 36: ...16 17 18 19 20 21 22 23 24 25 26 27 28 29 30 31 32 33 34 35 36 37 38 39 40 41 42 43 44 45 46 47 48 49 50 51 52 53 54 55 56 57 58 59 60 61 62 63 B 15 B 14 NTSC TV channels Japan standard frequencies Channel Freq MHz Channel Freq MHz 91 25 97 25 103 25 171 25 177 25 183 25 189 25 193 25 199 25 205 25 211 25 217 25 471 25 477 25 483 25 489 25 495 25 501 25 507 25 513 25 519 25 525 25 531 25 537 25 54...

Страница 37: ...Channel Frequencies cont d AVT 100 Channel Frequencies B 16 This page was intentionally left blank ...

Отзывы: