Version 2.1 7/09
11
PC Software
The supplied software combines
data acquisition
and
datalogger
functionality.
In the Datalogger mode, the meter stores readings remotely (explained in previous section)
then, at a later time, the meter is connected to the PC and the readings are transferred
(addressed in this section).
In the Data Acquisition mode, the meter takes readings while connected to the PC. The
readings are taken, displayed, and stored all at the same time.
PC Requirements
•
486-33 IBM compatible PC or better
•
CD-ROM
drive
•
Available serial port
•
Windows 95, 98, 2000, NT, ME, or XP Operating System
Installing the Windows Application Program
1. Connect the BT100 to the serial PC port (COM1 or COM2) using the 9-pin female
connector to the 9-pin male serial PC port cable supplied.
2. Place the supplied software CD in the PC CD-ROM drive
3. Wait for “Autorun” to start and follow the on-screen instructions
4. If “Autorun” does not start, click on “Start” then “Run”. Type the drive letter of the CD-
ROM and :\VB\Disk1\Setup.exe and click OK (To install the LabVIEW version, type the
drive letter and :\LV\installer\Setup.exe and click OK).
5. Change the path if necessary or choose to install the program to its default location.
6. Launch the program by double clicking the program file in the location where it was
saved during installation.
7. Do not run the supplied software until the meter is properly connected to the PC.
Software Operation
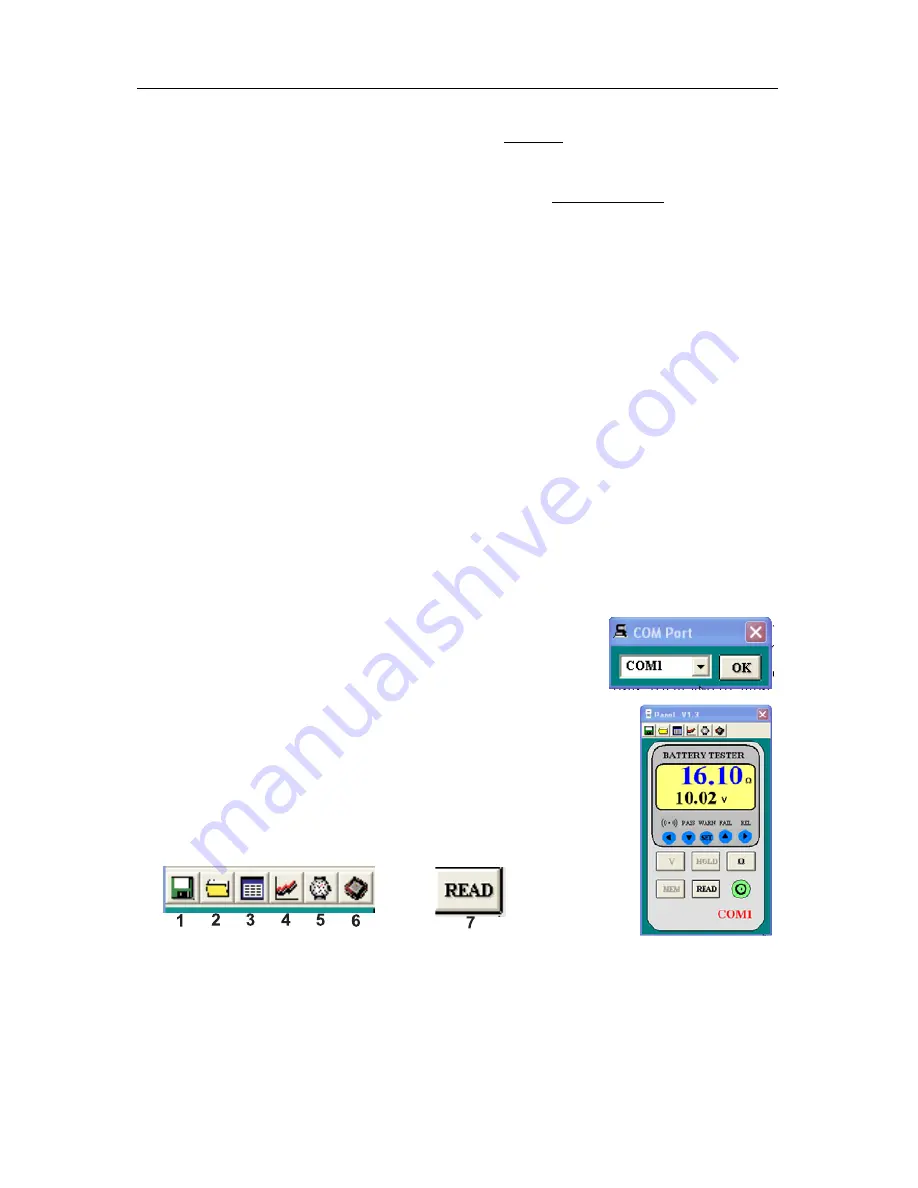
Click “Start” on the Start menu, click “Programs” and then click on
“BatTester” to launch the program. The COM Port screen will
appear. Select COM1 or COM2 then click OK
The Battery Tester main screen will appear. On the lower right of the
screen, “COM1” or “COM2” will appear if a connection has been
accomplished. “NO COM” will appear if there is no connection.
The function of the Main screen icons are:
1.
Opens the “Save As” dialog box to save data to a new file.
2.
Opens the “Open” dialog box to open a saved file.
3.
Opens the “Real Time List” display box for data acquisition mode.
4.
Opens the “Real Time Graph” of the voltage and resistance for data.
5.
Opens the “Real Time Sampling Rate” dialog box
6.
Opens the “Data Logger” box and downloads the data.
7.
Opens the “Manual Records” box and downloads the data.


