background image

13


Seriell RS

-

422/485 PCI Board


English


6.1


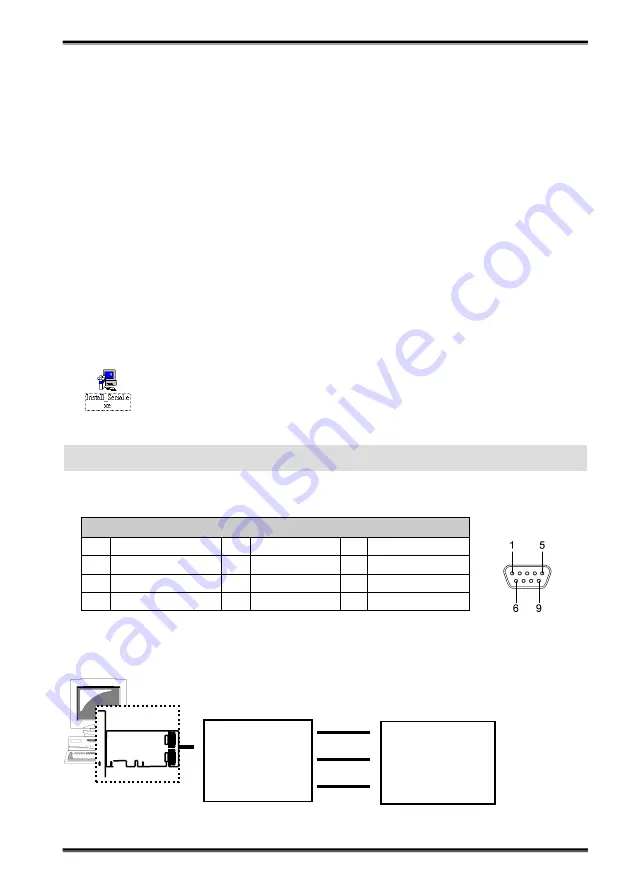
S1 and S2 Pin connection


DB 9M


9 Pin D

-

SUB male connector (S1 and S2) 


Pin


Signal


Pin


Signal


Pin


Signal


1


TXD

-

   (DATA

-

)


4


RXD

7


2


TXD+  (DATA+)


5


GND


8


3


RXD+


6


9


RS

-

422/485 PCI card


DATA(

-


Pin 1


DATA(+)


Pin 2


Ground


Pin 5


RS

-

485 Device


1.


When the system is powered, Windows will invoke Windows

’ 

New Hardware 

Wizard. Click

〝 

Next


to continue, select

〝 

Install from a list or specific loca-

tion

Advanced


and click

〝 

Next


.


2.


Select

〝 

Include this location in the search


then click


Browse


to speci-

fy the driver

s location for your OS (for  example, XP is 

E:\IO\OXFORD\XP32

and click

〝 

Next


to continue.


3.


Click

〝 

Next


to continue, and click


Finish 

to complete the installation.


4.


To check the Installation, right click on

My Computer

and choose

Manage

. Choose

〝 

Device Manager


and double click

〝 

Ports


.


5.1


Windows 98, ME, 2000, XP, Vista, 7, 8 and  


Server 2003 / 2008


6.2


RS

-

485 (2

-

wire) Cable Wiring


To  install  the  Windows  NT  driver,  please  go  into  WinNT4  sub

-

directory  and  run 

(double click)

 Install_Serial.exe

 to install all Serial Port Drivers.


Windows NT 4.0 start the Setup Program and install the driver. Restart 

Windows NT again.


5.2


Windows NT 4.0


Pin 1


DATA (

-

)


Pin 2


DATA (+)


Pin 5


Ground


6.


Pin Assignments and Cable Wiring


Содержание EX-42062

Страница 1: ...Bedienungsanleitung Vers 1 1 31 05 13 User Manual EX 42062 RS 422 485 Board EX 42062IS RS 422 485 Board Surge Protection Optical Isolation...

Страница 2: ...7 6 1 S1 und S2 Anschlussbelegung 7 6 2 RS 485 2 Draht Verkabelung 7 6 3 RS 422 4 Draht Verkabelung 8 7 Technische Daten 8 Index 1 Description 9 2 Packet Content 9 3 Layout and Jumper setting 10 3 1...

Страница 3: ...ment 1 1 128 byte On Chip FIFO und Arbitrary Trigger Levels und Interrupts Automatische Hardware Software Flow Control Bis 921 6 Kbps Baud Rate 5 6 7 8 9 bits Data Framing Unterst tzt Echo Mode Univer...

Страница 4: ...lung Es gibt zwei Jumper Reihen um die Ports S1 und S2 einzustellen 1 Mode Einstellungs Jumper JP5 f r S1 und JP6 f r S2 2 Abschlusswiderstand Jumper JP7 f r S1 und JP8 f r S2 3 Echo oder No Echo Jump...

Страница 5: ...F Abschlusswiderstand Ausgeschaltet Werkseinstellung ON Abschlusswiderstand Eingeschaltet 3 Echo oder No Echo Einstellung JP3 f r S1 Port JP4 f r S2 Port OFF ON OFF No Echo Data Werkseinstellung ON Ec...

Страница 6: ...das Geh use Suchen Sie einen freien PCI Slot und stecken Sie die RS 422 485 PCI Karte vor sichtig in den ausgew hlten PCI Slot ein Beachten Sie das die RS 422 485 PCI Karte korrekt eingesteckt wird un...

Страница 7: ...das Ger t suchen empfohlen und klicken sie auf Weiter W hlen sie jetzt Andere Quelle angeben und geben sie dann den Pfad f r ihr Betriebssystem wie auf Bild 1 gezeigt ein Kli cken Sie dann auf Weiter...

Страница 8: ...XD Pin 4 Ground Pin 5 Pin 1 TX Pin 2 TX Pin 3 RX Pin 4 RX Pin 5 Ground 6 3 RS 425 4 Draht Verkabelung Stromaufnahme 5V DC 450mA max Betriebstemperatur 00 bis 550 C 320 bis 1310 F Betriebs Luftfeuchtig...

Страница 9: ...0 and Power Management 1 1 128 byte On Chip FIFO and Arbitrary Trigger Levels and Interrupts Automatic Hardware Software Flow Control Up to 921 6Kbps Baud Rate 5 6 7 8 9 bits Data Framing Support Ech...

Страница 10: ...of the jumpers to set the settings for port 1 S1 and port 2 S2 respectively 1 Mode Selection Jumper JP5 for S1 and JP6 for S2 2 Termination Resistor Enable Disable Jumper JP7 for S1 and JP8 for S2 3 E...

Страница 11: ...esistor between DATA and DATA of the RS485 transceiver JP7 for S1 Port JP8 for S2 Port 3 Echo or No Echo Settings JP3 for S1 Port JP4 for S2 Port OFF ON OFF No Echo Data Default ON Transmission data w...

Страница 12: ...attached the I O card bracket to the computer chassis screw Put the chassis cover back on the computer Turn ON the power of your computer and peripherals Proceed with Software Driver Installation PLE...

Страница 13: ...speci fy the driver s location for your OS for example XP is E IO OXFORD XP32 and click Next to continue 3 Click Next to continue and click Finish to complete the installation 4 To check the Installat...

Страница 14: ...Pin 4 Ground Pin 5 Pin 1 TX Pin 2 TX Pin 3 RX Pin 4 RX Pin 5 Ground 6 3 RS 425 4 wire Cable Wiring Power requirements 5V DC 450mA max Operating temperature 00 to 550 C 320 to 1310 F Operating humidit...

Страница 15: ......

Страница 16: ......

Отзывы: