background image


17 

Expert Electronics 

2017 

3. Listen to the VFO A and VFO B frequencies simultaneously. 

Note! You can switch the point and click control on the panorama between VFO A and VFO 
B receivers, by pressing the middle mouse button. You’ll control the RX with the same color 
to the mouse cursor. 
When you change the band the SubRX is disabled. 

B>A – assign the VFO B frequency to VFO A 

A>B – assign the VFO A frequency to VFO B 

B<>A – swap frequencies between the VFO A and VFO B 


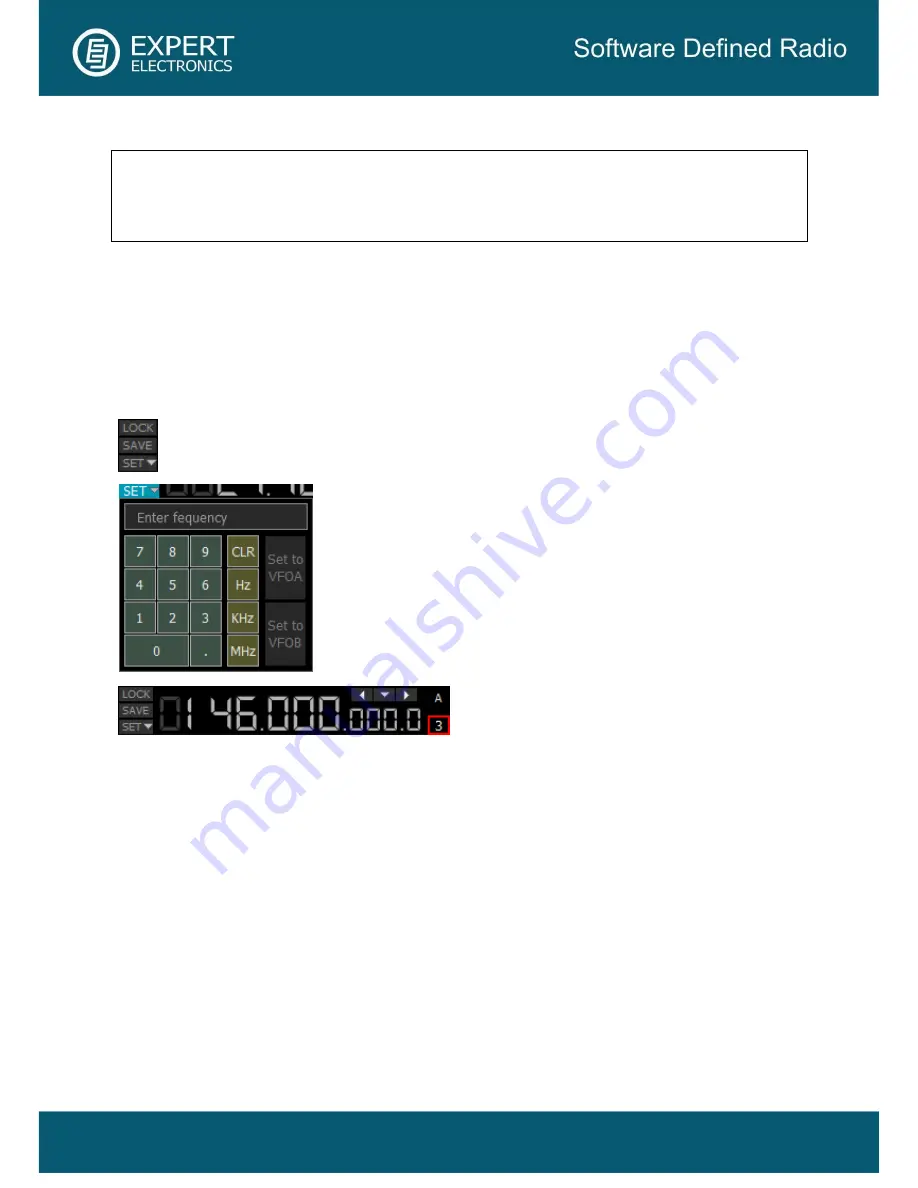
Main receiver control unit: 

LOCK – lock the VFO A frequency tuning. 

SAVE – save the current VFO A frequency and mode type in the memory panel. 

SET – manual input of the frequency to VFO A or VFO B. 


Band  Stacking  Memories  indicator  (VFO A 
only).  Each  memory  slot  has  a  frequency, 
mode, and filter settings. Each band has three 

memory slots associated with it. Successive presses on a band button will cycle through the 
stored memory slots. It might be useful for quick frequency and mode changes within a band. 
To replace one memory slot:  

1.


click the required band button you would like to modify. 

2.


change the frequency (within a selected band), mode, and filter to the required settings. 

3.


click the band button again to save the values. 

Содержание ColibriNANO

Страница 1: ...Expert Electronics 2017 ColibriNANO Direct Sampling HF 6M receiver User Manual V1 0 ...

Страница 2: ...Panorama description 21 7 2 4 1 Spectrum Scope 21 7 2 4 1 1 Spectrum Scope scaling 22 7 2 4 1 2 Frequency tuning 23 7 2 4 2 Waterfall 24 7 3 Status bar 25 8 ExpertSDR2 software fine tuning 26 8 1 Device menu 27 8 1 1 Device settings 27 8 1 2 VAC tab 27 8 1 3 DSP tab 28 8 1 4 Expert tab 30 8 2 Sound card menu 31 8 2 1 Sound card 32 8 2 2 Line output 32 8 3 Display menu 33 8 3 1 Main window tab 34 8...

Страница 3: ...3 Expert Electronics 2017 8 7 Manager menu 48 8 8 CW Skimmer menu 49 8 9 Shortcuts menu 50 ...

Страница 4: ...any difficulties To make this manual more user friendly we used screenshots of dialogue windows necessary functions are highlighted with colored contour Since the ColibriNANO is an SDR it means that you will need a PC or laptop to use the receiver You can control your receiver with the ExpertSDR2 HDSDR or SDRSharp software installed on your PC The main features of this receiver are the 14 bit ADC ...

Страница 5: ...e receivers 1 1 SubRX Sensitivity uV 0 35 Blocking Dynamic Range BDR dB 110 IMD3 Dynamic Range dB 95 Supply voltage range V 4 5 5 5 Maximum antenna input voltage without ADC overload mV ATT 0 dB 74 Pk Pk 32 7 RMS Maximum current consumption A 0 41 Input impedance Ohm 50 ADC clock frequency MHz 122 88 ADC resolution bit 14 Local oscillator stability ppm 0 5 Local attenuator with 0 5 dB step dB from...

Страница 6: ...strong signals Driver it s purpose is to amplify the signal and transfer it to the ADC Preamp preamplifier 0 6 dB it can additionally amplify signals TCXO Temperature Compensated Crystal Oscillator with 122 88 MHz frequency This is a high stability oscillator with temperature instability 0 5 ppm ADC high speed Analog to Digital Converter with 14 bit resolution and 122 88 MHz sample rate ADC is the...

Страница 7: ...Electronics 2017 Controller It controls all ColibriNANO systems and performs the data exchange between the receiver and the USB controller USB FT232H It performs the data exchange between the Controller and a PC ...

Страница 8: ... the right mouse button on the Windows Start button Programs and Features before installation of the ExpertSDR2 software if your installed version is above the one offered during installation select cancel When you plug the ColibriNANO in your PC Windows will automatically download required USB driver ensure PC is connected to the internet before connecting the ColibriNANO Then receiver will be de...

Страница 9: ...tenna connector 3 Open Options menu and ensure device connected is displayed If not get correct driver 4 Start the ExpertSDR2 software with the red Start button left top corner of the software window 5 Open Options Sound Card menu and make sure that the Enable checkbox in the Sound card block is set See picture 6 Click OK If everything is done correctly you will see the air noise on the panorama a...

Страница 10: ...an enjoy clear air from your phone tablet notebook or PC Even simple antennas placed in a quiet place allows you to listen to the far stations with low level Another feature of this system is that the receiver s software can be synchronized with transceivers and be used as the panorama adapter with high resolution Use the transceiver to transmit signals receive on your remotely located receiver vi...

Страница 11: ...with the software defined radio SDR the main settings and signal processing is held in the software 7 1 Global controls panel This panel consists of the following buttons the Start button switches on off the ExpertSDR2 software Attenuator level can be set in the drop down menu with a slider 0 5 dB step or by successive presses of the indicator button which cycles upwards the attenuation coefficien...

Страница 12: ...s of the whole program to the default state by the Default button Update the settings of the certain profile from the list to the current settings Remove the certain profile from the list Note All new profiles will be stacked up to the drop down menu as a new line Options menu will be fully described later in the Paragraph 9 of the manual About button opens the new window with the info about curre...

Страница 13: ...7 7 2 Software receiver settings These settings are divided in four logical parts 7 2 1 Receiver control panel volume and balance control menu for the first and second receivers separately button opens an 18 band equalizer menu ...

Страница 14: ...nal show the HF stations markers on the panorama from the EiBi data base Hover with the mouse pointer on the station frequency and you ll see its name IQ files recording is required for storing the RX bandwidth panorama The file is saved to the C Users User ExpertSDR2 wave turn on the CW Skimmer bigger S meter button The S meter window can be separated from the software window and moved to any pla...

Страница 15: ...on Double Side Band Lower Side Band Upper Side Band CW mode Narrow FM Wide FM supports receiving of the stereo signals Spectrum mode Receive the pure signal without any demodulation panadapter bandwidth The idea is to receive pure signal then pass it out via VAC or PC s soundcard Digital Lower Side Band Connect a third party software is not supplied to the receiver software for operating in digita...

Страница 16: ... grade types in S units and in dBm The signal strength displayed in dBm to mW yellow figure in the top left corner of the S Meter Note S Meter in the ExpertSDR2 has two different calibrations for HF 0 30 MHz and VHF 30 300 MHz HF and VHF signals with the same dBm level has different S scale values For example HF S9 73 dBm 50 uV 50 Ohm VHF S9 93 dBm 5 uV 50 Ohm S Meter in the ExpertSDR2 corresponds...

Страница 17: ... LOCK lock the VFO A frequency tuning SAVE save the current VFO A frequency and mode type in the memory panel SET manual input of the frequency to VFO A or VFO B Band Stacking Memories indicator VFO A only Each memory slot has a frequency mode and filter settings Each band has three memory slots associated with it Successive presses on a band button will cycle through the stored memory slots It mi...

Страница 18: ...l be held on a frequency Rit offset Offset is displayed as a translucent band on the spectrum scope Tuned frequency displayed as the red line RX frequency displayed as the green line with the filter band on the picture you can see USB mode In the drop down menu you can set the frequency offset in Hz Reset resets the offset value to zero You may enter the frequency offset value in the input box via...

Страница 19: ...e frequency difference between the mouse cursor and the RX filter Note If the RIT offset wasn t reset when you disable the RIT it s state will be saved When you activate the RIT next time the offset will equal the previous value AGC presets menu In the drop down menu you can select the receiver s AGC preset OFF AGC is off LONG preset with long AGC reaction approximately 750 ms Recommended for phon...

Страница 20: ... Notch Filter for adaptive rejection of the narrowband interference in the receiving band interference carrier signals CW signals etc Note If there are no interference ANF could slightly affect the reception quality of the desired signal Disable ANF if you don t need it enable Analog Pick Filter it creates the triangle filter s AFC amplitude frequency characteristic in the filter bandpass enable D...

Страница 21: ...1200 Hz WFM 50 310 kHz DRM mode has one fixed bandwidth 10 kHz user can adjust the RX filter bandwidth by himself possible at any modulation type except DRM 7 2 4 Panoramic Display description The panorama consists of two parts 1 Spectrum Scope and 2 Waterfall 7 2 4 1 Spectrum Scope In this window you can see the spectrum with the sample rate from 39 up to 312 kHz adjustable by User and the RX fil...

Страница 22: ...scope but it also may have a filling color You can change spectrum rendering mode line color filling color transparency etc in the software Options 7 2 4 1 1 Spectrum Scope scaling If you move the mouse cursor over the vertical scale a hand will appear Press and hold the right mouse button then move it up down to change the dBm scaling or press and hold the left mouse button then move it up down t...

Страница 23: ...2 4 1 2 Frequency tuning There are several ways of tuning on the spectrum scope Quick tuning by the mouse click On the spectrum scope mouse cursor looks like the crosshair Alongside this cursor displayed the exact frequency and dBm level in the certain point The RX filter moves to this position by the click of the left mouse button Dragging the RX filter over the spectrum scope Press and hold the ...

Страница 24: ...e wheel on the digit of the frequency indicator Rotate forward increase value rotate backward decrease value Aside from the listed above ways of tuning implemented the synchronous tuning between the bandscope and the main receivers Press the right mouse button on the required frequency on the bandscope the main receiver simultaneously tunes to this frequency Mouse wheel click on the digit of the f...

Страница 25: ...tom you can adjust them in the software Options 7 3 Status bar The status bar displays the following information from left to right ExpertSDR2 window resolution CPU load in percent Connection status to ColibriNANO red no connection blue connection Coordinated Universal Time UTC Current date Local Time ...

Страница 26: ...et all setting to default values by simply clicking the Global Default button The same applies to some enclosed menus where you can find the Global Default button You can check the changes without leaving the Options window just click the Apply button If you are satisfied with the changes and don t want to change anything else click the OK button to close Options window WARNING We recommend you to...

Страница 27: ...ator level based on the signal level on the ADC input The purpose of this feature is to maximize the ADC usage but do not overload the ADC we recommend to keep this feature ON 8 1 2 VAC tab If the ExpertSDR2 and digital modes software run on the same computer they can be connected via a Virtual Audio Cable VAC without wires and sound cards Enable set the Enable checkbox to enable Virtual Audio Cab...

Страница 28: ...ameters Slope set the slope of the transfer characteristic Attack when a signal gets stronger this value determines how quickly the AGC will decrease gain Decay when a signal gets weaker this value determines how quickly the AGC will increase gain Hang time signal recovery time Threshold AGC trigger threshold Default reset AGC setting to the default level Press the Default button if you set wrong ...

Страница 29: ...racteristic in the filter bandpass CW APF Analog Peak Filter for CW mode Gain Analog peak filter amplifying factor Quality Analog peak filter quality slope sharpness SSB APF Analog Peak Filter for SSB mode Gain Analog peak filter amplifying factor Quality Analog peak filter quality slope sharpness Frequency central frequency of the voice signal Filter taps receiver s filter taps Set the required r...

Страница 30: ...for correct DSE functionality if required Correct functionality slowly increasing the receiver tuning frequency while receiving the CW signal sounds as if CW signal moves from the right to the left channel WFM Wide FM standard USA set this checkbox to listen to WFM stations in the USA or South Korea DIG offset frequency offset use when you operate in digital modes Whether to use frequency offset o...

Страница 31: ...equency of the received signal Note Correction of the displayed frequency could be made according to the time signals on the 4 996MHz 9 996MHz or 14 996MHz preferably frequencies where you can find easily tracked pulse signals If they do not match with the tuned frequency adjust the Frequency coefficient till the frequency match The higher the frequency of the used time signal the higher calibrati...

Страница 32: ...und card s channels Sample rate sampling frequency Buffer size buffer size Latency signal delay time Note Before you ll enable the Sound card by the Enable checkbox make sure that all sound devices settings are set correctly 8 2 2 Line output In the Line output category you can see the settings of the sound card or virtual audio cables which could be used for sound output Note Sound output via the...

Страница 33: ...delay time Note Before you ll enable the Line output by the Enable checkbox make sure that all sound devices settings are set correctly 8 3 Display menu In the Display menu you can see the settings of the receiver s software display Display settings are placed according to their functionality Main window Spectrum Waterfall Grid Filter Background Indicators ...

Страница 34: ...ox setting off Autostart device receiver s autostart checkbox Set the Autostart device checkbox to automatically start the receiver after the launch of the software Recommended checkbox setting on Show current profile in window title display the current profile in the software window title Set the Show current profile in window title checkbox to display the current profile if the profile is on in ...

Страница 35: ...eraging Set the required amount of samples for averaging The bigger the amount of samples the slower the specter will change on the graph Update period spectrum scope update period Set the required specter s graph update period The bigger the number the more FPS on the spectrum scope along with the higher processor load Render mode specter render mode lines gradient Set the required specter render...

Страница 36: ... Show cursor info show frequency and dB level of the cursor position Set the Show cursor info checkbox to enable info display near the cursor on the spectrum scope Show the difference between VFOA and VFOB show the difference between VFOA and VFOB Set the Show the difference between VFOA and VFOB checkbox to display the difference between VFOA and VFOB near the cursor Auto hide cursor automaticall...

Страница 37: ...the minimum brightness relatively to the min signals levels Render mode waterfall render mode menu Rainbow Monochrome Custom Choose the required color render of the waterfall depending on your choice or tasks In the Custom mode you have three color presets 1 2 3 and User adjustable mode In the User preset there are 6 color markers at maximum Double click of the left mouse button on the color marke...

Страница 38: ... to show receiver s filter on the waterfall Show filter text show text info near the receiver s filter on the spectrum Set the Show filter text checkbox to display filter s tuned frequency signal level in S units etc in the used filter bandwidth Show S Meter enable animated S Meter near the receivers filter on the spectrum Set the Show S Meter checkbox to display S Meter near the receiver s filter...

Страница 39: ... the Background tab you can see the spectrum scope background settings Background type spectrum scope background type menu Solid Gradient Image Choose in the Background type menu spectrum scope background render type In the Solid mode available settings are Color background color menu Choose the required background color from the palette In the Gradient menu available settings are Color top top gr...

Страница 40: ...ser image in the presets list it ll open the window to choose the image file Supported files types png jpg jpeg bmp 8 3 7 Indicators tab In the Indicators tab you can change the averaging algorithm of the output power readings on the transmitter output Peak in this mode the power meter shows peak power values RMS in this mode the power meter shows the true RMS power values 8 4 САТ menu In the CAT ...

Страница 41: ...nable the control of the SubRX via the CAT system Antenna switch control checkbox to enable control of the antenna switch via the CAT system Set the Antenna switch control checkbox to enable the control of the antenna switch via the CAT system Useful for the Ham Radio Deluxe software Global volume control when this checkbox is enabled you control the global volume with the Volume slider on the top...

Страница 42: ...ngs in the OmniRig software are not required Select in the OmniRig settings any idle COM port in the system to avoid conflict OmniRig RX1 Status RX1 receiver and OmniRig connection status OmniRig RX2 Status RX2 receiver and OmniRig connection status 8 5 Panel menu In the Panel menu you can see the settings of the E Coder control panel In the drop down Device menu you can select the type of the con...

Страница 43: ...gned on the E Coder panel buttons Unused button is unused Main AGC Up Down AGC type switching Band Up Down band switching Filter Up Down receiver s filter switching Mode Up Down mode switching PA enable disable power amplifier Preamp Up Down preamp or attenuator level switching Power ON OFF transceiver s power on off RX ANT enable disable receive antenna Step Up Down change the tuning step WF enab...

Страница 44: ...ware RX1 and RX2 Main knob will tune the frequency of one of the receivers While you operate both RX1 and RX2 usually you need to listen to either only one of them or both of them but in different channels left right To do that we added special functions to the E Coder panel which set the mixer for both RXs Audio Listen both RX1 RX2 default settings both RXs have equal volume in both channels List...

Страница 45: ...le auto notch filter APF enable disable analog pick filter BIN enable disable binaural mode NR enable disable noise reduction NB1 enable disable noise blanker 1 NB2 enable disable noise blanker 2 SQL enable disable squelch The following functions may be assigned on the E Coder panel knobs Unused encoder is unused Volume volume adjustment SQL squelch threshold adjustment Filter Low High tuning the ...

Страница 46: ...t change step per knob s clack Filter Low set the filter s low limit change step per knob s clack Filter Width set the filter s width change step per knob s clack Filter Shift set the filter s shift change step per knob s clack RF Gain set the RF gain step per knob s clack Additional functions Enable PTT Transfer rerouting of the PTT signal from the panel to the COM port Set the Enable PTT Transfe...

Страница 47: ... Program 1 10 program s button Press the Prog X button to open the window and select exe file of the required program Delete button program delete button Press the Delete button if you need to delete a program from the autorun list Arguments input box to enter the argument after program s launch Enter some text message in the arguments input box for the corresponding program Note Arguments allow t...

Страница 48: ... will be 127 0 0 1 Port input box of the data exchange port Enter the exchange port number in the Port input box Connect button to launch the connection between the receiver s software and ExpertSync Press the Connect button to launch the connection between the receiver s software and ExpertSync Blue indicator means there is a connection Sync RX1 RX1 receiver sync button Set the Sync RX1 checkbox ...

Страница 49: ...ess IP address or DNS name of the CW Skimmer server Enter this 127 0 0 1 address or localhost if you want to connect to the CW Skimmer which is installed on the receiver s PC Port input box of the data exchange port Enter the exchange port number in the Port input box Callsign callsign input box Enter your callsign if the server requires it Password password input box Enter the password if the ser...

Страница 50: ... pdf 8 9 Shortcuts menu In the Shortcuts menu you can see the shortcut key combinations With the help of the key combinations you can control the receiver from your keyboard Note Shortcuts will be active only if the receiver s software window is in focus Enable Shortcuts enable button Set the Enable checkbox to activate assigned shortcuts Command receiver s functions column In the Command column d...

Страница 51: ...2017 Expert Electronics LLC All Rights Reserved DUC DDC SDR Series ColibriNANO receiver Specifications are subject to change without notice or obligation and specifications are only guaranteed within the amateur radio bands V1 0 05 05 2017 ...

Отзывы: