background image

PART NAMES AND FUNCTIONS

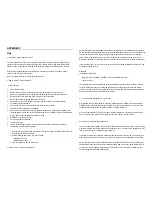
FRONT PANEL

The front panel of your CD Rewriter may look slightly different from the
figure shown below. The important parts and functions, however, are the same
regardless their locations.

1.

Eject button:

Press this button to eject the tray.

2.

Access LED:

This LED will blink when the drive is accessing the disc.

3.

Emergency Hole:

Insert a pin shaped item to manually eject the tray while power-off.

4.

Power LED:

This LED will light when power is on.

5.

Head Phone jack:

The CD-Audio sound output. Connect a headphone or external speaker here.

6.


Volume Control:

CD-Audio volume control.

Figure 1

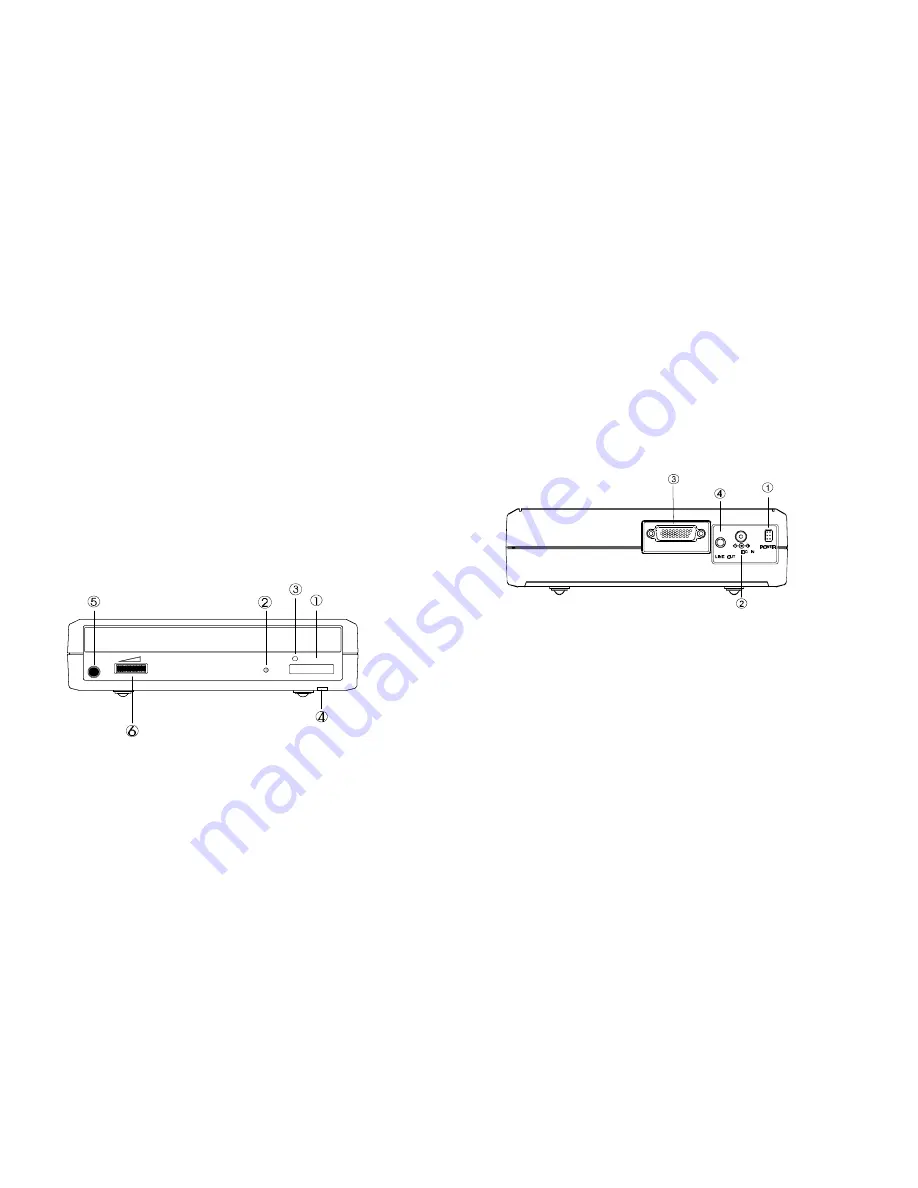
REAR PANEL

1. Power Button:

Press the button to manually power on/off the drive.

2. DC in Jack:

This jack connects to the AC adapter.

3. Interface Connector:

Connect the drive to the Parallel port cable or PCMCIA interface card.

4. Audio Line-Out Jack:

Send audio signal to an external amplifier.

Figure 2

POWER SOURCE

The CD Rewriter Drive powered by an AC adapter. The POWER LED indicates the
power status. It always light up when the power supply is in the normal condition.

1.

Connect the AC adapter plugs to the DC IN jack at the rear panel of the drive.

2.

Attach the AC adapter to the AC power outlet.

Содержание CRW-740

Страница 1: ...PC Card CD ReWritable Installation Manual CRW 740...

Страница 2: ...the date of purchase and the shipping cost of the failed product to EXP Computer Inc You are responsible for mailing the warranty registration card The warranty claims may not be honored if there is...

Страница 3: ...NTS Notebook or desktop computer with Pentium 133 Mhz or higher 32 MB RAM 75 MB free HD space A Parallel port EPP or bi directional or If using the PC Card interface the computer should have at least...

Страница 4: ...sound output Connect a headphone or external speaker here 6 Volume Control CD Audio volume control Figure 1 REAR PANEL 1 Power Button Press the button to manually power on off the drive 2 DC in Jack T...

Страница 5: ...nnect the other end to computer parallel port standard 25 connector 3 Plug in the AC adapter to a working AC receptacle 4 Press power button You are now ready to install the software CAUTION SOFTWARE...

Страница 6: ...d installation files specify the full path of the directory and click OK 5 Select P H T Parallel Port Trans Series Win95 98 Driver and click Next 6 Click Finish to complete installation 7 Remove Insta...

Страница 7: ...Have Disk button Windows NT will then prompt you to insert the manufacturer installation disk Insert the device driver disk into your floppy drive Specify the directory as A or A WINNT if the directo...

Страница 8: ...ce card into the slot and press firmly until the card is seated 6 You are now ready to install the CD ReWriter device driver SOFTWARE INSTALLATION FOR WINDOWS 95 98 The New Hardware Found dialog box w...

Страница 9: ...p click on My Computer icon There should be addition CD ROM drive s icon displayed SOFTWARE INSTALLATION FOR WINDOWS NT 4 0 PC CARD Interface Currently there is no Plug and Play support for PC Card PC...

Страница 10: ...Program Click on Install button The installation program will search for Setup exe program from the CD ROM Usually the application will start automatically If not click Browse button then open the sub...

Страница 11: ...er sharing device 4 If you connect the equipment in daisy chain fashion always turn on the device farthest away from the computer first in this case the EXP CD then turn on the device next on the chai...

Страница 12: ...see the screen below it means the PCMCIA device driver is not using 32 Bit Card Support Follow on screen instructions by except all the default setting At the end of the installation you will be asked...

Страница 13: ...Interrupt Request 15 may be use by a built in secondary IDE controller Try changing the interrupt to 9 10 or 11 You can also try different I O addresses 3 The EXP entry may have a yellow circle with...

Страница 14: ...ed Follow the instruction on Installation for Parallel Port Interface section PCMCIA INTERFACE If you need to remove or reinstalling the driver make sure the EXP CD ROM disk card is inserted Go to My...

Страница 15: ...ment off and on the user is encouraged to try to correct the interference by one or more of the following measures Reorient or relocate the receiving antenna Increase the Distance between the equipmen...

Страница 16: ...s into the drive You can disable it by opening the System icon in the Control Panel and selecting Device Manager For each item under CD ROM select the device click on the Settings tab and make sure th...

Страница 17: ...rejecting the CD and the drive rejecting the CD is to unplug the IDE cable from the back of the CD recorder before inserting the disc If the problem is the operating system you probably need to disabl...

Страница 18: ...o memory When an extracted track is 40 or 50MB and you don t have that much RAM Win95 s virtual memory system starts writing pieces out to disk The disk thrashes and you get nowhere There are several...

Страница 19: ...enabled when it shouldn t be One person supposedly fixed a similar problem by replacing the power supply in their computer Apparently the 200W supply wasn t enough to handle everything that was connec...

Отзывы: